(53)

SpringSecurity JWT(Json Web Token)에 대해 알아보고 JWT토큰 기반 인증 구현 해보기 - SpringSecurity6.x, EazyBytes EazyBank, Udemy

OpaqueToken(불투명토큰)과 JWT(Json Web Token) OpaqueToken (불투명 토큰) 현재 앞선 강의를 토대로 애플리케이션 로그인을 통해 Spring Security 프레임워크나 백엔드 코드에서는 두 가지 유형의 토큰을 제공한다. JSESSIONIDXSRF-TOKEN이 두가지두 가지 토큰은 브라우저 내 쿠키로 저장되며 React, Vue와 같은 클라이언트에서 백엔드로 보내는 모든 추가 요청은 이 두 가지 쿠키가 백엔드 측 요청에 자동으로 첨부된다. SpringSecurity 프레임워크는 이 토큰들을 검증을 합니다.이 토큰을 통해 얻을 수 있는 이점은 JSESSIONID 토큰은 백엔드 서버에 대한 모든 요청마다 사용자 이름과 비밀번호를 보낼 필요가 없다는 것이며 모든 요청 마다..

SpringSecurity Filter에 대해 알아보고 커스텀 필터 구현 - SpirngSecurity 6.x , EazyBank, Udemy

목차 SpringSecurity Filter 이 강의 초반 부 에서 서블릿(Servlets)과 필터(Filters) 에 대하여 간단하게 알려주었다. 서블릿 기반 웹 애플리케이션 내에 필터를 사용하면 웹 애플리케이션으로 들어오는 모든 요청을 가로챌 수 있어야 한다.필터의 이 기능을 활용하여 SpringSecurity 팀도 SpringSecurity의 필터를 많이 구축했다. 따라서 이 SpringSecurity Filters 의 역할은 웹 애플리케이션으로 들어오는 모든 요청을 가로 채고 요청을 검사하며 우리 웹 애플리케이션 내의 설정에 따라 Authentication, Granted Authority 또는 기타 등의 검사를 수행하는 것이다. 예시로 입력 검사(Input validation)추적, 감..

SpringSecurity에서 권한(Authority)와 역할(Role) - SpringSecurity 6.x, EazyBank Udmey

목차 스프링 시큐리티에서 권한들(Authorities)이 저장되는 방식 SpringSecurity 프레임 워크를 활용하여 웹 애플리케이션 내에 Authorization을 구현하기 위해서는 권한(Authority) 또는 역할(Role)이 Spring Security프레임워크 내에서 어떻게 저장되는지 알아야한다. GrantedAuthority Interface 이 인터페이스는 Authority 또는 Role 정보를 저장하려는 경우 따라야 하는 계약의 윤곽(schema)를 정의 한 것이다.단순한 인터페이스로 getAuthority()라는 단일 추상 메서드를 가지고 있다.모든 권한 또는 역할의 세부 정보를 String 타입으로 사용하여 저장할 것임을 나타낸다. 실제 프로젝트에서도 사용할 수 있는 구현 클래스들..

SpringSecurity CORS(Cross Origin Resourse Sharing), CSRF(Cross Site Request Forgery) - SpringSecurity6.x EazyBytes EazyBank Udemy

목차 사전 준비 CORS와 CSRF를 이해하고 실습하기 위해 강의 내에서는 Angular UI 프레임워크를 이용한 프론트 단위 클라이언트가 제공 되었다. PostMan으로는 CORS와 CSRF를 제대로 실습하기 어렵다. 그래도 강의 내의 EazyBank 애플리케이션의 CORS를 실습하기 위한 백엔드 애플리케이션과 DB의 변경점이 있기 때문에 준비 소스를 올려놓을려고 한다. EazyBank DB 스키마 변경점 더보기drop table `authorites`;drop table `users`;drop table `customer`;CREATE TABLE `customer` ( `customer_id` int NOT NULL AUTO_INCREMENT, ..

SecurityContext 와 SecurityContextHolder의 역할, Spring Security에서의 로그인 사용자 세부정보 로드 - SpringSecurity 6.x EazyBytes, Udemy EazyBank

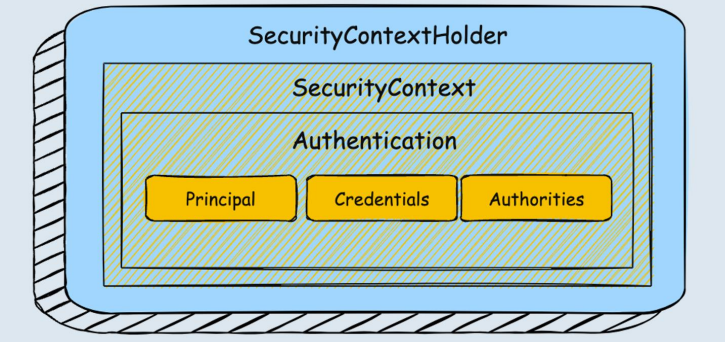
목차 SecurityContext와 SecurityContextHolder Spring Security 프레임워크 내부에서 인증(Authentication)이 완료되면 프레임워크는 이미 인증된 세부 정보를 나중에 사용할 수 있도록 SecurityContext 안에 저장합니다. 누군가가 SecurityContext에 대해 질문할 때 기억해야할 계층구조는 위의 사진과 같다. 인증 과정중에 인증 객체(Authentication object)가 생성된다.이 Authentication 객체는 내부에는 주체(principal)라는 username, credentials, authorities와 같은 세부정보가 포함된다.그리고 isauthenticated라는 boolean 변수도 포함된다. 인증 작업이 완료되면 Sp..

일반적인 사용 사례를 위한 Spring Security 사용자 정의 (HTTPS Redirection, Security Exception Handling, AuthenticationEntryPoint, Session Config, AuthenticationEvents)- SpringSecurity 6.x Udemy EazyBytes EazyBank

목차 시작 글 애플리케이션을 서비스하는 데 있어 SpringSecurity를 이용하여 일반적으로 설정하는 케이스들에 대해 알아보려고 한다. SpringSecurity를 활용한 HTTPS 트래픽만 허용하기 실제 서비스를 하기 위해선 HTTPS 프로토콜을 사용해아한다. HTTPS가 기본인 이유는?인증: SSL/TLS 인증서를 통해 서버의 신뢰성을 검증할 수 있어, 피싱이나 중간자 공격(MITM)을 방지합니다.무결성 보장: 데이터가 전송 중에 변조되지 않았음을 보장합니다.브라우저 정책: 최신 브라우저는 로그인, 결제, 쿠키 전송 등 민감한 작업을 HTTP에서 차단하거나 경고를 띄웁니다.규제 및 표준 준수: GDPR, PCI-DSS(결제 카드 산업 보안 표준) 등은 HTTPS 사용을 요구합니다.하지만 우리가 테..

SpringSecurity JWT(Json Web Token)에 대해 알아보고 JWT토큰 기반 인증 구현 해보기 - SpringSecurity6.x, EazyBytes EazyBank, Udemy

springSecurity 2026. 3. 10. 18:55

OpaqueToken(불투명토큰)과 JWT(Json Web Token)


OpaqueToken (불투명 토큰)


현재 앞선 강의를 토대로 애플리케이션 로그인을  통해  Spring Security 프레임워크나 백엔드 코드에서는 두 가지 유형의 토큰을 제공한다.


  • JSESSIONID
  • XSRF-TOKEN

이 두가지두 가지 토큰은 브라우저 내 쿠키로 저장되며 React, Vue와 같은 클라이언트에서 백엔드로 보내는 모든 추가 요청은 이 두 가지 쿠키가 백엔드 측 요청에 자동으로 첨부된다. SpringSecurity 프레임워크는 이 토큰들을 검증을 합니다.

이 토큰을 통해 얻을 수 있는 이점은 


JSESSIONID 토큰은 백엔드 서버에 대한 모든 요청마다 사용자 이름과 비밀번호를 보낼 필요가 없다는 것이며 모든 요청 마다 인증을 수행할 필요가 없다.


XSRF-TOKEN의 도움은 SpringSecurity 프레임워크가 CSRF 공격으로부터 사용자르 보호하려고 한다는것이다.


이러한 토큰들은 매우 간단한 토큰으로 무작위 한 문자열 값들 뿐이다. 이러한 토큰들을 OpaqueToken 불투명 토큰이라고 부른다.


토큰자체에 고유한 의미가 없으며 사용자 세션을 위해 백엔드 서버에서 유지관리하는 무작위 문자열 값일 뿐이다.
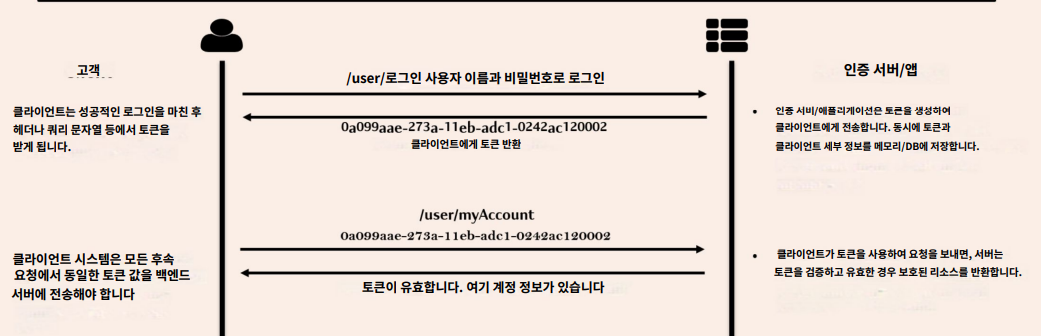


보안 API에 액세스 하려면 동일한 Opaque Token을 보내야 하며 백그라운드에서 백엔드 서버는 주어진 토큰에 연관된 사용자 세션이 있는지 확인해 있다면 보안 API에 액세스를 허용할 것이다.

이 것은  OpaqueToken을 검증하기 위해 항상 백엔드 서버에 의존하게 된다는 것이다.


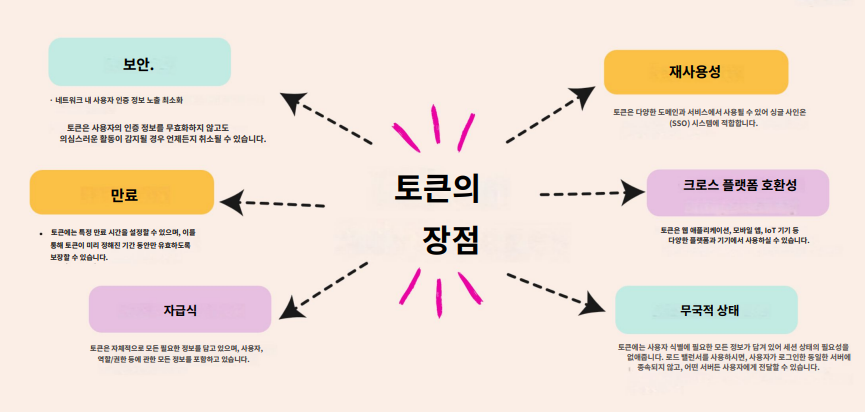
토큰 기반 인증 장점


JWT(Json Web Token)


현재 강의를 통해 배우고 있는 EazyBank라는 애플리케이션은 Opaque 토큰 형식의 불투명 토큰을 생성하고 있다.


우리는 추후에 JSESSIONID를 지우고 JWT로 대체를 해볼 것이다.


JWT란? 

  • JSON Web Token이라고 불리며 json 형식을 사용해 토큰을 구현하고 있다.
  • JWT토큰은 특별한 기능과 장점 덕분에 요즘 많은 시스템에서 일반적이며 선호되는 토큰 유형이다.
  • JWT토큰은 인증 및 권한 부여와 정보 교환에 모두 사용 될 수 있으며, 토큰 자체에 사용자 관련 데이터를 공유할 수 있음을 의미한다. 이를통해 클라이언트/서버 측에서 세션에 이러한 세부 정보를 유지하는 부담을 줄일 수 있다.

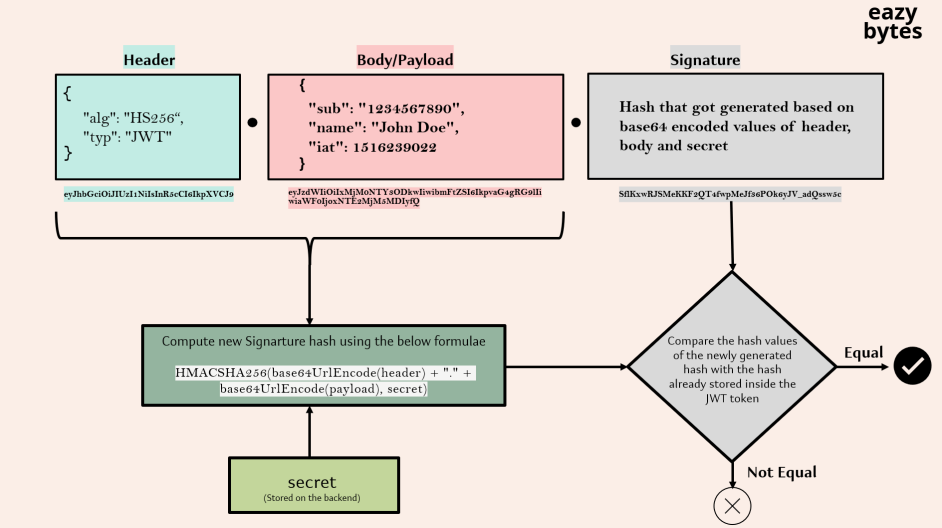
JWT토큰은 각 부분이 마침표(.)로 구분되어 있으며, 총 3개의 부분으로 구성된다.


예시로는

 

 1. Header


       토큰과 관련된 메타 데이터와 정보를 저장. 메타 데이터 정보라고 한다면 토큰의 종류가 무엇인지? 토큰 서명을 도출하는 데 사용된 알고리즘이 무엇인지? 등의 정보를 말한다. 알고리즘을 의미하는 "alg", 와 유형을 의미하는 "typ" 키 두 가지의 예시와 같다. 토큰 내부에 직접적인 값을 저장하지 않고 Base64를 사용하여 인코딩 되고 출력 결과를 jwt토큰 내부에 저장한다.

header


2. Payload(본문)


    사용자와 그의 역할에 대한 세부 정보를 저장할 수 있으며 그 정보는 나중에 인증 및 인가에 사용될 수 있다.

JWT토큰의 내용에 무엇을 얼마나 보낼 수 있는지에 대한 제한은 없지만 이 내용 요소를 가능한 가볍게 유지하기 위해 최선을 다해야 한다. 예시로 "sub": 주제, "name": 이름, "iat" : 발행시간 같은 사용자 관련 정보를 많이 저장한다. 마찬가지로 역할, 권한, 이메일, 전화번호 같은 세부 정보도 저장할 수 있어야 한다. 하지만 최종 사용자의 비밀번호는 내용에 저장하면 안 된다. 토큰에 접근할 수 있는 누구나 비밀번호를 볼 수 있기 때문이다. 모든 내용 데이터는 Base64로 인코딩 되며 인코딩 된 값은 JWT 토큰에 저장되기 때문이다.

payload


3. Signature(서명)


   토큰의 마지막 부분으로 디지털 서명이라고 부를 수 있다. 디지털 서명은 완전 선택사항으로 이 디지털 서명의 목적은 이 애플리케이션이 이 서명만을 사용하여 토큰 값이 변조되었는지 여부를 식별하자는 것이다. 

조직 내부 애플리케이션용 토큰 생성에서는 클라이언트 애플리케이션이나 신뢰할 수 있는 사용자가 토큰 변조 하지 않을 것이란 확신이 있기 때문에 디지털 서명이 필요하지 않지만, 오픈 웹에서 애플리케이션을 사용할 유저요이라면 JWT 토큰에 대해 디지털 서명이 필요하다.



토큰에서 디지털 서명을 생성하기 위해서는 해싱알고리즘 중 하나를 사용해야 하며 HMACSHA256이 가장 일반적으로 사용되는 해싱 알고리즘이다. 이 해싱 알고리즘에 입력값은 base64 URL Encode(header)로 계산되며 헤더는 또다시 base64 URL encode 형식으로 인코딩이 될 것이다. 이후에 "."을 추가하고 base64 URL Encode(payload)를 추가해야 한다. 이

base64 URL Encode(header)+"."+base64 URL Encode(payload)가 SHA256 알고리즘의 첫 번째 입력값이며 다음 입력값은 secret 비밀 키이다.


이 비밀 키는 신중하게 보관되어야 하며 백엔드 측에서 신중하게 관리된다. 


  • 백엔드 토큰 검증 흐름


  • JWT 토큰 해독 검증 사이트

https://www.jwt.io/


JSON Web Tokens - jwt.io

JSON Web Token (JWT) is a compact URL-safe means of representing claims to be transferred between two parties. The claims in a JWT are encoded as a JSON object that is digitally signed using JSON Web Signature (JWS).

www.jwt.io


JWT 토큰 기반 인증 구현


JWT 의존성 추가 및 ProjectSecurityConfig 설정 변경


  • build.gradle
implementation 'io.jsonwebtoken:jjwt-api:0.12.5'
implementation 'io.jsonwebtoken:jjwt-impl:0.12.6'
implementation 'io.jsonwebtoken:jjwt-jackson:0.12.5'


https://mvnrepository.com/artifact/io.jsonwebtoken


Maven Repository: io.jsonwebtoken

JSON Web Token support for the JVM and Android Last Release on Aug 20, 2025

mvnrepository.com

JWT라이브러를 통해 JWT 토큰을 쉽게 생성하고 검증할 수 있다.


  • ProjectSecurityConfig
@Configuration
@Profile("!prod")
public class ProjectSecurityConfig{

  @Bean
  SecurityFilterChain defaultSecurityFilterChain(HttpSecurity http) throws Exception {
    CsrfTokenRequestAttributeHandler csrfTokenRequestAttributeHandler = new CsrfTokenRequestAttributeHandler();

    http.cors(corsConfig -> corsConfig.configurationSource(new CorsConfigurationSource() {
          @Override
          public CorsConfiguration getCorsConfiguration(HttpServletRequest request){
            CorsConfiguration config = new CorsConfiguration();
            config.setAllowedOrigins(Collections.singletonList("http://localhost:4200"));
            config.setAllowedMethods(Collections.singletonList("*"));
            config.setAllowCredentials(true);
            config.setAllowedHeaders(Collections.singletonList("*"));
            config.setExposedHeaders(Arrays.asList("Authorization"));
            config.setMaxAge(3600L);
            return config;
          }
        }))
        .csrf(csrfConfig -> csrfConfig.csrfTokenRequestHandler(csrfTokenRequestAttributeHandler)
            .ignoringRequestMatchers("/contact", "/register", "/apiLogin")
            .csrfTokenRepository(CookieCsrfTokenRepository.withHttpOnlyFalse()))
        .addFilterAfter(new CsrfCookieFilter(), BasicAuthenticationFilter.class)
        .addFilterBefore(new RequestValidationBeforeFilter(), BasicAuthenticationFilter.class)
        .addFilterAfter(new AuthoritiesLoggingAfterFilter(), BasicAuthenticationFilter.class)
        .addFilterAt(new AuthoritiesLoggingAtFilter(), BasicAuthenticationFilter.class)
        .sessionManagement(smc -> smc.sessionCreationPolicy(SessionCreationPolicy.STATELESS))
        .authorizeHttpRequests((requests) -> requests
            .requestMatchers("/myAccount").hasRole("USER")
            .requestMatchers("/myBalance").hasAnyRole("USER", "ADMIN")
            .requestMatchers("/myLoans").hasRole("USER")
            .requestMatchers( "myCards").hasRole("USER")
            .requestMatchers("/user").authenticated()
        .requestMatchers("/notices", "/contact","/error","/register", "/invalidSession", "/apiLogin").permitAll());
    http.formLogin(withDefaults());
    http.httpBasic(hbc -> hbc.authenticationEntryPoint(new CustomBasicAuthenticationEntryPoint()));
    http.exceptionHandling(ehc -> ehc.accessDeniedHandler(new CustomAccessDeniedHandler()));
    return http.build();
  }


  @Bean
  PasswordEncoder passwordEncoder(){
    return PasswordEncoderFactories.createDelegatingPasswordEncoder();
  }

  @Bean
  public CompromisedPasswordChecker compromisedPasswordChecker(){
    return new HaveIBeenPwnedRestApiPasswordChecker();
  }


}


변경점들을 설명하자면 

  • . sessionManagement(smc -> smc.sessionCreationPolicy(SessionCreationPolicy.STATELESS))

원래는 SpringSecurity 프레임워크에서 JSESSIONID를 항상 생성하도록 지시하고 있었지만 이제는 JWT토큰을 인증토큰으로 활용할 것이기 때문에 JSESSIONID를 SpringSecurity 프레임워크가 생성하지 않도록 지시하기 위해 SessionCreationPolicy.ALWAYS를 무상태(STATELESS)로 교체를 해주어야 한다. 

최종적으로 애플리케이션을 stateless로 만들게 될 것이다.

  • . securityContext(contextConfig -> contextConfig.requireExplicitSave(false)) 설정 제거

repuireExplicitSave(false)는 SecurityContext 저장방식을 제어하는 옵션으로 SpringSecurity는 SecurityContext를 세션에 저장할 때 명시적으로 저장 요청이 있어야만 저장하도록 설정한다. 

하지만 false로 설정 시에는 인증 성공 시점에서 자동으로 세션에 SecurityContext가 저장이 된다. 하지만 JWT기반 인증 구현을 목표로 하고 있기에 세션을 쓰지 않게 됨으로 SecurityContext 저장자체가 불필요하게 되었다.

  • config.setExposedHeaders(Arrays.asList("Authorization"));

강의에서는 Angular로 구현된 클라이언트가 있으며 프런트와 서로 다른 도메인 위치에서 서로 다른 출처 위치에 배포되었다. 이러한 환경으로 CORS 설정을 하였으며 클라이언트에서 백엔드 서버로 오는 모든 헤더를 수락하려고 한다. 

즉, 클라이언트 애플리케이션은 요청 내에서 어떤 헤더 값이든 보낼 수 있지만 백엔드 응답 내에서 어떤 헤더도 보낼 수 없는 상황이기 때문에 JWT 토큰을 생성하고 토큰을 응답 내에서 클라이언트 애플리케이션 헤더로 보내고자 하기 위해

setExposedHeaders()를 호출하여"Authorization" 이름의 헤더를 노출하게 하였다.


JWTTokenGeneratorFilter - JWT 토큰 생성 필터


초기 로그인이 완료되면 JWT토큰을 생성하기 위해서 Filter 방식을 사용해 구현을 할 것이다.


이전 필터 관련 글에서 나왔던 OncePerRequestFilter를 이용할 것인데 요청의 일부로 필터가 한 번만 실행되어야 하기 때 문둥이ㅏ.

요청의 일부로 필터가 여러 번 호출이 되어 여러번 JWT 토큰을 생성하는 건 알맞지 않기 때문이다.


  • ApplicationConstants - 환경변수 설정 가정 
public final class ApplicationConstants {

  public static final String JWT_SECRET_KEY = "JWT_SECRET";
  public static final String JWT_SECRET_DEFAULT_VALUE = "$2a$12$135vzpHuJPUuxOG2sMjceeWAsUbWqjAXhWsTHitNVN9kZ8qSrLVOm";
  public static final String JWT_HEADER = "Authorization";


}


이렇게 설정하면 secret 키가 하드코딩 됨으로 권장하지는 않는다.


    ※ secret 키 보관 권장 하는 방식

더보기
  • application.properties
# application.properties
jwt.secret=$2a$12$135vzpHuJPUuxOG2sMjceeWAsUbWqjAXhWsTHitNVN9kZ8qSrLVOm
jwt.header=Authorization


  • JwtProperties
@Component
public class JwtProperties {
    @Value("${jwt.secret}")
    private String secret;

    @Value("${jwt.header}")
    private String header;

    // getter
}


장점

  • 보안성: 코드에 직접 노출되지 않고, 환경별로 다른 값을 설정 가능.
  • 유연성: 운영/개발/테스트 환경마다 다른 secret을 쉽게 적용.
  • 관리성: 키를 교체할 때 코드 수정 없이 설정만 바꾸면 됨.


  • JWT secret을 환경 변수 + application.properties +dockercompose 로 관리

. env 파일을 활용

JWT_SECRET=$2a$12$135vzpHuJPUuxOG2sMjceeWAsUbWqjAXhWsTHitNVN9kZ8qSrLVOm
//추가 환경변수 설정 등등


 docker-compose.yml

version: "0.1"
services:
  app:
    image: myapp:latest
    environment:
      JWT_SECRET: ${JWT_SECERT}
      //추가 환경변수 설정 등등
    ports:
      - "8080:8080"


application.properties

jwt.secret=${JWT_SECRET:$2a$12$135vzpHuJPUuxOG2sMjceeWAsUbWqjAXhWsTHitNVN9kZ8qSrLVOm}
jwt.header=Authorization


  • JWTTokenGeneratorFilter
public class JWTTokenGeneratorFilter extends OncePerRequestFilter {


  @Override
  protected void doFilterInternal(HttpServletRequest request, HttpServletResponse response,
      FilterChain filterChain) throws ServletException, IOException {
      //인증 세부 정보 읽어오기
    Authentication authentication = SecurityContextHolder.getContext().getAuthentication();
    if(null!= authentication){
    	//환경변수 불러오기
      Environment env = getEnvironment();
      if(null != env) {
      // JWT_SECRET 키 가져오기
        String secret = env.getProperty(ApplicationConstants.JWT_SECRET_KEY,
            ApplicationConstants.JWT_SECRET_DEFAULT_VALUE);
            //문자열을 UTF-8바이트 배열로 변환 후, HMAC-SHA 알고리즘 용 SecretKey 객체 생성
        SecretKey secretKey = Keys.hmacShaKeyFor(secret.getBytes(StandardCharsets.UTF_8));
        //JWT토큰 생성
        String jwt = Jwts.builder().issuer("Eazy Bank").subject("JWT Token") // 발행자, 주제
            .claim("username", authentication.getName()) //최종사용자 ID
            .claim("authorities", authentication.getAuthorities().stream().map(
                GrantedAuthority::getAuthority).collect(Collectors.joining(","))) //authorities
            .issuedAt(new Date()) //발행일
            .expiration(new Date((new Date()).getTime() + 30000000)) //  만료일 ms 단위
            .signWith(secretKey).compact();// 토큰 내부 디지털 서명 생성
       //헤더에 Authorization 이름으로 jwt 토큰 응답 전달
       response.setHeader(ApplicationConstants.JWT_HEADER, jwt); 
      }
    }
    filterChain.doFilter(request, response);

  }

  @Override
  protected boolean shouldNotFilter(HttpServletRequest request) throws ServletException {
    return !request.getServletPath().equals("/user");
  }
}


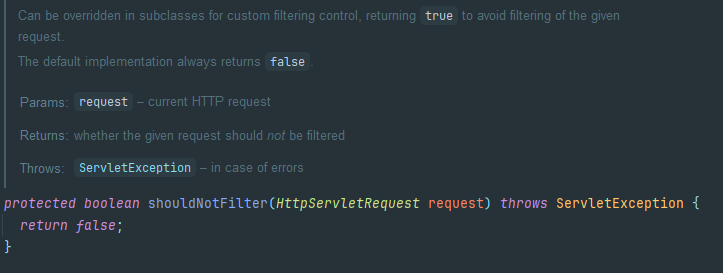
  • shuldNotFilter 설정을 통해 리턴값이 true 일 경우 JWTTokenGeneratorFilter가 동작하지 않는다. 여기서는 ("/user)라는 로그인 API 경로와 같다면 필터를 실행하도록 설정하였다.
  • ProjectSecurityConfig
.addFilterAfter(new JWTTokenGeneratorFilter(), BasicAuthenticationFilter.class)


인증 성공 후 JWT토큰을 생성하기 위해 BasicAuthenticationFilter  이후에 필터가 동작하도록 설정하였다.


JWTTokenValidatorFilter - JWT 토큰 검증 필터


  • JWTTokenValidatorFilter
public class JWTTokenValidatorFilter extends OncePerRequestFilter {

  @Override
  protected void doFilterInternal(HttpServletRequest request, HttpServletResponse response,
      FilterChain filterChain) throws ServletException, IOException {
      //헤더에서 jwt토큰을 가져옴
    String jwt = request.getHeader(ApplicationConstants.JWT_HEADER);
    if(null != jwt) {
      try{
        Environment env = getEnvironment();
        if(null != env) {
        //환경변수에서 secretkey가져오기
          String secret = env.getProperty(ApplicationConstants.JWT_SECRET_KEY,
              ApplicationConstants.JWT_SECRET_DEFAULT_VALUE);
          SecretKey secretKey = Keys.hmacShaKeyFor(secret.getBytes(StandardCharsets.UTF_8));
          if(null!= secretKey){
          //JWT 토큰을 secretKey를 이용하여 파싱을 통해 payload값을 가져온다.
          //parseSignedClaims(jwt)를 통해 exp(만료일) 검증까지한다.
            Claims claims = Jwts.parser().verifyWith(secretKey)
                .build().parseSignedClaims(jwt).getPayload();
            //username과 authorities를 가져와 Authentication 객체를 생성한 뒤에 SecurityContext에 저장
            String username =String.valueOf(claims.get("username"));
            String authorities = String.valueOf(claims.get("authorities"));
            Authentication authentication = new UsernamePasswordAuthenticationToken(username, null,
                AuthorityUtils.commaSeparatedStringToAuthorityList(authorities));
            SecurityContextHolder.getContext().setAuthentication(authentication);
          }
        }
      }catch(Exception e){
        throw new BadCredentialsException("Inavlid Token received!!");
      }
    }


    filterChain.doFilter(request, response);
  }

  @Override
  protected boolean shouldNotFilter(HttpServletRequest request) throws ServletException {
    return request.getServletPath().equals("/user");
  }
}


  • shouldNotFilter 가 ("/user") 로그인 API 외에는 실행하도록 원하기 때문에 JWTTokenGeneratorFilter와 다르게!  조건을 삭제하였다.


  • ProjectSecurityConfig
.addFilterBefore(new JWTTokenValidatorFilter(), BasicAuthenticationFilter.class)


SpringSecurity 프레임워크의 실제 인증 전에 매번 실행이 되어 토큰이 유효한지 유효성 검사 후에 유효하다면 이미 인증이 검증되었다는 것을 알려 다시 인증을 시도하지 않도록 한다. 따라서

BasicAuthenticationFilter 이전에 필터가 실행되도록 한다.


JWT 인증 검증 테스트


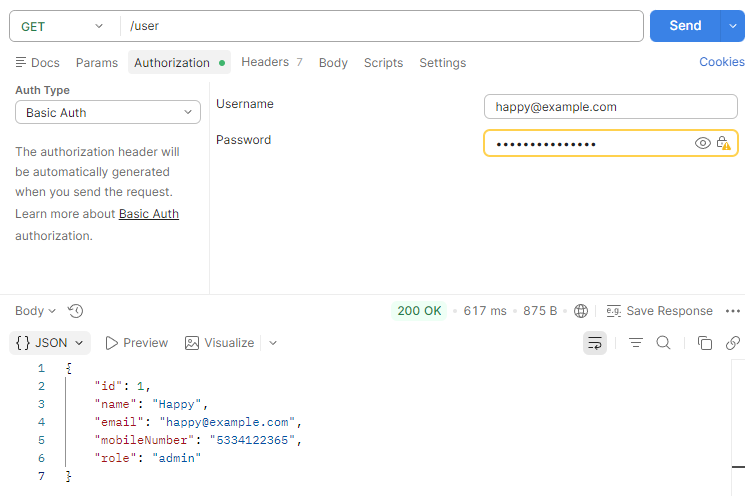
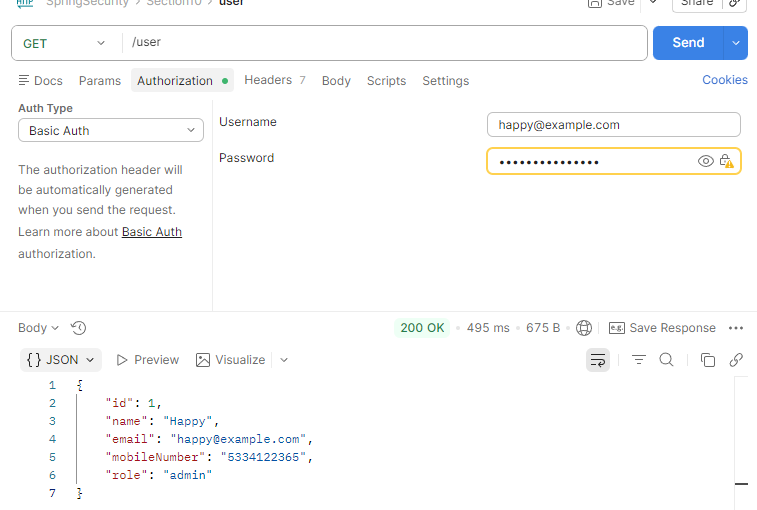
  • userAPI - username, pwd  입력 인증
더보기
/userapi 응답


JWT 토큰 응답


XSRF-TOKEN


cookie에서 JSESSIONID 쿠키가 사라진 것과 

Authorization 이름으로 JWT 토큰을 응답받은 것을 볼 수 있다. JWT 토큰은 jwt.io 사이트에서 해석을 해보면
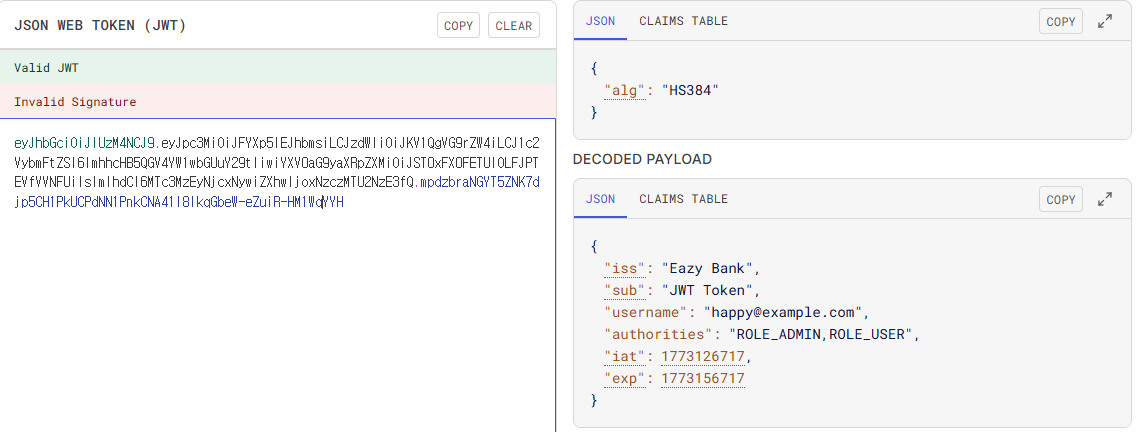
 

jwt.io
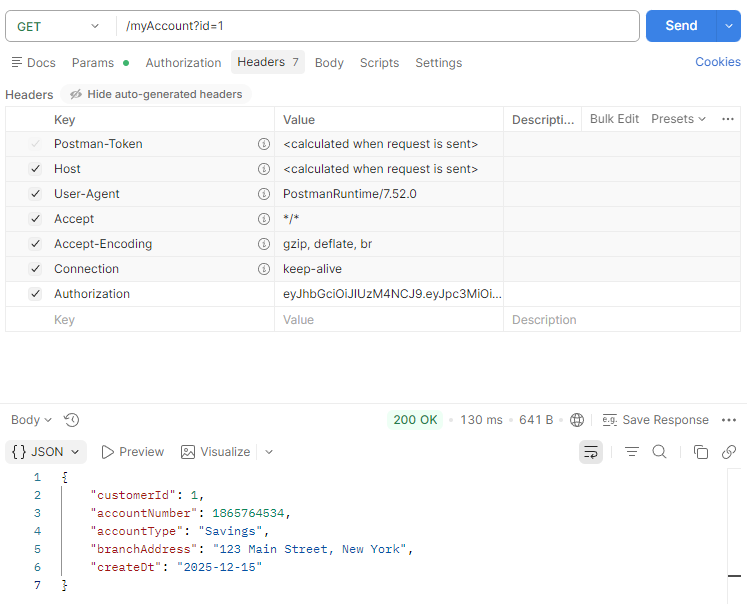
  • 응답받은 JWT 토큰으로 myAccountAPI 요청
더보기
jwt토큰을 통해 추가 인증없이 myAccountAPI 응답을 받았다.


자체 자격증명 api 로그인 구현 - apilogin


지금 까지는 httpBasic 형식을 사용하여 로그인 작업을 지원하고 있었다.

애플리케이션에 로그인하려는 사람은 /user API를 호출해야 하며 이 API에 기본 인증 자격증명(username, password)을 전달했다. 

하지만 요구사항에 따라 httpBasic과 formLogin 형식의 방법이 아닌 

RequsetBody 또는 RequestHeaders 내부에 자격증명을 받아야 하는 요구사항이 있을 수 있다.

이러한 시나리오에선 느 어떠한 SpringSecurityProvider도 도움이 되지 않을 것이다. 사용자가 원하는 곳에 자격증명을 수락하는

자체 REST API 작업을 구축할 것이다.

인증이 완료되면 JWT 토큰을 ResponseBody 내에 전송하고자 한다.


@PostMapping("/apiLogin")


  • UserController
@RestController
@RequiredArgsConstructor
public class UserController {

  private final CustomerRepository customerRepository;
  private final PasswordEncoder passwordEncoder;
  private final AuthenticationManager authenticationManager;
  private final Environment env;

  @PostMapping("/register")
  public ResponseEntity<String> registerUser(@RequestBody Customer customer) {

    try {
        String hashPwd = passwordEncoder.encode(customer.getPwd());
        customer.setPwd(hashPwd);
        customer.setCreateDt(new Date(System.currentTimeMillis()));
        Customer savedCustomer = customerRepository.save(customer);

        if(savedCustomer.getId() > 0){
          return ResponseEntity.status(HttpStatus.CREATED)
              .body("Given user details are successfully registered");
        }else {
          return ResponseEntity.status(HttpStatus.BAD_REQUEST)
              .body("user register failed");
        }
    }catch(Exception e) {
      return ResponseEntity.status(HttpStatus.INTERNAL_SERVER_ERROR)
          .body("An exception occurred: " +e.getMessage());

    }
  }

  @RequestMapping("/user")
  public Customer getUserDetailsAfterLogin(Authentication authentication){
    Optional<Customer> optionalCustomer = customerRepository.findByEmail(authentication.getName());
    return optionalCustomer.orElse(null);
  }

  @PostMapping("/apiLogin")
  public ResponseEntity<LoginResponseDTO> apiLogin(@RequestBody LoginRequestDTO loginRequest) {
    String jwt = "";
    Authentication authentication = UsernamePasswordAuthenticationToken.unauthenticated(
        loginRequest.username(), loginRequest.password());
    Authentication authenticationResponse = authenticationManager.authenticate(authentication);
    if(null != authenticationResponse && authenticationResponse.isAuthenticated()) {
        if(null != env) {
          String secret = env.getProperty(ApplicationConstants.JWT_SECRET_KEY,
              ApplicationConstants.JWT_SECRET_DEFAULT_VALUE);
          SecretKey secretKey = Keys.hmacShaKeyFor(secret.getBytes(StandardCharsets.UTF_8));
          jwt = Jwts.builder().issuer("Eazy Bank").subject("JWT Token")
              .claim("username", authenticationResponse.getName())
              .claim("authorities", authenticationResponse.getAuthorities().stream().map(
                  GrantedAuthority::getAuthority).collect(Collectors.joining(",")))
              .issuedAt(new java.util.Date())
              .expiration(new java.util.Date((new java.util.Date()).getTime() + 30000000))
              .signWith(secretKey).compact();
        }
    }
    return ResponseEntity.status(HttpStatus.OK).header(ApplicationConstants.JWT_HEADER,jwt)
        .body(new LoginResponseDTO(HttpStatus.OK.getReasonPhrase(), jwt));
  }
}


  • LoginRequestDTO
public record LoginRequestDTO(
    String username,
    String password
) {

}


  • LoginResponseDTO
public record LoginResponseDTO(
    String status,
    String jwtToken
) {

}


  • ProjectSecurityConfig

AuthenticationManager를 @Bean을 생성해수동으로 인증 프로세스를 시작할 수 있다.

 @Bean
  public AuthenticationManager authenticationManager(UserDetailsService userDetailsService, PasswordEncoder passwordEncoder) {
    EazyBankUsernamePwdAuthenticationProvider authenticationProvider =
        new EazyBankUsernamePwdAuthenticationProvider(userDetailsService, passwordEncoder);
    ProviderManager providerManager = new ProviderManager(authenticationProvider);
    providerManager.setEraseCredentialsAfterAuthentication(false); // authentication 객체의 비밀번호를 지우지않을 것이다.
    return providerManager;

  }


여기서  providerManager.setEraseCredentialsAfterAuthentication(false);라는 설정이 있는데 기본적으로 인증이 성공하면 Authentication 객체 안의 비밀번호를 지워버린다. 인증이 끝난 후에는 보안상의 이유로 민감한 정보를 계속 들고 있을 필요가 없기 때문이다. 그래서 기본값은 true로 하는 게 좋으며 만약에 비즈니스로직 내에 또 다른 유효성 검사를 위해 비밀번호를 사용하고자 한다면 false로 설정하면 된다.


  • "/apiLogin"  permitAll() 설정
.requestMatchers("/notices", "/contact","/error","/register", "/invalidSession", "/apiLogin").permitAll());


  • CSRF "/apiLogin" 예외처리

"/apiLogin" 이 postMapping이기 때문에 CSRF 설정을 하였다면 예외 리스트에도 추가해주어야 한다.

.csrf(csrfConfig -> csrfConfig.csrfTokenRequestHandler(csrfTokenRequestAttributeHandler)
            .ignoringRequestMatchers("/contact", "/register", "/apiLogin")


  • EazyBankUsernamePwdAuthenticationProvider

https://kiwimel0n-study.tistory.com/entry/AuthenticationProvider%EB%A5%BC-%EC%9D%B4%ED%95%B4%ED%95%98%EA%B3%A0-%EC%BB%A4%EC%8A%A4%ED%85%80-Provider-%EA%B5%AC%ED%98%84%ED%95%98%EA%B8%B0-SpringSecurity6x-Udemy-EazyBytes-EazyBank#%ED%94%84%EB%A1%9C%ED%8C%8C%EC%9D%BC_%EB%B3%84%EB%A1%9C_AuthenticationProvider%EB%A5%BC_%EA%B5%AC%EC%84%B1%ED%95%B4_%EB%B9%84%EB%B0%80%EB%B2%88%ED%98%B8%EB%A5%BC_%EC%A1%B0%EA%B1%B4%EB%B6%80%EB%A1%9C_%ED%97%88%EC%9A%A9%ED%95%98%EA%B8%B0


AuthenticationProvider를 이해하고 커스텀 Provider 구현하기-SpringSecurity6.x Udemy EazyBytes EazyBank

목차 시작 글 앞선 글에서 InMemoryUserDetailsManager와 JdbcUserDetailsManager를 통해 유저를 Springboot 메모리와 MySQL DB에 유저를 생성시켜 보았고 JdbcDaoImpl에서는 기본적인 유저(userTable(username , password, enabled

kiwimel0n-study.tistory.com


자체 인증 apiLogin api 테스트
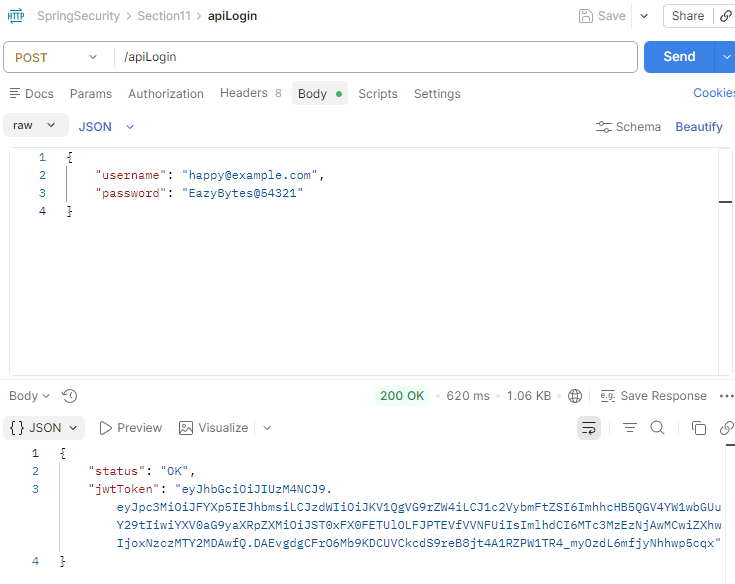
 

apiLogin 테스트


Json 형식으로 username, password를  입력을 하였고 백엔드 애플리케이션에서 RequestBody를 통해 성공적으로 로그인이 되어 ResponseBody 형식으로 status 와 jwtToken을 응답받았다.

header에도 정상적으로 JWT 토큰이 응답되었다.


콘솔 로그에서도 자체적으로 만든 EazyBankUsernamePwdAuthenticationProvider를 통해 인증이 된것을 알 수 있다.

Kiwimel0n

Kiwimel0n

내용정리

SpringSecurity Filter에 대해 알아보고 커스텀 필터 구현 - SpirngSecurity 6.x , EazyBank, Udemy

springSecurity 2026. 3. 6. 17:44


목차


    SpringSecurity Filter


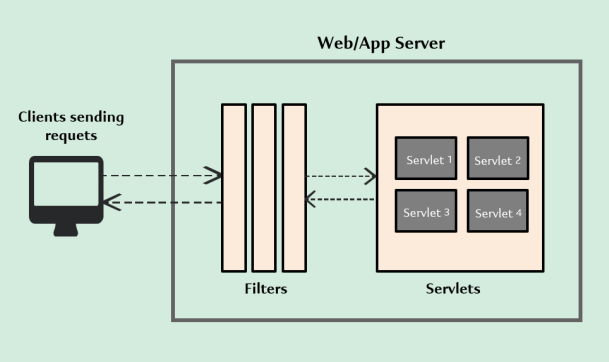
    이 강의 초반 부 에서  서블릿(Servlets)과 필터(Filters) 에 대하여 간단하게 알려주었다. 

    서블릿 기반 웹 애플리케이션 내에 필터를 사용하면 웹 애플리케이션으로 들어오는 모든 요청을 가로챌 수 있어야 한다.

    필터의 이 기능을 활용하여 SpringSecurity 팀도 SpringSecurity의 필터를 많이 구축했다. 


    따라서 이 SpringSecurity Filters 의 역할은 웹 애플리케이션으로 들어오는 모든 요청을 가로 채고 요청을 검사하며 우리 웹 애플리케이션 내의 설정에 따라 Authentication, Granted Authority 또는 기타 등의 검사를 수행하는 것이다.


    예시로 

    • 입력 검사(Input validation)
    • 추적, 감사 및 보고
    • IP 주소등의 입력 기록
    • 암호화 및 복호화

    이러한 모든 요구사항을 SpringSecurity의 HTTP 필터를 활용하여 처리가 가능하다.


    Filter는 요청을 받아 처리한 뒤에 다음 Filter로 전달하는 역할을 하는 구성요소이다.

    SpringSecurity는 서블릿 필터의 chain(연쇄)를 기반으로 한다. 각 필터는 고유한 역할을 가지고 구성에 따라 필터를 추가하거나 제거할 수 있다. 필요에 따라 직접 커스텀도 가능하다.


    SpringSecurity  Filter의 내부실행 알아보는법


    Production 단계 에서는 설정하면 안됨


    • SpringSecurity 내부필터 체인 알아보는 설정

    SpringBoot 메인 클래스 클래스 상단에 @EnableWebSecurity(debug  = true)어노테이션 추가


    @SpringBootApplication
    @EnableWebSecurity(debug = true)
    public class EazyBankBackendApplication {
    
      public static void main(String[] args) {
        SpringApplication.run(EazyBankBackendApplication.class, args);
      }
    
    }


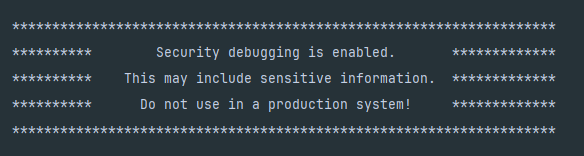
    기본값은 false이며 설정을 활성화 후 애플리케이션을 실행시키면


    SpringSecurity 디버깅이 활성화 되었습니다.

    민감한 정보를 포함하고 있습니다.

    실제 운영 시스템에서 실행되면 안됩니다.


    로컬 시스템의 Spring Security에 대해 알아보려는 것이므로 로컬테스트에서는 문제가 되지 않는다.


    이러한 로그가 보이지 않는 다면 application.properties 설정에


    logging.level.org.springframework.security=${SPRING_SECURITY_LOG_LEVEL:TRACE}


    콘솔에서 보고 있는 모든 로그를 표시하는 속성이 적용되지 않아서이다. 


    이제 콘솔 로그를 초기화 하고 포스트맨을 통해 사용자 이름, 비밀번호를 제공하여 user API를 호출한다면 정상적으로 응답을 받고

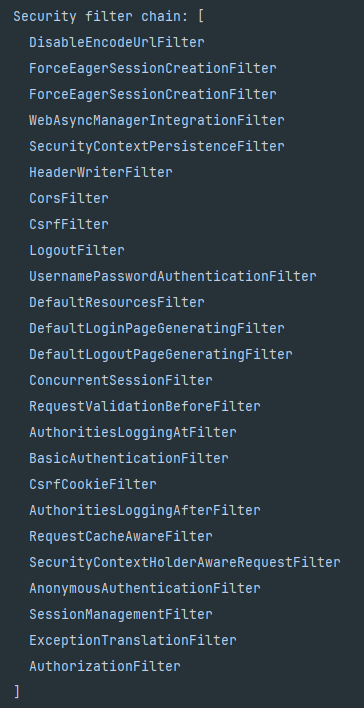
    콘솔 내부에서는  Security filter chain이라는 정보가 표시가 된다.


    • Security filter chain


    SpringSecurity 프레임 워크 내에서 실행 된 모든 필터들을 표시해 주며 

    사용중인 SpringSecurity 버전이나 웹 애플리케이션 내에서 구성한 설정에 따라 보이는 필터의 수가 다를 수 있다.


    FilterChainProxy 클래스를 통한 필터 호출 내부구조 이해


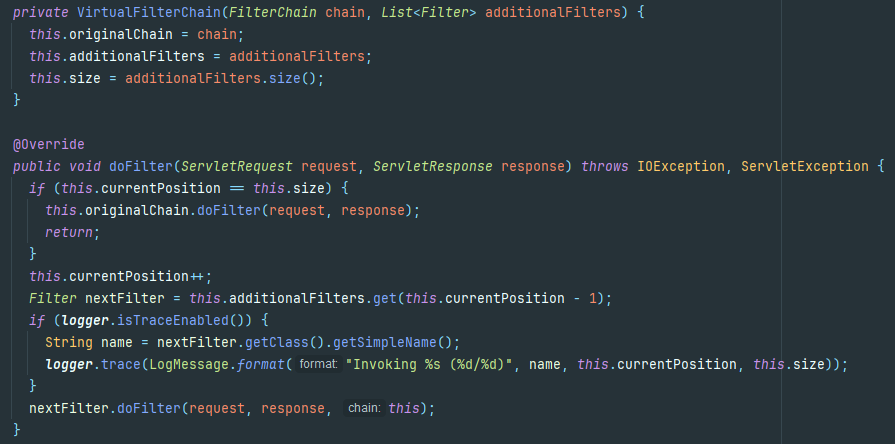
    FilterChainProxy 클래스의 내부에는 VirtualFiterChain이라는 내부클래스가 존재한다.


    • FroxyFilterChain 내의 VirtualFilterChain 내부 클래스


    VirtualFilterChain 내에는 FilterChain 안의 각 Security 필터를 호출하는 로직을 갖게된다.


    currentPosition이 필터의 size와 같은지 확인하고 만약 같다면 요청은 originalChain으로 전달 된다. 

    필터의 size와 같지 않다면 SpringSecurity 필터 체인의 일부로 있는 각 필터가 이 로직을 통해 호출 된다.


    필터의 사이즈가 21이라면 21개의 다른 Security filter chain이 api 요청의 일부로 실행된다.

    currentPosition이 0부터 시작 하여 if조건이 만족되지 않는다면 로직에 따라 SpringSecurity 관련 필터들이 하나씩 실행된다.

    모든 필터들이 실행 되면 originalFilter으로 전달 된다. 이 originalFilter에서 api 요청이 DispatcherServlet으로 전달되고 

    DispatchServlet 에서 Controller Layer에 도착하게 된다.


    자신만의 필터 생성을 위한 옵션 3가지


    우리는 SpringSecurity 프레임워크 내에서 커스텀 필터를 생성 할 수 있어야 하며 이 커스텀 필터를 Security filterChain 사이에 주입할 수 있게 하려고 한다. 어떻게 Custom Filter를 생성하는지 선택사항 3가지에 알아보려고 한다.


    Filter 인터페이스 - jakarta.servlet

    package jakarta.servlet;
    
    import java.io.IOException;
    
    
    public interface Filter {
    
       
        default void init(FilterConfig filterConfig) throws ServletException {
        }
    
       
        void doFilter(ServletRequest request, ServletResponse response, FilterChain chain)
                throws IOException, ServletException;
    
        default void destroy() {
        }
    }


    한가지 방식으로는 Filter라는 인터페이스를 구현하는 것이다. 이 인터페이스는 jakarta.servlet 패키지 안에 있으며


    doFilter라는 추상 메서드 한개와 init과 destory라는 기본 메서드가 존재한다.


    커스텀 필터를 생성하려면 Filter 인터페이스의 구현체를 만들고 doFilter() override 메서드 내에서 비즈니스로직을 정의하면된다.

    이 메서드는 세개의 입력 매개변수를 허용한다.

    1. ServletRequest : 클라이언트 애플리케이션에서 오는 서블릿 요청을 나타낸다.
    2. ServletResponse : 클라이언트 애플리케이션에 보낼 HTTP 응답을 나타낸다.
    3. FilterChain : SpringSecurity 내의 모든 필터는 서블릿 컨테이너 환경 내에 있으며 체인 방식으로 실행 이 객체를 활용하여 커스텀 필터 내에서 비즈니스 로직을 실행 한 후에는 체인 내의 다음 필터를 호출한다.

    init() 메서드와 destroy() 메서드는 기본적으로 비워져 있는데

    • init() 메서드

    필터의 초기화 시점에 실행해야하는 비즈니스 로직이 있다면 이러한 로직을 init filter 내부에 작성할 수 있다.

    보통 웹 애플리케이션의 시작 시점에만 호출되며 

    예시로 개발자가 데이터베이스나 데이터 소스에 연결하는 로직을 작성하여 dofilter() 메서드 내부에 이러한 열결 정보를 사용할 수 있다.


    • destory() 메서드

    서블릿이 파괴될 때 서블릿 컨테이너에 의해 호출되는 메서드, 대부분의 경우 서블릿은 웨 애플리케이션 종료 과정에서 파괴가 됨으로 애플리케이션 종료 과정에 호출된다.

    예시로 개발자가 데이터베이스나 다른 데이터 소스와의 연결을 해제하거나 닫을 때 destroy()메서드 내부에 로직을 작성하여 수행


    이 Filter 인터페이스는 SpringBoot 라이브러리나 SpringSecurity에 국한 된 것이 아닌 java 초기 부터 사용이 가능하다.


    GenericFilterBean 추상클래스


    이 추상 클래스는 Spring라이브러리나 SpringBoot 라이브러리 내에 존재 한다. 

    이 GenericFilterBean 추상클래스를 확장 함으로 커스텀 필터를 정의할 수 있는데


    Filter 인터페이스를 구현하고 있는 것을 볼 수 있다.

    따라서 filter 인터페이스의 dofilter() 메서드내에 로직을 작성하면 된다.


    Filter 인터페이스 옵션과 GenericFilterBean 옵션의 차이점은


    • web.xml 내에 정의된 servlet 관련 init 매개변수를 읽어야 하는 요구 사항이 있거나 servletContext 세부 정보나 application.properties 세부 정보를 읽을 수 있는 옵션이 필요한 경우 

    이러한 시나리오에서 이 GenericFilterBean을 활용할 수 있다.


    메서드 목록을 보면

    • Environment
    • FilterConfig
    • ServletContext

    이 세가지 와 관련된 메서드 들이 많이 있다. 


    다른 매개변수에 의존하지 않는 간단한 비즈니스 로직이라면 Filter 방식, Servlet 관련 매개변수 Context 세부 정보 환경 세부정보 등을 읽어서 로직에 사용해야한다면 GenericFilterBean 방식을 사용하면 된다.


    OncePerRequestFIlter 추상클래스


    Spring 라이브러리 내에서 사용이 가능 하며 OncePerRequestFilter 라는 추상 클래스는 GenericFilterBean을 확장하고 있다.

    이 클래스 이름은 이름처럼 Spring 프레임워크가 각 요청에 대해 최대 한번만 필터가 실행되도록 보장한다.


    Servlet Container 환경 내에서 동일한 요청이 여러번 처리 될 수 있는 특정 시나리오에서 비즈니스 로직을 한번만 실행 하고자 한다면 이 OncePerRequestFilter를 활용하여 커스텀 필터를 생성해야한다.


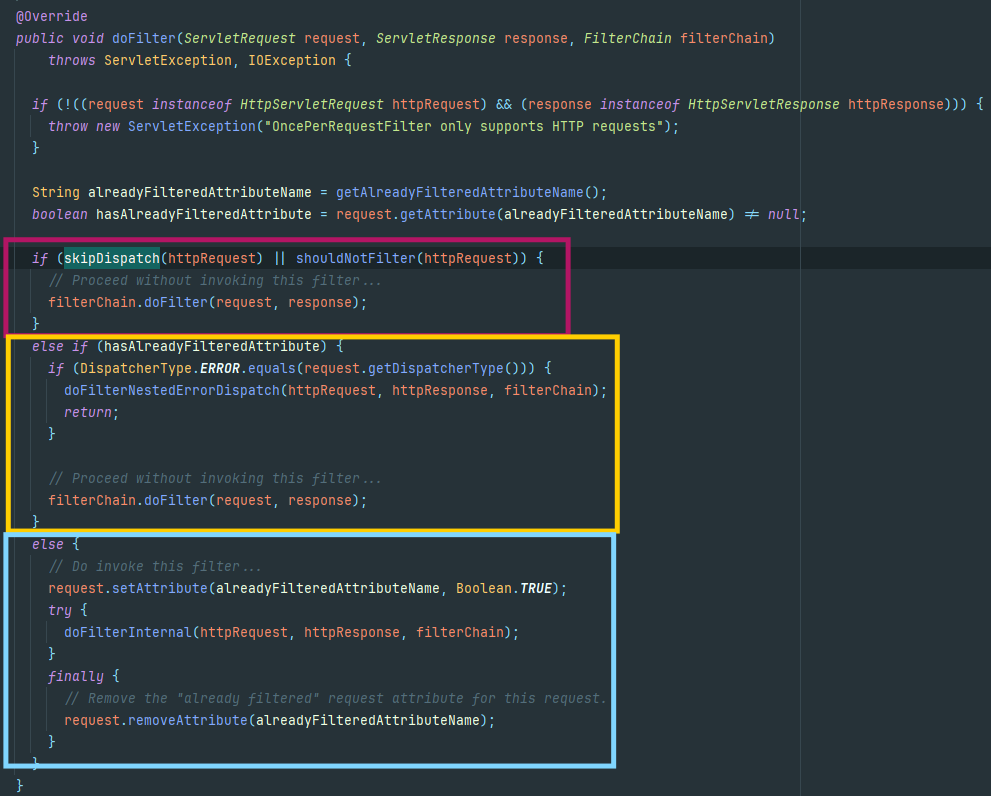
    OncePerRequestFilter 클래스의 dofilter


      빨간색 박스처럼 특정 조건을 만족하게 되면 필터가 스킵이된다.

    유사하게 노란색 박스 처럼 필터를 호출하지 않고 진행하는 경우도 있으며 

    모든 검사가 실패하는 시나리오 에서는 하늘색 박스처럼 else 블럭으로 이동하여 doFIlterInternal() 메서드를 호출하게 된다.


    doFilterInternal


    이 doFilterInternal() 메서드는 OncePerRequestFilter를 확장할 때 커스텀 필터 내부에서 재정의 해야하는 메서드이다.

    이 메서드 내부에만 모든 비즈니스 로직을 작성해야한다.


    • shouldNotFilter()


    특정 시나리오에서 필터가 실행되지 않도록 하고 싶을 때 사용하는 것이다.

    특정 MVC 부분이나 특정 RESTAPI 부분에서 필터가 실행되지 않아야하는 요구사항이 있을 수 있다. 이러한 모든 로직을  이 메서드 내에 재 정의 하고 조건이 충족되면 이 메서드에 true를 반환 할 수 있는데 


    true를 반환하게 되면 필터가 실행되지 않으며 그렇지 않으면 모든 유형의 요청에 대해 항상 실행된다.


    SpringSecurity에 커스텀 필터 주입 방법


    스프링 시큐리티 흐름에 커스텀 필터를 주입할 수 있는 방법은 3가지가 있다.

    1. addFilterBefore(filter, class) - 지정된 필터 클래스의 위치 앞에 필터를 추가
    2. addFilterAfter(filter, class) - 지정된 필터 클래스의 위치 뒤에 새로운 필터를 추가
    3. addFilterAt(filter, class) - 지정된 필터 클래스의 위치에 필터를 추가


    하나하나 예시를 통해 알아보겠다.


    addFilterBefore(filter, class) - 인증 요청에 이메일'test' 문자열이 들어갔는지에 대한 검증 필터 구성 예시


    BasicAuthenticationFilter 직전에 필터를 추가하여 입력된 이메일 주소에'test' 문자열이 포함되어 있지 않은지 자체적인 사용자 정의 유효성 검사를 수행한다. 


    HttpBasic 형태의 인증을 따를 때 마다 실제 인증은 BasicAuthenticationFilter에서 시작된다. 그래서 이 필터의 동작 전에 커스텀 필터를 구성해야 한다. 바로 직전에 필터를 실행하기 위해서 addFilterBefore()을 사용할 것이다.


    • RequestValidationBeforeFilter
    더보기
    import jakarta.servlet.Filter;
    import jakarta.servlet.FilterChain;
    import jakarta.servlet.ServletException;
    import jakarta.servlet.ServletRequest;
    import jakarta.servlet.ServletResponse;
    import jakarta.servlet.http.HttpServletRequest;
    import jakarta.servlet.http.HttpServletResponse;
    import java.io.IOException;
    import java.nio.charset.StandardCharsets;
    import java.util.Base64;
    import org.springframework.http.HttpHeaders;
    import org.springframework.security.authentication.BadCredentialsException;
    import org.springframework.util.StringUtils;
    
    public class RequestValidationBeforeFilter implements Filter {
    
      @Override
      public void doFilter(ServletRequest request, ServletResponse response, FilterChain chain)
          throws IOException, ServletException {
        HttpServletRequest req = (HttpServletRequest) request;
        HttpServletResponse res = (HttpServletResponse) response;
        //HTTP 프로토콜을 사용하여 요청을 수락하려고 하기때문에 HTTPServletReq, Res로 형변환을 해야한다.
        String header = req.getHeader(HttpHeaders.AUTHORIZATION);
        //HTTPBasic 표준을 사용하여 로그인 할때 자격증명이 authorization이름으로 RequestHeader안에 전달된다.
        if (null != header) {
          header = header.trim();
          if (StringUtils.startsWithIgnoreCase(header, "Basic")) {
          //HTTPBasic 표준을 통해 자격증명을 보낼때 접두사가 Basic값을 추가하기 때문에 검증
            byte[] base64Token = header.substring(6).getBytes(StandardCharsets.UTF_8);
            //header 값에 Basic 접두사 제거 후 Base64 디코딩을 위해 바이트 배열로 변환
            byte[] decoded;
            try {
              decoded = Base64.getDecoder().decode(base64Token);
              //Base64디코딩
              String token = new String(decoded, StandardCharsets.UTF_8);
              //디코딩된 결과를 문자열로 변환 이 문자열은 username:password형식
              int delim = token.indexOf(":");
              // ':' 기준으로 username과 password 분리 : 이 없다면 delim은 -1
              if (delim == -1) {
                throw new BadCredentialsException("Invalid basic authentication token");
              }
              String email = token.substring(0, delim);
              //문자열의 시작부터 : 직전까지 잘라냄 password가 필요한 경우 token.substring(delim + 1)
              if (email.toLowerCase().contains("test")) {
              //문자열에 "test"가 포함된 경우 요청 거부
                res.setStatus(HttpServletResponse.SC_BAD_REQUEST);
                return;
              }
            } catch (IllegalArgumentException exception) {
              throw new BadCredentialsException("Failed to decode basic authentication token");
            }
          }
        }
        chain.doFilter(request, response);
      }
      }
    • ProjectSecurityConfig

    FilterChain 안에 addFilterBefore() 메서드를 호출해준다.

    .addFilterBefore(new RequestValidationBeforeFilter(), BasicAuthenticationFilter.class)


    • 테스트
    더보기
    •  
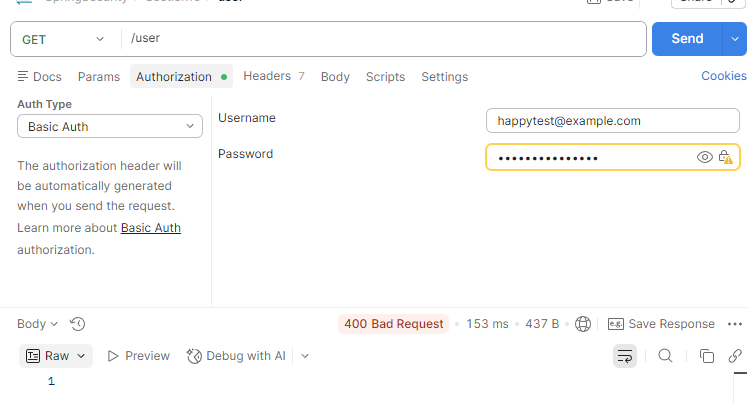
    • 이메일에 "test" 문자열을 포함했을 경우 결과
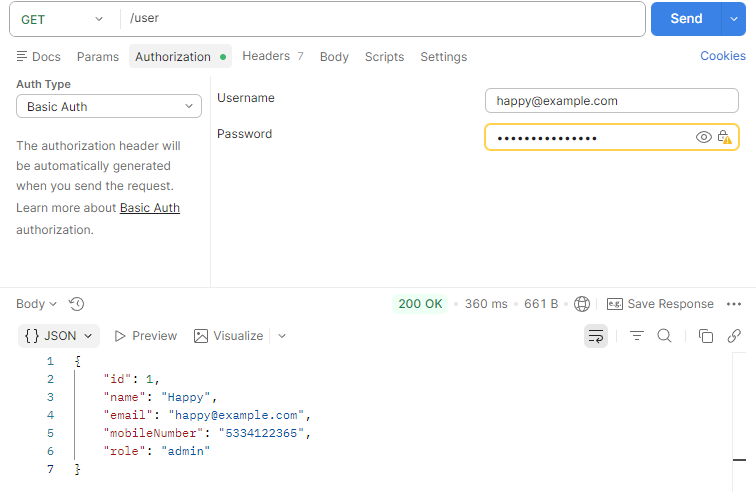
    • "test"문자열을 포함하지 않았을 경우


    addFilterAfter(filter, class) - 사용자의 인증 성공 여부와 권한 세부정보를 로그에 기록하는 필터 구성 예시


    인증 직후 인증 성공 여부와 권한 세부 정보를 로그에 기록하는 필터를 BasicAuthenticationFilter 직후에 addFilterAfter()을 활용하여 구성해보려고 한다.


    • AuthoritiesLogginAfterFilter
    import jakarta.servlet.Filter;
    import jakarta.servlet.FilterChain;
    import jakarta.servlet.ServletException;
    import jakarta.servlet.ServletRequest;
    import jakarta.servlet.ServletResponse;
    import java.io.IOException;
    import lombok.extern.slf4j.Slf4j;
    import org.springframework.security.core.Authentication;
    import org.springframework.security.core.context.SecurityContextHolder;
    
    @Slf4j
    public class AuthoritiesLoggingAfterFilter implements Filter {
    
      @Override
      public void doFilter(ServletRequest request, ServletResponse response, FilterChain chain)
          throws IOException, ServletException {
    
        Authentication authentication = SecurityContextHolder.getContext().getAuthentication();
        if(null != authentication) {
          log.info( "User " + authentication.getName() + "is successfully authentication and "
          + "has the authorities " + authentication.getAuthorities().toString());
        }
        chain.doFilter(request, response);
    
      }
    }


    • ProjectSecurityConfig
    .addFilterAfter(new AuthoritiesLoggingAfterFilter(), BasicAuthenticationFilter.class)


    • 테스트

    userAPI를 요청후 정상적으로 응답


    필터가 호출되고 정상적으로 로그가 찍히는 걸 확인 할 수 있다.


    addFilterAt(filter, class) - 사용자가 인증되고 있다는 로그 를 기록하는 필터 구성 예시 


    addFilterAt()은 지정된 필터 클래스의 위치에 필터를 추가하지만 수행 순서를 보장할 수 가 없다. 순서에 대한 제어가 불가능 하고 무작위 적인 특성을 가지고 있기 때문에, 동일한 순서로 필터를 제공하는 것은 피해야한다.


    • AuthoritiesLogginAtFilter
    import jakarta.servlet.Filter;
    import jakarta.servlet.FilterChain;
    import jakarta.servlet.ServletException;
    import jakarta.servlet.ServletRequest;
    import jakarta.servlet.ServletResponse;
    import java.io.IOException;
    import lombok.extern.slf4j.Slf4j;
    
    @Slf4j
    public class AuthoritiesLoggingAtFilter implements Filter {
    
      @Override
      public void doFilter(ServletRequest request, ServletResponse response, FilterChain chain)
          throws IOException, ServletException {
        log.info("Authentication Validation is in progress");
    
        chain.doFilter(request, response);
      }
    }


    • ProjectSecurityConfig
    .addFilterAt(new AuthoritiesLoggingAtFilter(), BasicAuthenticationFilter.class)


    • 테스트

    userAPI를 요청을 하고 응답을 받았을 때

    BasicAuthenticationFilter 보다 먼저 실행된 결과를 볼 수 있다.


    이상으로 커스텀 필터 구성과 주입 방법을 알아 보았다. SpringSecurity 필터를 주축으로 실행해야하는 비즈니스 요구사항이 있는 경우  커스텀 필터를 만드는 것을 탐구해보면 좋을 것 같다. 
    다른 방식으로 AuthenticationEvents나 AuthorizationEvents와 같은 이벤트 수신으로 비즈니스로직을 실행하는 방식도 있지만,

    이벤트 방식에 비즈니스 로직을 묶고 싶지 않고 모든 유형의 시나리오와 모든 유형의 요청에 대해 비즈니스 로직이 실행되기를 원한다면 커스텀 필터를 만드는것도 하나의 접근 방식이다.


    Kiwimel0n

    Kiwimel0n

    내용정리

    SpringSecurity에서 권한(Authority)와 역할(Role) - SpringSecurity 6.x, EazyBank Udmey

    springSecurity 2026. 2. 26. 17:55


    목차


      스프링 시큐리티에서 권한들(Authorities)이 저장되는 방식


      SpringSecurity 프레임 워크를 활용하여 웹 애플리케이션 내에 Authorization을 구현하기 위해서는 권한(Authority) 또는 역할(Role)이 Spring Security프레임워크 내에서 어떻게 저장되는지 알아야한다.


      GrantedAuthority Interface


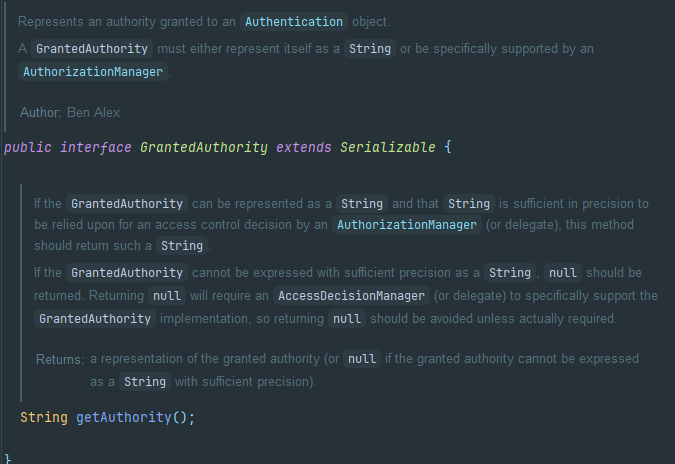
      이 인터페이스는 Authority 또는 Role 정보를 저장하려는 경우 따라야 하는 계약의 윤곽(schema)를 정의 한 것이다.

      단순한 인터페이스로 getAuthority()라는 단일 추상 메서드를 가지고 있다.

      모든 권한 또는 역할의 세부 정보를 String 타입으로 사용하여 저장할 것임을 나타낸다.


      실제 프로젝트에서도 사용할 수 있는 구현 클래스들도 제공해주는데 이중에 SimpleGrantedAuthority가 가장 일반적으로 사용된다.


      SimpleGrantedAuthority

      더보기
      public final class SimpleGrantedAuthority implements GrantedAuthority {
      
      	private static final long serialVersionUID = SpringSecurityCoreVersion.SERIAL_VERSION_UID;
      
      	private final String role;
      
      	public SimpleGrantedAuthority(String role) {
      		Assert.hasText(role, "A granted authority textual representation is required");
      		this.role = role;
      	}
      
      	@Override
      	public String getAuthority() {
      		return this.role;
      	}
      
      	@Override
      	public boolean equals(Object obj) {
      		if (this == obj) {
      			return true;
      		}
      		if (obj instanceof SimpleGrantedAuthority sga) {
      			return this.role.equals(sga.getAuthority());
      		}
      		return false;
      	}
      
      	@Override
      	public int hashCode() {
      		return this.role.hashCode();
      	}
      
      	@Override
      	public String toString() {
      		return this.role;
      	}
      
      }


      필드 이름이 role 이지만 Authority 또는 role 정보를 저장할 수 있다. 이것은 단순하게 SpringSecurity 팀이 제공한 이름일 뿐이다.


      따라서 누군가가 역할 정보 또는 권한 정보를 저장하고자 할때 생성자를 호출하여 클래스 객체를 생성해야하며, 생성자에 권한 이름이나 역할 이름을 전달해야한다.

      이제 이클래스와 인터페이스를 알아 보았으며

      SpringSecurity 프레임 워크 내에서 사용자 관련 데이터를 두가지 다른 인터페이스와 그 구현클래스들을 사용하여 표현하는데 

      UserDetails 인터페이스와 Authentication 인터페이스이다.


      최종 사용자 데이터를 저장하는 UserDetails 와 Authentication Interface 흐름


      인증 과정 중에 저장시스템에서 UserDetails를 로드 할때 UserDetails 구현 클래스의 객체를 사용하여 UserDetails를 저장할 것이다. 마찬가지로 인증이 성공되면 로그인한 사용자 정보를 Authentication 구현 클래스 객체의 형태로 저장할 것이다.

      이러한 인터페이스들이 최종 사용자의 권한(Authority) 또는 역할(Role) 정보를 어떻게 저장하는 지 알아 보려고 한다.


      • EazyBankUserDetailsService
      @Service
      @RequiredArgsConstructor
      public class EazyBankUserDetailsService implements UserDetailsService {
      
        private final CustomerRepository customerRepository;
      
        @Override
        public UserDetails loadUserByUsername(String username) throws UsernameNotFoundException {
          Customer customer = customerRepository.findByEmail(username).orElseThrow(() -> new
              UsernameNotFoundException("User details not found for the user" + username));
      
          List<GrantedAuthority> authorities = List.of(new SimpleGrantedAuthority(customer.getRole()));
          return new User(customer.getEmail(),customer.getPwd(),authorities);
        }
      }


      • Customer
      더보기
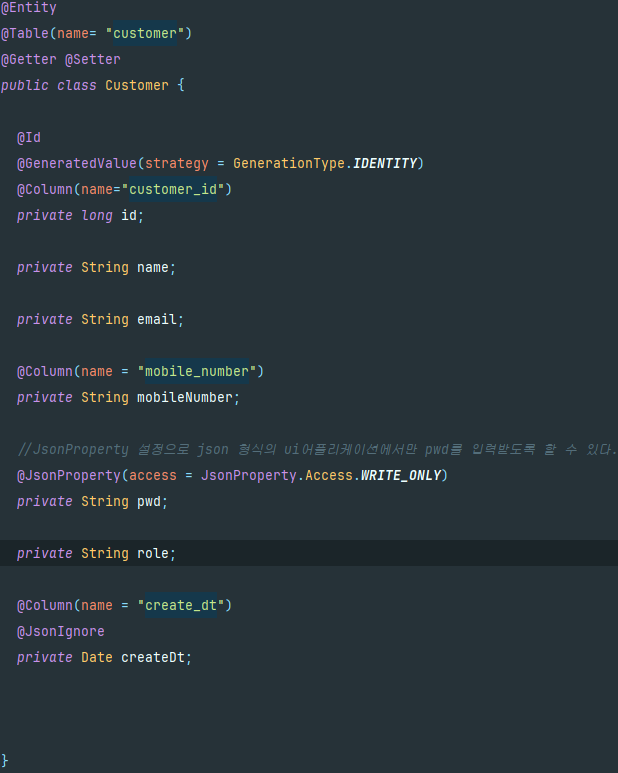
      1. findByEmail() 메서드를 통해 데이터 베이스에서 UserDetails를 불러오고 있다. 현재 username, pwd, role 정보를 customer 테이블에 저장하고 있다. 따라서 UserDetails의 구현체인 User 객체를 생성할때 사용자의 이름인 이메일이 무엇이고 비밀번호가 무엇인지 전달하려고 한다.
      2.  한 사람이 여려 권한 또는 역할을 가질 수 있기 때문에 사용자 생성자는 항상 List<GrantedAuthority>객체 형태로 권한 세부 정보를 받아 들인다.  customer 객체에서 역할 정보를 확인인 하여 SimpleGrantedAuthority 객체를 생성하려고 한다.
      3. 최종 사용자의 다양한 권한이나 역할 정보를 저장하기 위해 여러개의 SimpleGrantedAuthority 객체를 생성해야하며 동일한 리스트를 User 생성자에 전달해 준다.
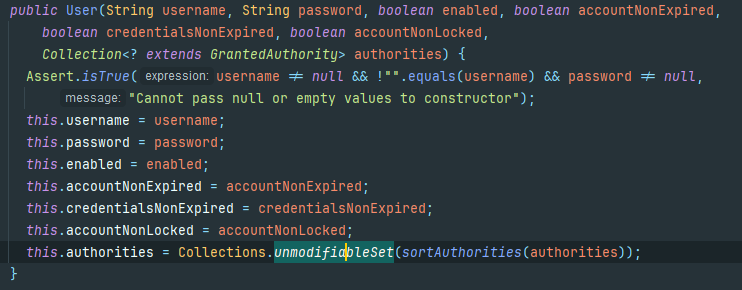
      • User 생성자
      더보기
      package org.springframework.security.core.userdetails;


      unmodifiableSet()을 사용하여 권한 세부정보를 authorities 변수에 설정하는 것을 볼 수 있다.

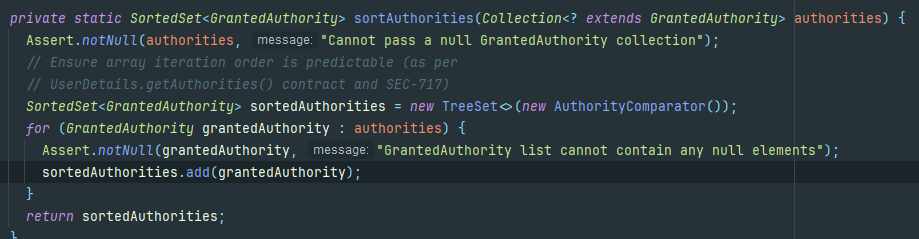
      이것은 SpringSecurity 팀이 권한을 한번 생성되면 수정할 수 없는 고유한 요소들로 구성된 세트로 만들려고 한다는 것을 알 수있다.


      이러한 권한 컬렉션 객체는 누군가 User.java 내의 getAuthorities() 메서드를 호출할때마다 반환 될것이다.

      UserDetails 인터페이스 내부에는 getAuthorities()라는 메서드가 있으며 이 메서드는 컬렉션 객체를 반환할 것이다.

      여기까지의 흐름은 인증 중 보여지는 흐름이며 특히 데이터베이스나 다른 저장 시스템에서 사용자 세부 정보를 로드하려고 할때 발생한다. 이제 인증이 성공적으로 완료 되었다고 가정을 하고 모든 사용자 세부 정보가 Authentication 객체로 반환된다.

      이제는 Authentication 객체가 이러한 권한 세부 정보를 어떻게 저장 하는지 알아보겠다.


      • EazyBankUsernamePwdAuthenticationProvider
      @Component
      @Profile("!prod")
      @RequiredArgsConstructor
      public class EazyBankUsernamePwdAuthenticationProvider implements AuthenticationProvider {
      
        private final UserDetailsService userDetailsService;
        private final PasswordEncoder passwordEncoder;
      
        @Override
        public Authentication authenticate(Authentication authentication) throws AuthenticationException {
          String username = authentication.getName();
          String pwd = authentication.getCredentials().toString();
          UserDetails userdetails = userDetailsService.loadUserByUsername(username);
            return new UsernamePasswordAuthenticationToken(username, pwd, userdetails.getAuthorities());
      
        }
      
        @Override
        public boolean supports(Class<?> authentication) {
          return (UsernamePasswordAuthenticationToken.class.isAssignableFrom(authentication));
        }
      }


      이전에 AuthenticationProvider를 커스텀한 EazyBankUsernamePwdAuthenticationProvider이다.


      이것은 개발 프로파일용이라 비밀번호 검사를 수행하지 않는다. Prod 프로파일용에서는 비밀번호 검사를 수행한 후 일치하면 

      UsernamePasswordAuthenticationToken을 생성한다.


      UsernamePasswordAuthentiationToken 생성자를 열어보면


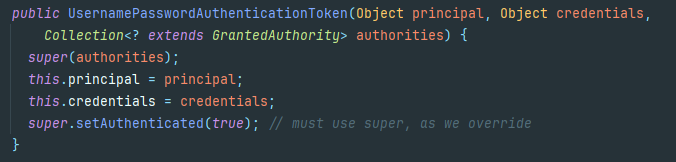
      권한을 super 생성자에 전달하려 하고 있다.

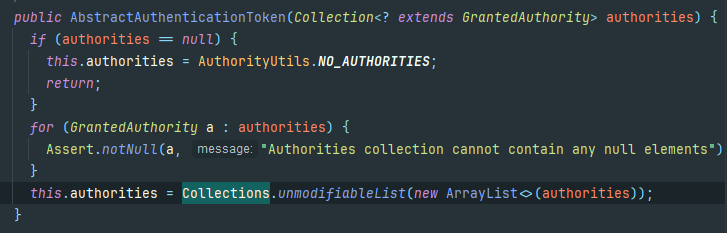
      super 생성자를 호출하면 우리가 전달하려고 하는 모든 권한을 authorities 컬렉션 객체에 전달하려고 한다.

      여기서 권한 세부 정보를 unmodifiableList()에 저장한다. 따라서 누군가 getAuthorities() 메서드를 호출 한다면 동일한 권한 세부정보를 반환한다.


      Spring Security 프레임 워크가 Authorization을 validate하는 많은 곳에서 최종 사용자가 가지고 있는 권한이나 역할을 이해하기 위해 getAuthorities() 메서드를 호출 할것이며

      이 흐름을 알게 되면서 시큐리티 프레임워크가 최종사용자의 권한 또는 역할 정보를 어떻게 저장하는지에 대해 명확히 할게 되었다.


      이제는 다양한 역할 또는 권한을 저장하는 방법에 대해 알아보겠다.


      권한(Authority) VS 역할(Role)

      • 권한(Authority)

      개인이 누리는 특권이나 행위라고 말할 수 있으며 세밀한 방식으로 접근 제한할때 사용


      • 역할(Role)

      특권 및 행동의 집합이라고 말할 수 있으며 coarse-grained(거친?, 조잡한?)방식으로 접근 제한할때 사용한다.


      • 권한/역할의 이름은 임의적이며, 비즈니스 요구 사항에 따라 맞춤 설정이 가능하다.
      • 스프링 시큐리티에서 역할 또한 권한과 동일한 Granted/Authority를 사용하여 표현한다.
      •  역할을 정의할때는 ROLE_이라는 접두사를 사용해야 하며 이것은 역할과 권한을 구분하는데 사용된다.


      다양한 권한(Authority) 또는 역할(Role) 구성하기


      현재 Customer 테이블에 이메일, 비밀번호, 역할을 나타내는 열을 사용하고 있다.


      SpringSecurity는 단일 사용자에 대해 여러개의 역할과 권한을 저장할 수 있는 유연성을 제공한다.


      DB 스키마 변경을 통해 단일 사용자에 대해 여러 역할 또는 권한을 저장 할 수 있도록 할 것이다.


      여러 권한 설정 하기


      • authorities 테이블
      CREATE TABLE `authorities` (
                                     `id` int NOT NULL AUTO_INCREMENT,
                                     `customer_id` int NOT NULL ,
                                     `name` varchar(50) NOT NULL ,
                                     primary key (`id`),
                                     KEY `customer_id` (`customer_id`),
                                     constraint  `authorities_ibfk_1` FOREIGN KEY (`customer_id`) REFERENCES `customer` (`customer_id`)
      );


      INSERT into `authorities` (`customer_id`, `name`)
      VALUES (1,'VIEWACCOUNT');
      
      INSERT into `authorities` (`customer_id`, `name`)
      VALUES (1,'VIEWCARDS');
      
      INSERT into `authorities` (`customer_id`, `name`)
      VALUES (1,'VIEWLOANS');
      
      INSERT into `authorities` (`customer_id`, `name`)
      VALUES (1,'VIEWBALANCE');


      customer ID 가 1 에 대해 VIEWACCOUNT, VIEWCARDS, VIEWLOANS, VIEWBALANCE 권한을 부여 했다.


      • authority  Entity 클래스
      import jakarta.persistence.Entity;
      import jakarta.persistence.GeneratedValue;
      import jakarta.persistence.GenerationType;
      import jakarta.persistence.Id;
      import jakarta.persistence.JoinColumn;
      import jakarta.persistence.ManyToOne;
      import jakarta.persistence.Table;
      import lombok.Getter;
      import lombok.Setter;
      
      @Entity
      @Getter
      @Setter
      @Table(name="authorities")
      public class Authority {
      
        @Id
        @GeneratedValue(strategy = GenerationType.IDENTITY)
        private long id;
      
        private String name;
      
        @ManyToOne
        @JoinColumn(name="customer_id")
        private Customer customer;
      }


      • Customer Entity 클래스
      import com.fasterxml.jackson.annotation.JsonIgnore;
      import com.fasterxml.jackson.annotation.JsonProperty;
      import jakarta.persistence.Column;
      import jakarta.persistence.Entity;
      import jakarta.persistence.FetchType;
      import jakarta.persistence.GeneratedValue;
      import jakarta.persistence.GenerationType;
      import jakarta.persistence.Id;
      import jakarta.persistence.JoinColumn;
      import jakarta.persistence.OneToMany;
      import jakarta.persistence.Table;
      import java.sql.Date;
      import java.util.Set;
      import lombok.Getter;
      import lombok.Setter;
      
      @Entity
      @Table(name= "customer")
      @Getter @Setter
      public class Customer {
      
        @Id
        @GeneratedValue(strategy = GenerationType.IDENTITY)
        @Column(name="customer_id")
        private long id;
      
        private String name;
      
        private String email;
      
        @Column(name = "mobile_number")
        private String mobileNumber;
      
        //JsonProperty 설정으로 json 형식의 ui어플리케이션에서만 pwd를 입력받도록 할 수 있다.
        @JsonProperty(access = JsonProperty.Access.WRITE_ONLY)
        private String pwd;
      
        private String role;
      
        @Column(name = "create_dt")
        @JsonIgnore
        private Date createDt;
      
        @OneToMany(mappedBy = "customer", fetch = FetchType.EAGER)
        @JsonIgnore
        private Set<Authority> authorities;


      }


      기본적으로 단일 역할만 줄 수 있었던 String 타입의 role 대신 Set<Authority>의 중복 없이의 authorities를 필드에 추가해 주어 authority Entity와의 관계를 설정해 주었다. fetch 타입 eager을 통하여 customer 객체를 불러옴과 동시에 권한을 로드할 수 있도록 설정 하였다.

      • EazyBankUserDetailsService
      @Service
      @RequiredArgsConstructor
      public class EazyBankUserDetailsService implements UserDetailsService {
      
        private final CustomerRepository customerRepository;
      
        @Override
        public UserDetails loadUserByUsername(String username) throws UsernameNotFoundException {
          Customer customer = customerRepository.findByEmail(username).orElseThrow(() -> new
              UsernameNotFoundException("User details not found for the user" + username));
      
          List<GrantedAuthority> authorities = customer.getAuthorities().stream().map(authority -> new
              SimpleGrantedAuthority(authority.getName())).collect(Collectors.toList());
          return new User(customer.getEmail(),customer.getPwd(),authorities);
        }
      }


      기본적으로 원래는 role 필드를 가져 왔지만 이제는 최종사용자의 권한을 읽기 위해 .getAuthorities() 메서드를 호출한다.

      여러 권한들을 제공하기 때문에 모든 Authority 객체를 SimpleGrantedAuthority로 변환 한다.


      위의 설정으로 Customer ID가 1인 유저에게 4가지 권한을 부여하고 최종사용자가 로그인을 하게되면 Security 프레임워크가 정상적으로 Authentication 객체에 4가지 권한을 저장할 수 있도록 변경을 하였다.


      이제 이러한 권한을 어떻게 활용하는지 알아보겠다.


      SpringSecurity를 활용한 애플리케이션 내 권한 구성 hasAuthority(), hasAnyAuthority()


      • ProjectSecurityConfig
      @Configuration
      @Profile("!prod")
      public class ProjectSecurityConfig {
      
        @Bean
        SecurityFilterChain defaultSecurityFilterChain(HttpSecurity http) throws Exception {
          CsrfTokenRequestAttributeHandler csrfTokenRequestAttributeHandler = new CsrfTokenRequestAttributeHandler();
      
          http.securityContext(contextConfig -> contextConfig.requireExplicitSave(false))
              .cors(corsConfig -> corsConfig.configurationSource(new CorsConfigurationSource() {
                @Override
                public CorsConfiguration getCorsConfiguration(HttpServletRequest request) {
                  CorsConfiguration config = new CorsConfiguration();
                  config.setAllowedOrigins(Collections.singletonList("http://localhost:4200"));
                  config.setAllowedMethods(Collections.singletonList("*"));
                  config.setAllowCredentials(true);
                  config.setAllowedHeaders(Collections.singletonList("*"));
                  config.setMaxAge(3600L);
                  return config;
                }
              }))
              .csrf(csrfConfig -> csrfConfig.csrfTokenRequestHandler(csrfTokenRequestAttributeHandler)
                  .ignoringRequestMatchers("/contact", "/register")
                  .csrfTokenRepository(CookieCsrfTokenRepository.withHttpOnlyFalse()))
              .addFilterAfter(new CsrfCookieFilter(), BasicAuthenticationFilter.class)
              .sessionManagement(smc -> smc.sessionCreationPolicy(SessionCreationPolicy.ALWAYS)
                  .invalidSessionUrl("/invalidSession")
                  .maximumSessions(1).maxSessionsPreventsLogin(true))
              .authorizeHttpRequests((requests) -> requests
                  .requestMatchers("/myAccount").hasAuthority("VIEWACCOUNT")
                  .requestMatchers("/myBalance").hasAnyAuthority("VIEWBALANCE", "VIEWACCOUNT")
                  .requestMatchers("/myLoans").hasAuthority("VIEWLOANS")
                  .requestMatchers( "myCards").hasAuthority("VIEWCARDS")
                  .requestMatchers("/user").authenticated()
              .requestMatchers("/notices", "/contact","/error","/register", "/invalidSession").permitAll());
          http.formLogin(withDefaults());
          http.httpBasic(hbc -> hbc.authenticationEntryPoint(new CustomBasicAuthenticationEntryPoint()));
          http.exceptionHandling(ehc -> ehc.accessDeniedHandler(new CustomAccessDeniedHandler()));
          return http.build();
        }
      
      
        @Bean
        PasswordEncoder passwordEncoder() {
          return PasswordEncoderFactories.createDelegatingPasswordEncoder();
        }
      
        @Bean
        public CompromisedPasswordChecker compromisedPasswordChecker(){
          return new HaveIBeenPwnedRestApiPasswordChecker();
        }


      }


      • .requestMatchers(엔드포인트 ).hasAuthority("권한")
      • .requestMatchers(엔드포인트).hasAnyAuthority(권한, 권한)


      이 두가지 메서드를 통해 권한에 해당하는 최종 사용자들만 이용할 수 있게 된다. 권한이 없는 유저가 요청을 하게된다면

      403 forbidden 응답을 받게 될 것이다.


      추가적으로 .access() 라는 메서드또한 존재하는데 권한 뿐 아니라 특정 조건을 충족해야할 경우 사용하는 메서드 이다.

      스프링 표현 언어(SpEL)을 활용하며 메서드 내부에 OR, AND와 같은 연산자도 사용가능하다.


      스프링 시큐리티를 활용한 역할 구성, 접두사변경, hasRole(), hasAnyRole()


      • ROLE_ 접두사 변경
      @Configuration
      public class SecurityConfig {
      
          @Bean
          GrantedAuthorityDefaults grantedAuthorityDefaults() {
              // 기본 접두사 "ROLE_" 대신 사용할 접두사를 매개변수로넣어주면 된다.
              return new GrantedAuthorityDefaults("PREFIX_");
          }
      }


       SecurityConfig에 GrantedAuthorityDefaults Bean을 생성해주면 접두사를 변경할 수 있다.


      • ProjectSecurityConfig
      @Configuration
      @Profile("!prod")
      public class ProjectSecurityConfig {
      
        @Bean
        SecurityFilterChain defaultSecurityFilterChain(HttpSecurity http) throws Exception {
          CsrfTokenRequestAttributeHandler csrfTokenRequestAttributeHandler = new CsrfTokenRequestAttributeHandler();
      
          http.securityContext(contextConfig -> contextConfig.requireExplicitSave(false))
              .cors(corsConfig -> corsConfig.configurationSource(new CorsConfigurationSource() {
                @Override
                public CorsConfiguration getCorsConfiguration(HttpServletRequest request) {
                  CorsConfiguration config = new CorsConfiguration();
                  config.setAllowedOrigins(Collections.singletonList("http://localhost:4200"));
                  config.setAllowedMethods(Collections.singletonList("*"));
                  config.setAllowCredentials(true);
                  config.setAllowedHeaders(Collections.singletonList("*"));
                  config.setMaxAge(3600L);
                  return config;
                }
              }))
              .csrf(csrfConfig -> csrfConfig.csrfTokenRequestHandler(csrfTokenRequestAttributeHandler)
                  .ignoringRequestMatchers("/contact", "/register")
                  .csrfTokenRepository(CookieCsrfTokenRepository.withHttpOnlyFalse()))
              .addFilterAfter(new CsrfCookieFilter(), BasicAuthenticationFilter.class)
              .sessionManagement(smc -> smc.sessionCreationPolicy(SessionCreationPolicy.ALWAYS)
                  .invalidSessionUrl("/invalidSession")
                  .maximumSessions(1).maxSessionsPreventsLogin(true))
              .authorizeHttpRequests((requests) -> requests
                  .requestMatchers("/myAccount").hasRole("USER")
                  .requestMatchers("/myBalance").hasAnyRole("USER", "ADMIN")
                  .requestMatchers("/myLoans").hasRole("USER")
                  .requestMatchers( "myCards").hasRole("USER")
                  .requestMatchers("/user").authenticated()
              .requestMatchers("/notices", "/contact","/error","/register", "/invalidSession").permitAll());
          http.formLogin(withDefaults());
          http.httpBasic(hbc -> hbc.authenticationEntryPoint(new CustomBasicAuthenticationEntryPoint()));
          http.exceptionHandling(ehc -> ehc.accessDeniedHandler(new CustomAccessDeniedHandler()));
          return http.build();
        }
      
        @Bean
        PasswordEncoder passwordEncoder() {
          return PasswordEncoderFactories.createDelegatingPasswordEncoder();
        }
      
        @Bean
        public CompromisedPasswordChecker compromisedPasswordChecker(){
          return new HaveIBeenPwnedRestApiPasswordChecker();
        }


      }


      • .requestMatchers(엔드포인트).hasRole(역할)
      • .requestMatchers(엔드포인트).hasAnyRole(역할, 역할)


      • hasRole()

      엔드포인트가 구성될 단일 역할 이름을 받아들이고, 사용자가 언급된 단일 역할에 대해 유효성 검증을 수행합니다. 동일한 역할을 설정한 사용자만 엔드포인트를 호출할 수 있습니다.


      • hasAnyRole()

      엔드포인트에 설정할 여러 역할을 받아들이고, 사용자가 언급한 역할에 따라 유효성 검증을 수행합니다. 구성된 역할 중 하나 이상을 가진 사용자만이 엔드포인트를 호출할 수 있습니다.


      ★ ROLE_ 접두사는 데이터베이스에서 역할을 설정할 때만 사용해야 합니다. 역할을 설정할 때는 이름만으로 설정합니다.


      AuthorizationEvent 수신하기


      권한 부여 실패 시 SpringSecurity는 403 에러를 응답한다. 

      클라이언트 측에 403 에러를 처리하는 것 외에도때때로 백엔드 측에서도 일부 비즈니스 로직을 트리거 하고자 할 수있다.

      예를 들어 이메일을 트리거 하거나 데이터베이스에 감사 항목을 추가하거나 로그에 오류 로그 메세지를 작성하고자 할 수있다.

      이러한 요구사항을 지원하기 위해 SpringSecurity프레임 워크는 권한 부여가 실패 할 때 마다 이벤트를 게시한다.


      사전에 events 패키지에 AuthenticationEvents를 구현 했던 것처럼 유사하게 AuthorizationDeniedEvent도 수신할 수 있다.


      • AuthorizationDeniedEvent
      @Component
      @Slf4j
      public class AuthorizationEvents {
      
        @EventListener
        public void onFailure(AuthorizationDeniedEvent deniedEvent){
          log.error("Authorization failed for the user: {} due to: {}", deniedEvent.getAuthentication().get().getName(),
              //deniedEvent.getAuthorizationDecision().toString()
              //getAuthorizationDecision() deprated 됨
              deniedEvent.getAuthorizationResult().toString());
        }
      
      }


      이렇게 권한 거부 이벤트만 수신할 수 있는가 하면 

      권한 승인 이벤트를 수신 할 수 도 있다. 하지만 기본적으로 SpringSecurity 프레임워크는 권한 부여 성공 이벤트를 게시하지 않는다. 모든 이벤트를 수신하려면 노이즈가 많이 발생하기 때문이다.


      따라서 특수한 요구사항에 따라 권한 성공에 따른 비즈니스 로직을 작동시키기 위해서는

      AuthorizationEventPublisher 라는 @Bean을 생성해 주고

      커스텀 EventPublisher를 구성해주면된다. 


      https://docs.spring.io/spring-security/reference/6.5/servlet/authorization/events.html#authorization-granted-events


      Authorization Events :: Spring Security

      For each authorization that is denied, an AuthorizationDeniedEvent is fired. Also, it’s possible to fire an AuthorizationGrantedEvent for authorizations that are granted. To listen for these events, you must first publish an AuthorizationEventPublisher.

      docs.spring.io

      공식문서를 참고 하면 될것이다.


      Kiwimel0n

      Kiwimel0n

      내용정리

      SpringSecurity CORS(Cross Origin Resourse Sharing), CSRF(Cross Site Request Forgery) - SpringSecurity6.x EazyBytes EazyBank Udemy

      springSecurity 2026. 2. 25. 00:30


      목차


        사전 준비


        CORS와 CSRF를 이해하고 실습하기 위해 강의 내에서는 Angular UI 프레임워크를 이용한 프론트 단위 클라이언트가 제공 되었다. PostMan으로는 CORS와 CSRF를 제대로 실습하기 어렵다. 그래도 강의 내의 EazyBank 애플리케이션의 CORS를 실습하기 위한 백엔드 애플리케이션과 DB의 변경점이 있기 때문에 준비 소스를 올려놓을려고 한다.


        EazyBank DB 스키마 변경점


        더보기
        drop table `authorites`;
        drop table `users`;
        drop table `customer`;
        
        CREATE TABLE `customer` (
                                    `customer_id` int NOT NULL AUTO_INCREMENT,
                                    `name` varchar(100) NOT NULL,
                                    `email` varchar(100) NOT NULL,
                                    `mobile_number` varchar(20) NOT NULL,
                                    `pwd` varchar(500) NOT NULL,
                                    `role` varchar(100) NOT NULL,
                                    `create_dt` date DEFAULT NULL,
                                    PRIMARY KEY (`customer_id`)
        );
        
        INSERT INTO `customer` (`name`,`email`,`mobile_number`, `pwd`, `role`,`create_dt`)
        VALUES ('Happy','happy@example.com','5334122365', '{bcrypt}$2a$12$88.f6upbBvy0okEa7OfHFuorV29qeK.sVbB9VQ6J6dWM1bW6Qef8m', 'admin',CURDATE());
        
        CREATE TABLE `accounts` (
                                    `customer_id` int NOT NULL,
                                    `account_number` int NOT NULL,
                                    `account_type` varchar(100) NOT NULL,
                                    `branch_address` varchar(200) NOT NULL,
                                    `create_dt` date DEFAULT NULL,
                                    PRIMARY KEY (`account_number`),
                                    KEY `customer_id` (`customer_id`),
                                    CONSTRAINT `customer_ibfk_1` FOREIGN KEY (`customer_id`) REFERENCES `customer` (`customer_id`) ON DELETE CASCADE
        );
        
        INSERT INTO `accounts` (`customer_id`, `account_number`, `account_type`, `branch_address`, `create_dt`)
        VALUES (1, 1865764534, 'Savings', '123 Main Street, New York', CURDATE());
        
        CREATE TABLE `account_transactions` (
                                                `transaction_id` varchar(200) NOT NULL,
                                                `account_number` int NOT NULL,
                                                `customer_id` int NOT NULL,
                                                `transaction_dt` date NOT NULL,
                                                `transaction_summary` varchar(200) NOT NULL,
                                                `transaction_type` varchar(100) NOT NULL,
                                                `transaction_amt` int NOT NULL,
                                                `closing_balance` int NOT NULL,
                                                `create_dt` date DEFAULT NULL,
                                                PRIMARY KEY (`transaction_id`),
                                                KEY `customer_id` (`customer_id`),
                                                KEY `account_number` (`account_number`),
                                                CONSTRAINT `accounts_ibfk_2` FOREIGN KEY (`account_number`) REFERENCES `accounts` (`account_number`) ON DELETE CASCADE,
                                                CONSTRAINT `acct_user_ibfk_1` FOREIGN KEY (`customer_id`) REFERENCES `customer` (`customer_id`) ON DELETE CASCADE
        );


        INSERT INTO `account_transactions` (`transaction_id`, `account_number`, `customer_id`, `transaction_dt`, `transaction_summary`, `transaction_type`,`transaction_amt`,
                                            `closing_balance`, `create_dt`)  VALUES (UUID(), 1865764534, 1, DATE_SUB(CURDATE(), INTERVAL 7 DAY), 'Coffee Shop', 'Withdrawal', 30,34500,DATE_SUB(CURDATE(), INTERVAL 7 DAY));
        
        INSERT INTO `account_transactions` (`transaction_id`, `account_number`, `customer_id`, `transaction_dt`, `transaction_summary`, `transaction_type`,`transaction_amt`,
                                            `closing_balance`, `create_dt`)  VALUES (UUID(), 1865764534, 1, DATE_SUB(CURDATE(), INTERVAL 6 DAY), 'Uber', 'Withdrawal', 100,34400,DATE_SUB(CURDATE(), INTERVAL 6 DAY));
        
        INSERT INTO `account_transactions` (`transaction_id`, `account_number`, `customer_id`, `transaction_dt`, `transaction_summary`, `transaction_type`,`transaction_amt`,
                                            `closing_balance`, `create_dt`)  VALUES (UUID(), 1865764534, 1, DATE_SUB(CURDATE(), INTERVAL 5 DAY), 'Self Deposit', 'Deposit', 500,34900,DATE_SUB(CURDATE(), INTERVAL 5 DAY));
        
        INSERT INTO `account_transactions` (`transaction_id`, `account_number`, `customer_id`, `transaction_dt`, `transaction_summary`, `transaction_type`,`transaction_amt`,
                                            `closing_balance`, `create_dt`)  VALUES (UUID(), 1865764534, 1, DATE_SUB(CURDATE(), INTERVAL 4 DAY), 'Ebay', 'Withdrawal', 600,34300,DATE_SUB(CURDATE(), INTERVAL 4 DAY));
        
        INSERT INTO `account_transactions` (`transaction_id`, `account_number`, `customer_id`, `transaction_dt`, `transaction_summary`, `transaction_type`,`transaction_amt`,
                                            `closing_balance`, `create_dt`)  VALUES (UUID(), 1865764534, 1, DATE_SUB(CURDATE(), INTERVAL 2 DAY), 'OnlineTransfer', 'Deposit', 700,35000,DATE_SUB(CURDATE(), INTERVAL 2 DAY));
        
        INSERT INTO `account_transactions` (`transaction_id`, `account_number`, `customer_id`, `transaction_dt`, `transaction_summary`, `transaction_type`,`transaction_amt`,
                                            `closing_balance`, `create_dt`)  VALUES (UUID(), 1865764534, 1, DATE_SUB(CURDATE(), INTERVAL 1 DAY), 'Amazon.com', 'Withdrawal', 100,34900,DATE_SUB(CURDATE(), INTERVAL 1 DAY));
        
        
        CREATE TABLE `loans` (
                                 `loan_number` int NOT NULL AUTO_INCREMENT,
                                 `customer_id` int NOT NULL,
                                 `start_dt` date NOT NULL,
                                 `loan_type` varchar(100) NOT NULL,
                                 `total_loan` int NOT NULL,
                                 `amount_paid` int NOT NULL,
                                 `outstanding_amount` int NOT NULL,
                                 `create_dt` date DEFAULT NULL,
                                 PRIMARY KEY (`loan_number`),
                                 KEY `customer_id` (`customer_id`),
                                 CONSTRAINT `loan_customer_ibfk_1` FOREIGN KEY (`customer_id`) REFERENCES `customer` (`customer_id`) ON DELETE CASCADE
        );
        
        INSERT INTO `loans` ( `customer_id`, `start_dt`, `loan_type`, `total_loan`, `amount_paid`, `outstanding_amount`, `create_dt`)
        VALUES ( 1, '2020-10-13', 'Home', 200000, 50000, 150000, '2020-10-13');
        
        INSERT INTO `loans` ( `customer_id`, `start_dt`, `loan_type`, `total_loan`, `amount_paid`, `outstanding_amount`, `create_dt`)
        VALUES ( 1, '2020-06-06', 'Vehicle', 40000, 10000, 30000, '2020-06-06');
        
        INSERT INTO `loans` ( `customer_id`, `start_dt`, `loan_type`, `total_loan`, `amount_paid`, `outstanding_amount`, `create_dt`)
        VALUES ( 1, '2018-02-14', 'Home', 50000, 10000, 40000, '2018-02-14');
        
        INSERT INTO `loans` ( `customer_id`, `start_dt`, `loan_type`, `total_loan`, `amount_paid`, `outstanding_amount`, `create_dt`)
        VALUES ( 1, '2018-02-14', 'Personal', 10000, 3500, 6500, '2018-02-14');
        
        CREATE TABLE `cards` (
                                 `card_id` int NOT NULL AUTO_INCREMENT,
                                 `card_number` varchar(100) NOT NULL,
                                 `customer_id` int NOT NULL,
                                 `card_type` varchar(100) NOT NULL,
                                 `total_limit` int NOT NULL,
                                 `amount_used` int NOT NULL,
                                 `available_amount` int NOT NULL,
                                 `create_dt` date DEFAULT NULL,
                                 PRIMARY KEY (`card_id`),
                                 KEY `customer_id` (`customer_id`),
                                 CONSTRAINT `card_customer_ibfk_1` FOREIGN KEY (`customer_id`) REFERENCES `customer` (`customer_id`) ON DELETE CASCADE
        );
        
        INSERT INTO `cards` (`card_number`, `customer_id`, `card_type`, `total_limit`, `amount_used`, `available_amount`, `create_dt`)
        VALUES ('4565XXXX4656', 1, 'Credit', 10000, 500, 9500, CURDATE());
        
        INSERT INTO `cards` (`card_number`, `customer_id`, `card_type`, `total_limit`, `amount_used`, `available_amount`, `create_dt`)
        VALUES ('3455XXXX8673', 1, 'Credit', 7500, 600, 6900, CURDATE());
        
        INSERT INTO `cards` (`card_number`, `customer_id`, `card_type`, `total_limit`, `amount_used`, `available_amount`, `create_dt`)
        VALUES ('2359XXXX9346', 1, 'Credit', 20000, 4000, 16000, CURDATE());
        
        CREATE TABLE `notice_details` (
                                          `notice_id` int NOT NULL AUTO_INCREMENT,
                                          `notice_summary` varchar(200) NOT NULL,
                                          `notice_details` varchar(500) NOT NULL,
                                          `notic_beg_dt` date NOT NULL,
                                          `notic_end_dt` date DEFAULT NULL,
                                          `create_dt` date DEFAULT NULL,
                                          `update_dt` date DEFAULT NULL,
                                          PRIMARY KEY (`notice_id`)
        );
        
        INSERT INTO `notice_details` ( `notice_summary`, `notice_details`, `notic_beg_dt`, `notic_end_dt`, `create_dt`, `update_dt`)
        VALUES ('Home Loan Interest rates reduced', 'Home loan interest rates are reduced as per the goverment guidelines. The updated rates will be effective immediately',
                CURDATE() - INTERVAL 30 DAY, CURDATE() + INTERVAL 30 DAY, CURDATE(), null);
        
        INSERT INTO `notice_details` ( `notice_summary`, `notice_details`, `notic_beg_dt`, `notic_end_dt`, `create_dt`, `update_dt`)
        VALUES ('Net Banking Offers', 'Customers who will opt for Internet banking while opening a saving account will get a $50 amazon voucher',
                CURDATE() - INTERVAL 30 DAY, CURDATE() + INTERVAL 30 DAY, CURDATE(), null);
        
        INSERT INTO `notice_details` ( `notice_summary`, `notice_details`, `notic_beg_dt`, `notic_end_dt`, `create_dt`, `update_dt`)
        VALUES ('Mobile App Downtime', 'The mobile application of the EazyBank will be down from 2AM-5AM on 12/05/2020 due to maintenance activities',
                CURDATE() - INTERVAL 30 DAY, CURDATE() + INTERVAL 30 DAY, CURDATE(), null);
        
        INSERT INTO `notice_details` ( `notice_summary`, `notice_details`, `notic_beg_dt`, `notic_end_dt`, `create_dt`, `update_dt`)
        VALUES ('E Auction notice', 'There will be a e-auction on 12/08/2020 on the Bank website for all the stubborn arrears.Interested parties can participate in the e-auction',
                CURDATE() - INTERVAL 30 DAY, CURDATE() + INTERVAL 30 DAY, CURDATE(), null);
        
        INSERT INTO `notice_details` ( `notice_summary`, `notice_details`, `notic_beg_dt`, `notic_end_dt`, `create_dt`, `update_dt`)
        VALUES ('Launch of Millennia Cards', 'Millennia Credit Cards are launched for the premium customers of EazyBank. With these cards, you will get 5% cashback for each purchase',
                CURDATE() - INTERVAL 30 DAY, CURDATE() + INTERVAL 30 DAY, CURDATE(), null);
        
        INSERT INTO `notice_details` ( `notice_summary`, `notice_details`, `notic_beg_dt`, `notic_end_dt`, `create_dt`, `update_dt`)
        VALUES ('COVID-19 Insurance', 'EazyBank launched an insurance policy which will cover COVID-19 expenses. Please reach out to the branch for more details',
                CURDATE() - INTERVAL 30 DAY, CURDATE() + INTERVAL 30 DAY, CURDATE(), null);
        
        CREATE TABLE `contact_messages` (
                                            `contact_id` varchar(50) NOT NULL,
                                            `contact_name` varchar(50) NOT NULL,
                                            `contact_email` varchar(100) NOT NULL,
                                            `subject` varchar(500) NOT NULL,
                                            `message` varchar(2000) NOT NULL,
                                            `create_dt` date DEFAULT NULL,
                                            PRIMARY KEY (`contact_id`)
        );

        EazyBank 애플리케이션 변경점

        • Model 패키지
        더보기
        • Accounts
        import jakarta.persistence.Column;
        import jakarta.persistence.Entity;
        import jakarta.persistence.Id;
        import lombok.Getter;
        import lombok.Setter;
        
        import java.sql.Date;
        
        @Entity
        @Getter @Setter
        public class Accounts{
        
        	@Column(name = "customer_id")
        	private long customerId;
        
        	@Id
        	@Column(name="account_number")
        	private long accountNumber;
        
        	@Column(name="account_type")
        	private String accountType;
        
        	@Column(name = "branch_address")
        	private String branchAddress;
        
        	@Column(name = "create_dt")
        	private Date createDt;
        	
        }


        • AccountTransations
        import jakarta.persistence.Column;
        import jakarta.persistence.Entity;
        import jakarta.persistence.Id;
        import jakarta.persistence.Table;
        import lombok.Getter;
        import lombok.Setter;
        
        import java.sql.Date;
        
        @Entity
        @Getter
        @Setter
        @Table(name="account_transactions")
        public class AccountTransactions{
        	
        	@Id
        	@Column(name = "transaction_id")
        	private String transactionId;
        	
        	@Column(name="account_number")
        	private long accountNumber;
        	
        	@Column(name = "customer_id")
        	private long customerId;
        	
        	@Column(name="transaction_dt")
        	private Date transactionDt;
        	
        	@Column(name = "transaction_summary")
        	private String transactionSummary;
        	
        	@Column(name="transaction_type")
        	private String transactionType;
        	
        	@Column(name = "transaction_amt")
        	private int transactionAmt;
        	
        	@Column(name = "closing_balance")
        	private int closingBalance;
        	
        	@Column(name = "create_dt")
        	private Date createDt;
        
        }


        • Cards
        import jakarta.persistence.*;
        import lombok.Getter;
        import lombok.Setter;
        
        import java.sql.Date;
        
        @Entity
        @Getter @Setter
        @Table(name = "cards")
        public class Cards{
        
            @Id
            @Column(name = "card_id")
            private long cardId;
        
            @Column(name = "customer_id")
            private long customerId;
        
            @Column(name = "card_number")
            private String cardNumber;
        
            @Column(name = "card_type")
            private String cardType;
        
            @Column(name = "total_limit")
            private int totalLimit;
        
            @Column(name = "amount_used")
            private int amountUsed;
        
            @Column(name = "available_amount")
            private int availableAmount;
        
            @Column(name = "create_dt")
            private Date createDt;
        
        }


        • Contact
        @Entity
        @Getter @Setter
        @Table(name = "contact_messages")
        public class Contact{
        
        	@Id
        	@Column(name = "contact_id")
        	private String contactId;
        
        	@Column(name = "contact_name")
        	private String contactName;
        
        	@Column(name = "contact_email")
        	private String contactEmail;
        	
        	private String subject;
        
        	private String message;
        
        	@Column(name = "create_dt")
        	private Date createDt;
        	
        }


        • Customer
        import com.fasterxml.jackson.annotation.JsonIgnore;
        import com.fasterxml.jackson.annotation.JsonProperty;
        import jakarta.persistence.Column;
        import jakarta.persistence.Entity;
        import jakarta.persistence.GeneratedValue;
        import jakarta.persistence.GenerationType;
        import jakarta.persistence.Id;
        import jakarta.persistence.Table;
        import java.sql.Date;
        import lombok.Getter;
        import lombok.Setter;
        
        @Entity
        @Table(name= "customer")
        @Getter @Setter
        public class Customer{
        
          @Id
          @GeneratedValue(strategy = GenerationType.IDENTITY)
          @Column(name="customer_id")
          private long id;
        
          private String name;
        
          private String email;
        
          @Column(name = "mobile_number")
          private String mobileNumber;
        
          //JsonProperty 설정으로 json 형식의 ui어플리케이션에서만 pwd를 입력받도록 할 수 있다.
          @JsonProperty(access = JsonProperty.Access.WRITE_ONLY)
          private String pwd;
        
          private String role;
        
          @Column(name = "create_dt")
          @JsonIgnore
          private Date createDt;


        }


        • Loans
        import jakarta.persistence.Column;
        import jakarta.persistence.Entity;
        import jakarta.persistence.Id;
        import jakarta.persistence.Table;
        import lombok.Getter;
        import lombok.Setter;
        
        import java.sql.Date;
        
        @Entity
        @Getter @Setter
        @Table(name = "loans")
        public class Loans{
        
            @Id
            @Column(name = "loan_number")
            private long loanNumber;
        
            @Column(name = "customer_id")
            private long customerId;
        
            @Column(name = "start_dt")
            private Date startDt;
        
            @Column(name = "loan_type")
            private String loanType;
        
            @Column(name = "total_loan")
            private int totalLoan;
        
            @Column(name = "amount_paid")
            private int amountPaid;
        
            @Column(name = "outstanding_amount")
            private int outstandingAmount;
        
            @Column(name = "create_dt")
            private Date createDt;
        
        }


        • Notice
        import com.fasterxml.jackson.annotation.JsonIgnore;
        import jakarta.persistence.Column;
        import jakarta.persistence.Entity;
        import jakarta.persistence.Id;
        import jakarta.persistence.Table;
        import lombok.Getter;
        import lombok.Setter;
        
        import java.sql.Date;
        
        @Entity
        @Getter @Setter
        @Table(name = "notice_details")
        public class Notice {
        
            @Id
            @Column(name = "notice_id")
            private long noticeId;
        
            @Column(name = "notice_summary")
            private String noticeSummary;
        
            @Column(name = "notice_details")
            private String noticeDetails;
        
            @Column(name = "notic_beg_dt")
            private Date noticBegDt;
        
            @Column(name = "notic_end_dt")
            private Date noticEndDt;
        
            @JsonIgnore
            @Column(name = "create_dt")
            private Date createDt;
        
            @JsonIgnore
            @Column(name = "update_dt")
            private Date updateDt;
        
        }
        • repository 패키지
        더보기
        • AccountsRepository
        import com.kiwimel0n.model.Accounts;
        import org.springframework.data.repository.CrudRepository;
        import org.springframework.stereotype.Repository;
        
        @Repository
        public interface AccountsRepository extends CrudRepository<Accounts, Long> {
        
            Accounts findByCustomerId(long customerId);
        
        }


        • AccountTransactionsRepository
        import com.kiwimel0n.model.AccountTransactions;
        import java.util.List;
        
        import org.springframework.data.repository.CrudRepository;
        import org.springframework.stereotype.Repository;
        
        
        @Repository
        public interface AccountTransactionsRepository extends CrudRepository<AccountTransactions, String> {
        	
        	List<AccountTransactions> findByCustomerIdOrderByTransactionDtDesc(long customerId);
        
        }


        • CardsRepository
        import com.kiwimel0n.model.Cards;
        import java.util.List;
        
        
        import org.springframework.data.repository.CrudRepository;
        import org.springframework.stereotype.Repository;
        
        
        @Repository
        public interface CardsRepository extends CrudRepository<Cards, Long> {
        
          List<Cards> findByCustomerId(long customerId);
        
        }


        • ContactRepository
        import com.kiwimel0n.model.Contact;
        import org.springframework.data.repository.CrudRepository;
        import org.springframework.stereotype.Repository;
        
        
        @Repository
        public interface ContactRepository extends CrudRepository<Contact, String> {
        	
        	
        }


        • CustomerRepository
        import com.kiwimel0n.model.Customer;
        import java.util.Optional;
        import org.springframework.data.repository.CrudRepository;
        import org.springframework.stereotype.Repository;
        
        @Repository
        public interface CustomerRepository extends CrudRepository<Customer,Long> {
        
          Optional<Customer> findByEmail(String email);
        
        }


        • LoansRepository
        import com.kiwimel0n.model.Loans;
        import java.util.List;
        import org.springframework.data.repository.CrudRepository;
        import org.springframework.stereotype.Repository;


        @Repository
        public interface LoanRepository extends CrudRepository<Loans, Long> {
        	
        	List<Loans> findByCustomerIdOrderByStartDtDesc(long customerId);
        
        }


        • NoticeRepository
        import com.kiwimel0n.model.Notice;
        import java.util.List;
        import org.springframework.data.jpa.repository.Query;
        import org.springframework.data.repository.CrudRepository;
        import org.springframework.stereotype.Repository;


        @Repository
        public interface NoticeRepository extends CrudRepository<Notice, Long> {
        	
        	@Query(value = "from Notice n where CURDATE() BETWEEN noticBegDt AND noticEndDt")
        	List<Notice> findAllActiveNotices();
        
        }
        • Controller 패키지
        더보기
        • AccountController
        import com.kiwimel0n.model.Accounts;
        import com.kiwimel0n.repository.AccountsRepository;
        import lombok.RequiredArgsConstructor;
        import org.springframework.web.bind.annotation.GetMapping;
        import org.springframework.web.bind.annotation.RequestParam;
        import org.springframework.web.bind.annotation.RestController;
        
        @RestController
        @RequiredArgsConstructor
        public class AccountController {
        
          private final AccountsRepository accountsRepository;
        
          @GetMapping("/myAccount")
          public Accounts getAccountDetails(@RequestParam long id){
            Accounts accounts = accountsRepository.findByCustomerId(id);
            if (accounts != null) {
              return accounts;
            }else {
              return null;
            }
          }
        
        
        }


        • BalanceController
        import com.kiwimel0n.model.AccountTransactions;
        import com.kiwimel0n.repository.AccountTransactionsRepository;
        import java.util.List;
        import lombok.RequiredArgsConstructor;
        import org.springframework.web.bind.annotation.GetMapping;
        import org.springframework.web.bind.annotation.RequestParam;
        import org.springframework.web.bind.annotation.RestController;
        
        @RestController
        @RequiredArgsConstructor
        public class BalanceController {
        
          private final AccountTransactionsRepository accountTransactionsRepository;
        
          @GetMapping("/myBalance")
          public List<AccountTransactions> getBalanceDetails(@RequestParam long id){
            List<AccountTransactions> accountTransactions = accountTransactionsRepository.
                findByCustomerIdOrderByTransactionDtDesc(id);
            if(accountTransactions != null){
              return accountTransactions;
            }else
              return null;
          }
        
        }


        • CardsController
        import com.kiwimel0n.model.Cards;
        import com.kiwimel0n.repository.CardsRepository;
        import java.util.List;
        import lombok.RequiredArgsConstructor;
        import org.springframework.web.bind.annotation.GetMapping;
        import org.springframework.web.bind.annotation.RequestParam;
        import org.springframework.web.bind.annotation.RestController;
        
        @RestController
        @RequiredArgsConstructor
        public class CardsController {
        
          private final CardsRepository cardsRepository;
        
          @GetMapping("/myCards")
          public List<Cards> getCardsDetails(@RequestParam long id){
            List<Cards> cards = cardsRepository.findByCustomerId(id);
            if (cards != null) {
              return cards;
            }else {
              return null;
            }
          }
        
        
        }


        • ContactController
        import com.kiwimel0n.model.Contact;
        import com.kiwimel0n.repository.ContactRepository;
        import java.sql.Date;
        import java.util.Random;
        import lombok.RequiredArgsConstructor;
        import org.springframework.web.bind.annotation.PostMapping;
        import org.springframework.web.bind.annotation.RequestBody;
        import org.springframework.web.bind.annotation.RestController;
        
        @RestController
        @RequiredArgsConstructor
        public class ContactController {
        
          private final ContactRepository contactRepository;
        
          @PostMapping("/contact")
          public Contact saveContactInquiryDetails(@RequestBody Contact contact){
            contact.setContactId(getServiceReqNumber());
            contact.setCreateDt((new Date(System.currentTimeMillis())));
            return contactRepository.save(contact);
          }
        
          public String getServiceReqNumber() {
            Random random = new Random();
            int ranNum = random.nextInt(999999999 - 9999) + 9999;
            return "SR" + ranNum;
          }
        
        }


        • LoansController
        import com.kiwimel0n.model.Loans;
        import com.kiwimel0n.repository.LoanRepository;
        import java.util.List;
        import lombok.RequiredArgsConstructor;
        import org.springframework.web.bind.annotation.GetMapping;
        import org.springframework.web.bind.annotation.RequestParam;
        import org.springframework.web.bind.annotation.RestController;
        
        @RestController
        @RequiredArgsConstructor
        public class LoansController {
        
          private final LoanRepository loanRepository;
        
          @GetMapping("/myLoans")
          public List<Loans> getLoansDetails(@RequestParam long id){
            List<Loans> loans = loanRepository.findByCustomerIdOrderByStartDtDesc(id);
            if( loans != null) {
              return loans;
            }else{
              return null;
            }
          }
        
        
        }


        • NoticesController
        import com.kiwimel0n.model.Notice;
        import com.kiwimel0n.repository.NoticeRepository;
        import java.util.List;
        import java.util.concurrent.TimeUnit;
        import lombok.RequiredArgsConstructor;
        import org.springframework.http.CacheControl;
        import org.springframework.http.ResponseEntity;
        import org.springframework.web.bind.annotation.GetMapping;
        import org.springframework.web.bind.annotation.RestController;
        
        @RestController
        @RequiredArgsConstructor
        public class NoticesController {
        
          private final NoticeRepository noticeRepository;
        
          @GetMapping("/notices")
          public ResponseEntity<List<Notice>> getNotices(){
            List<Notice> notices = noticeRepository.findAllActiveNotices();
            if(notices != null) {
              return ResponseEntity.ok()
                  .cacheControl(CacheControl.maxAge(60, TimeUnit.SECONDS))
                  .body(notices);
            } else {
              return null;
            }
          }
        
        
        }


        • UserController
        import com.kiwimel0n.model.Customer;
        import com.kiwimel0n.repository.CustomerRepository;
        import java.sql.Date;
        import java.util.Optional;
        import lombok.RequiredArgsConstructor;
        import org.springframework.http.HttpStatus;
        import org.springframework.http.ResponseEntity;
        import org.springframework.security.core.Authentication;
        import org.springframework.security.crypto.password.PasswordEncoder;
        import org.springframework.web.bind.annotation.PostMapping;
        import org.springframework.web.bind.annotation.RequestBody;
        import org.springframework.web.bind.annotation.RequestMapping;
        import org.springframework.web.bind.annotation.RestController;
        
        @RestController
        @RequiredArgsConstructor
        public class UserController {
        
          private final CustomerRepository customerRepository;
          private final PasswordEncoder passwordEncoder;
        
          @PostMapping("/register")
          public ResponseEntity<String> registerUser(@RequestBody Customer customer) {
        
            try {
                String hashPwd = passwordEncoder.encode(customer.getPwd());
                customer.setPwd(hashPwd);
                customer.setCreateDt(new Date(System.currentTimeMillis()));
                Customer savedCustomer = customerRepository.save(customer);
        
                if(savedCustomer.getId() > 0){
                  return ResponseEntity.status(HttpStatus.CREATED)
                      .body("Given user details are successfully registered");
                }else {
                  return ResponseEntity.status(HttpStatus.BAD_REQUEST)
                      .body("user register failed");
                }
            }catch(Exception e) {
              return ResponseEntity.status(HttpStatus.INTERNAL_SERVER_ERROR)
                  .body("An exception occurred: " +e.getMessage());
        
            }
          }
        
          @RequestMapping("/user")
          public Customer getUserDetailsAfterLogin(Authentication authentication){
            Optional<Customer> optionalCustomer = customerRepository.findByEmail(authentication.getName());
            return optionalCustomer.orElse(null);
          }
        }

        CORS(Cross Orign Resource Sharing) 대하여


        만약 프론트엔드(React, Vue, Angular)와 같은 프레임워크로 만든 클라이언트 애플리케이션에서 우리가 만든 백엔드 애플리케이션의 API를 요청을 하여 응답을 받으려고 한다면 


        이러한 CORS 정책으로인 해 block이 됐다고 오류가 발생할 것이다. PostMan과 같은 프로그램으로 API를 직접 호출하는것은 응답이 정상적으로 받아지지만, 가정한 상황에선 안된다. 이것을 해결하기 위해 우리는 CORS 정책을 알아보고 클라이언트 애플리케이션과 백엔드 애플리케이션의 통신이 어떻게 하는 지 알아보도록 하고자 한다.


        CORS 란?


        CORS의 전체 명칭은 교차 출처 자원 공유(Cross Origin Resource Sharing)으로 브라우저 클라이언트에서 실행되는 스크립트가 다른 출처의 리소스와 상호작용할 수 있게 하는 프로토콜이다.


        여기서 출처는 URL 또는 도메인 이름으로 세가지의 매개변수 조합이다.

        1. HTTP or HTTPS

        2. 도메인 이름 or 호스트 이름

        3.포트 번호


        출처에 대한 이해를 바탕으로 교차 출처 자원 공유(CORS)가 무엇인지 알아보려고 한다.


        이름 자체로 두개의 다른 출처는 서로 다른 출처에서 배포된 두개의 다른 애플리케이션을 말한다. 이들의 서로 간의 통신을통해 리소스를 공유하려고 한다는 것이다. 기본적으로 최슨의 브라우저에 내장된 CORS 정책으로 다른 출처를 가진 애플리케이션 간의 통신을 차단 할것이다. 

        ex) domain01.com 에 배포된 클라이언트 애플리케이션과 domain02.com에 배포된 백엔드 애플리케이션에서 

        domain01.com에서 domain02.com의 백엔드 API를 호출하려고한다하면 출처가 다르기 때문에 기본적으로 CORS 정책에 의해 차단된다. 


        이러한 이유는

        일반적으로 대부분의 경우에 서로다른 출처에 배포된 애플리케이션은 특별한 시나리오가 없는 이상 기본적으로 통신하지 않기 때문에 보안적으로 조심하려고하기 때문이다.


        이제는 CORS에 대해 알았기 때문에 다른 출처에 배포된 애플리케이션이 통신을 원할때 어떻게 해야할지 알아보려고한다.


        CORS 정책 허용 설정


        1. @CrossOrigin 어노테이션 사용하기

        @CrossOrigin(origins = "출처URL")
        @GetMapping("/example")
        public String exampleController(){
        
        	return "example";
        }


        컨드롤러 단에서 @CrossOrigin 을 사용하여 CORS 설정을 할 수 있다. 하지만 컨트롤러가 수십가지가 넘어가면 개별적으로 설정해주기 번거러움으로 이 방법은 권장하진 않는다.


        2.  CorsConfigurationSource @Bean등록

        @Bean
        public CorsConfigurationSource corsConfigurationSource() {
            CorsConfiguration configuration = new CorsConfiguration();
            configuration.setAllowedOriginPatterns(List.of("*")); 
            // 모든 도메인 허용  
            configuration.setAllowedMethods(List.of("GET", "POST", "PUT", "DELETE", "OPTIONS"));
            configuration.setAllowedHeaders(List.of("*"));
            configuration.setAllowCredentials(true);
            configuartion.setMaxAge(3600L);// 캐시가능시간 설정 second 단위 계산
        
            UrlBasedCorsConfigurationSource source = new UrlBasedCorsConfigurationSource();
            //URL 패턴별 CORS 정책을 관리하는 컨테이너
            source.registerCorsConfiguration("/**", configuration);
            //모든 요청 경로에 동일한 정책을 적용
            return source;
        }
        
        
        @Bean
        public SecurityFilterChain securityFilterChain(HttpSecurity http) throws Exception {
            http
                .csrf(csrf -> csrf.disable()) // 개발 단계에서 CSRF 비활성화
                .cors(cors -> cors.configurationSource(corsConfigurationSource())) // CORS 적용
                .authorizeHttpRequests((requests) -> requests
                .requestMatchers("/myAccount", "/myBalance", "/myLoans", "myCards", "/user").authenticated()
                .requestMatchers("/notices", "/contact","/error","/register", "/invalidSession").permitAll());
        
            return http.build();
        }


        @ Bean으로 전역설정을 등록하고 SecurityFilterChain에서 .cors(cors -> confgiurationSource(corsConfigurationSource())로 연결함으로 설정을 재사용 가능하고 여러 FilterChain에서 동일한 Bean을사용 가능하다.


        3. 익명 클래스 방식 

         @Bean
          SecurityFilterChain defaultSecurityFilterChain(HttpSecurity http) throws Exception {
        
        http.cors(corsConfig -> corsConfig.configurationSource(new CorsConfigurationSource() {
                  @Override
                  public CorsConfiguration getCorsConfiguration(HttpServletRequest request) {
                    CorsConfiguration config = new CorsConfiguration();
                    config.setAllowedOrigins(List.of("http://localhost:4200"));
                    config.setAllowedMethods(List.of("*"));
                    config.setAllowCredentials(true);
                    config.setAllowedHeaders(List.of("*"));
                    config.setMaxAge(3600L);
                    return config;
                  }
                }))
                .csrf(csrf -> csrf.disable()) // 개발 단계에서 CSRF 비활성화
                .authorizeHttpRequests((requests) -> requests
                .requestMatchers("/myAccount", "/myBalance", "/myLoans", "myCards", "/user").authenticated()
                .requestMatchers("/notices", "/contact","/error","/register", "/invalidSession").permitAll());
                
                return http.build();
                }


        .cors()안에 new CorsConfigruation을 직접 구현함으로 SecurityFilterChain에만 국한된 설정이다. 


        이 세가지 방식들을 적절히 사용하면 클라이언트가 백엔드의 응답을 정상적으로 받을 수 있을 것이다.


        CSRF(Cross Site Request Forgery) 에 대하여


        CSRF 란?


        사이트간 요청 위조를 말하며 사용자의 명시적인 동의 없이 웹 애플리케이션에서 작업을 수행하는 것이다. 사용자의 신원을 직접적으로 도용하지는 않지만, 사용자의 의지와 상관없이 행동을 취하도록 유도하는 방식으로 악용 된다.


        예시로는 


        1. 은행 계좌 이체

        • 사용자가 은행 사이트에 로그인 한 상태
        • 공격자가 만든 악성 웹페이지에 접속하면, 그 페이지 안에 숨겨진 폼이 자동으로 실행되어 은행 사이트에 "공격자의 계좌로 돈 송금" 요청을 보낸다.
        • 사용자는 아무것도 모른 채 자신의 계좌에서 돈이 빠져나갑니다.

        2. 이메일 주소 변경

        • 사용자가 어떤 서비스에 로그인한 상태에서 공격자가 보낸 링크를 클릭합니다.
        • 그 링크를 해당 서비스에 "사용자의 이메일을 공격자의 이메일로 변경"하는 요청을 담고 있습니다.
        • 그 결과 공격자는 계정을 탈취할 수 있다.

        3. 게시판 글 작성

        • 로그인된 사용자가 악성 사이트를 방문하면, 그 사이트가 자동으로 포럼에 글을 작성하는 요청을 보낸다.
        • 사용자의 이름을 스팸이나 악성링크가 게시판에 올라가게 된다.


        핵심 포인트는 

        • CSRF는 사용자가 이미 로그인한 세션을 악용한다.
        • 공격자는 보통 피싱 메일, 악성 링크, 광고 배너 등을 통해 사용자를 속여 악성 요청을 실행시킨다.
        • 피해자는 자신이 공격에 이용된 사실을 모르는 경우가 많다.


        개발환경에서 CSRF 보호설정을 disable 하는 이유


        기본적으로 개발 환경에서는 CSRF 보호 설정을 disable을 한다.

        @Bean
        public SecurityFilterChain securityFilterChain(HttpSecurity http) throws Exception {
            http
                .csrf(csrf -> csrf.disable()) // 개발 단계에서 CSRF 비활성화
                .authorizeHttpRequests((requests) -> requests
                .requestMatchers("/myAccount", "/myBalance", "/myLoans", "myCards", "/user").authenticated()
                .requestMatchers("/notices", "/contact","/error","/register", "/invalidSession").permitAll());
        
            return http.build();
        }


        주된 이유로는 


        1. 개발 편의성 - CSRF 보안상 중요한 역할이지만, 개발단계에서 RESTAPI 테스트나 프론트엔드-백엔드 연동을 빠르게 확인해야하는 경우, 매요청을 CSRF 토큰을 발급 검증 하는 과정이 번거롭기 때문에 개발환경에서는 비활성화한다.

        2. REST API 구조와의 충돌 - CSRF는 주로 브라우저 기반 세션 쿠키인증에서 의미가 있다. 개발환경에서는 종종 JWT, OAuth2 와 같은 토큰 기반인증을 사용하거나 단순 API 호출을 테스트 하기 때문에 CSRF 보호가 불 필요 하다.

        3. 테스트 자동화 용이성 - Postman, cURL 같은 도구로 API를 테스트할 때 CSRF 토큰을 매번 포함시키는 것은 번거롭습니다. 개발 단계에서는 빠른 테스트와 디버깅을 위해 CSRF를 꺼두는 것이 일반적이다.

        4. 실제 운영 환경과 구분 - 운영 환경에서는 반드시 CSRF를 활성화해야 하지만, 개발 환경에서는 보안보다 생산성이 우선되므로 disable 설정을 기본값처럼 사용하는 경우가 많다.


        CSRF 방어방법 - CSRF 토큰 사용


        기본 설정


        Spring Security는 unsafe HTTP 메서드(POST, PUT, DELETE 등) 에 대해 잗ㅇ으로 CSRF 방어를 적용한다.


        @Bean
        SecurityFilterChain securityFilterChain(HttpSecurity http) throws Exception {
            http
                .csrf(Customizer.withDefaults()) // 기본 CSRF 보호 활성화
                .authorizeHttpRequests(auth -> auth
                    .anyRequest().authenticated()
                );
            return http.build();
        }


        별도의 설정을 하지 않아도 기본적으로 CSRF 토큰이 적용된다.


        CSRF 토큰 방어 설정


        SPA(React, Angular)와 연동할때는 쿠키 기반 저장소를 사용하여 CSRF 방어법을 사용한다.


         @Bean
          SecurityFilterChain defaultSecurityFilterChain(HttpSecurity http,
              RestClientCustomizer restClientCustomizer) throws Exception {
            CsrfTokenRequestAttributeHandler csrfTokenRequestAttributeHandler = new CsrfTokenRequestAttributeHandler();
            
            http.csrf(csrfConfig -> csrfConfig.csrfTokenRequestHandler(csrfTokenRequestAttributeHandler)
                    .ignoringRequestMatchers("/contact", "/register")
                    .csrfTokenRepository(CookieCsrfTokenRepository.withHttpOnlyFalse()))
                .addFilterAfter(new CsrfCookieFilter(), BasicAuthenticationFilter.class)
                .sessionManagement(smc -> smc.sessionCreationPolicy(SessionCreationPolicy.ALWAYS)
                .securityContext(contextConfig -> contextConfig.requireExplicitSave(false))


        • http.csrf.csrfTokenRepository(CookieCsrfTokenRepository.withHttpOnlyFalse())

        여기서  CookieCsrfTokenRepository에 대해 알아보면

        CSRF 토큰을 "XSRF-TOKEN" 이라는 쿠키에 보관하고 AngularJS의 규칙에 따라 "X-XSRF-TOKEN" 헤더에서 읽는 CsrfTokenRepository입니다. AngularJS와 함께 사용할 때는 HttpOnlyFalse()와 함께 사용해야 합니다. 라고 한다.


        이것을 통해 csrfTokenRepository를 통해 쿠키에 XSRF-TOKEN 을 브라우저 쿠키에 저장하며
        클라이언트(React, Vue 같은 SPA)가 이 쿠키에서 토큰을 읽어 AJAX 요청을 헤더( XSRF-TOKEN )에 포함 시킨다.

        withHttpOnlyFalse()를 통해 JS코드에서 쿠키를 읽어 토큰을 활용할 수 가 있다.


        • .ignoringRequestMatchers("/contact", "/register")

        보안적으로 민감하지 않는 엔드포인트를 적용시켜 CSRF 검증을 생략할 수 있다.


        • .csrfTokenRequestHandler(csrfTokenRequestAttributeHandler)

        CSRF 토큰을 요청 속성이나 헤더로 전달 할 수 있도록 RequsetHandler를 지정할 수 있다.


        • .addFilterAfter(new CsrfCookieFilter(), BasicAuthenticationFilter.class)

        CsrfCookieFilter


        filter라는 패키지를 만들어주고 CsrfCookieFilter 클래스를 생성해 주었다.

        import jakarta.servlet.FilterChain;
        import jakarta.servlet.ServletException;
        import jakarta.servlet.http.HttpServletRequest;
        import jakarta.servlet.http.HttpServletResponse;
        import java.io.IOException;
        import org.springframework.security.web.csrf.CsrfToken;
        import org.springframework.web.filter.OncePerRequestFilter;
        
        
        public class CsrfCookieFilter extends OncePerRequestFilter {
        
        
          @Override
          protected void doFilterInternal(HttpServletRequest request, HttpServletResponse response,
              FilterChain filterChain) throws ServletException, IOException {
            CsrfToken csrfToken = (CsrfToken)request.getAttribute(CsrfToken.class.getName());
            csrfToken.getToken();
            filterChain.doFilter(request, response);
          }
        }


        이필터를 생성하고 인증 필터 이후에 추가한 이유


        1. 기본적으로 Spring Security는 CSRF 토큰을 세션에 저장하지만, 클라이언트가 직접 접근할 수 없다.
        2. CookieCsrfTokenRepository를 쓰면 쿠키로 전달 할 수 있는데, 토큰을 실제로 읽는 동작이 있어야 쿠키가 채워진다.
        3. CsrfCookieFilter는 이 과정을 강제로 실행해서 항상 클라이언트가 CSRF 토큰을 받을 수 있도록 보장


        추가적으로 

        • .securityContext(contextConfig -> contextConfig.requireExplicitSave(false))
        •  .sessionManagement(smc -> smc.sessionCreationPolicy(SessionCreationPolicy.ALWAYS)

        이 두가지 설정이 추가 되었는데


        1. .securityContext(contextConfig -> contextConfig.requireExplicitSave(false))

           인증 후에  SecurityContext를 자동으로 세션에 저장하게 하는 설정


        2. .sessionManagement(smc -> smc.sessionCreationPolicy(SessionCreationPolicy.ALWAYS)

            세션을 항상 생성해 CSRF 토큰 발급/검증이 가능하도록 보장 하는 것이다. 


        이 두가지 설정을 추가 하는 이유는 CSRF는 세션 기반 토큰관리에 의존한다. 따라서 세션이 항상 존재해야하고, 인증 정보(SecurityContext)가 자동으로 세션에 저장되어야 CSRF 토큰이 정상적으로 동작한다. 즉 CSRF 토큰이 안정적으로 발급, 검증이 되도록 보장하기위해서 추가한 것이다.


        EazyBank ProjectSecurityProdConfig


        이렇게 해서 총 EazyBank ProjectSecurityProdConfig의 CORS 와 CSRF 방어설정을 적용한 소스이다.

        더보기
        import static org.springframework.security.config.Customizer.withDefaults;
        
        import com.kiwimel0n.exceptionhandling.CustomAccessDeniedHandler;
        import com.kiwimel0n.exceptionhandling.CustomBasicAuthenticationEntryPoint;
        import jakarta.servlet.http.HttpServletRequest;
        import java.util.List;
        import org.springframework.boot.web.client.RestClientCustomizer;
        import org.springframework.context.annotation.Bean;
        import org.springframework.context.annotation.Configuration;
        import org.springframework.context.annotation.Profile;
        import org.springframework.security.authentication.password.CompromisedPasswordChecker;
        import org.springframework.security.config.annotation.web.builders.HttpSecurity;
        import org.springframework.security.config.http.SessionCreationPolicy;
        import org.springframework.security.crypto.factory.PasswordEncoderFactories;
        import org.springframework.security.crypto.password.PasswordEncoder;
        import org.springframework.security.web.SecurityFilterChain;
        import org.springframework.security.web.authentication.password.HaveIBeenPwnedRestApiPasswordChecker;
        import org.springframework.security.web.csrf.CookieCsrfTokenRepository;
        import org.springframework.security.web.csrf.CsrfTokenRequestAttributeHandler;
        import org.springframework.web.cors.CorsConfiguration;
        import org.springframework.web.cors.CorsConfigurationSource;
        
        @Configuration
        @Profile("prod")
        public class ProjectSecurityProdConfig {
        
          @Bean
          SecurityFilterChain defaultSecurityFilterChain(HttpSecurity http,
              RestClientCustomizer restClientCustomizer) throws Exception {
            CsrfTokenRequestAttributeHandler csrfTokenRequestAttributeHandler = new CsrfTokenRequestAttributeHandler();
        
            http.cors(corsConfig -> corsConfig.configurationSource(new CorsConfigurationSource() {
                  @Override
                  public CorsConfiguration getCorsConfiguration(HttpServletRequest request) {
                    CorsConfiguration config = new CorsConfiguration();
                    config.setAllowedOrigins(List.of("http://localhost:4200"));
                    config.setAllowedMethods(List.of("*"));
                    config.setAllowCredentials(true);
                    config.setAllowedHeaders(List.of("*"));
                    config.setMaxAge(3600L);
                    return config;
                  }
                }))
                .csrf(csrfConfig -> csrfConfig.csrfTokenRequestHandler(csrfTokenRequestAttributeHandler)
                    .ignoringRequestMatchers("/contact", "/register")
                    .csrfTokenRepository(CookieCsrfTokenRepository.withHttpOnlyFalse()))
                    .addFilterAfter(new CsrfCookieFilter(), BasicAuthenticationFilter.class)
                .sessionManagement(smc -> smc.sessionCreationPolicy(SessionCreationPolicy.ALWAYS)
                    .invalidSessionUrl("/invalidSession")
                    .maximumSessions(1).maxSessionsPreventsLogin(true))
                .redirectToHttps(withDefaults())
               // .csrf(csrfConfig -> csrfConfig.disable())
                .authorizeHttpRequests((requests) -> requests
                .requestMatchers("/myAccount", "/myBalance", "/myLoans", "myCards", "/user").authenticated()
                .requestMatchers("/notices", "/contact","/error","/register", "/invalidSession").permitAll());
            http.formLogin(withDefaults());
            http.httpBasic(hbc -> hbc.authenticationEntryPoint(new CustomBasicAuthenticationEntryPoint()));
            http.exceptionHandling(ehc -> ehc.accessDeniedHandler(new CustomAccessDeniedHandler()));
            return http.build();
          }
          
        
          @Bean
          PasswordEncoder passwordEncoder() {
            return PasswordEncoderFactories.createDelegatingPasswordEncoder();
          }
        
          @Bean
          public CompromisedPasswordChecker compromisedPasswordChecker(){
            return new HaveIBeenPwnedRestApiPasswordChecker();
          }
        
        }


        CSRF 토큰 방어법 적용후 응답


        React, Vue와 같은 SPA에서도 CSRF 토큰을 읽고 토큰을 담아 보내야 하는 설정을 따로 적용 시켜주어야 한다. 그 설정을 여기서는 다루지는 않겠다. 


        전체적인 CSRF 토큰 흐름


        1. CSRF 토큰 발급 → 세션과 연결, 쿠키에 저장
        2. 클라이언트가 쿠키에서 토큰 읽음 → AJAX 요청 헤더에 포함
        3. 서버가 토큰 검증 → 세션에 저장된 값과 비교
        4. SecurityContext 자동 저장 → 인증 상태 유지
        5. 특정 요청은 예외 처리 → /login, /register 등은 CSRF 검증 생략
        •  


        Kiwimel0n

        Kiwimel0n

        내용정리

        SecurityContext 와 SecurityContextHolder의 역할, Spring Security에서의 로그인 사용자 세부정보 로드 - SpringSecurity 6.x EazyBytes, Udemy EazyBank

        springSecurity 2026. 2. 10. 18:27


        목차


          SecurityContext와 SecurityContextHolder


          Spring Security 프레임워크 내부에서 인증(Authentication)이 완료되면 프레임워크는 이미 인증된 세부 정보를 나중에 사용할 수 있도록 SecurityContext 안에 저장합니다.

          SecurityContext 계층구조


          누군가가 SecurityContext에 대해 질문할 때 기억해야할 계층구조는 위의 사진과 같다.


          인증 과정중에 인증 객체(Authentication object)가 생성된다.

          이 Authentication 객체는 내부에는 주체(principal)라는 username, credentials, authorities와 같은 세부정보가 포함된다.

          그리고 isauthenticated라는 boolean 변수도 포함된다.


          인증 작업이 완료되면 SpringSecurity  프레임 워크는  SecurityContext 객체 내부에 인증 세부정보를 저장한다.


          SecurityContext는 인터페이스로 구현체로는 SecurityContextImplementation 이라는 이름을 가지고 있다.


          SecurityContext는 SecurtiyContextHolder이라는 클래스에 의해 관리되며 이 홀더 클래스는 SecurityContext의 내부의 세부정보를 관리할 책임을 가지고 있다.


          SecurityContext

          더보기
          SecurityContext 인터페이스


          현재 실행중인 스레드와 관련된 최소 보안 정보를 정의하는 인터페이스. SecurityContext는 SecurityContextHolder에 저장된다.


          Authentication getAuthentication() : 현재 인증된 principal or Authentication request token을 가져오는 메서드, 인증정보가 없는 경우 null을 반환


          void setAuthentication(Authentication authentication)  : 현재의 Authentication Principal을 바꾸거나, 인증 정보를 지운다. 매개변수(authentication)는 새로운 Authentication 인증 토큰, 인증 정보를 저장하지 않을 시에는 null


          구현체로 SecurityContextImpl이 있으며


          클래스 설명을 보면


          SecurityContextImpl class 설명

          SecurityContext의 기본이 되는 구현체로, SecurityContextHolder 전략의 기본값으로 사용된다.


          SecurityContextHolder


          더보기
          public class SecurityContextHolder {
          
          	public static final String MODE_THREADLOCAL = "MODE_THREADLOCAL";
          
          	public static final String MODE_INHERITABLETHREADLOCAL = "MODE_INHERITABLETHREADLOCAL";
          
          	public static final String MODE_GLOBAL = "MODE_GLOBAL";
          
          	private static final String MODE_PRE_INITIALIZED = "MODE_PRE_INITIALIZED";
          
          	public static final String SYSTEM_PROPERTY = "spring.security.strategy";
          
          	private static String strategyName = System.getProperty(SYSTEM_PROPERTY);
          
          	private static SecurityContextHolderStrategy strategy;
          
          	private static int initializeCount = 0;
          
          	static {
          		initialize();
          	}
          
          	private static void initialize() {
          		initializeStrategy();
          		initializeCount++;
          	}
          
          	private static void initializeStrategy() {
          		if (MODE_PRE_INITIALIZED.equals(strategyName)) {
          			Assert.state(strategy != null, "When using " + MODE_PRE_INITIALIZED
          					+ ", setContextHolderStrategy must be called with the fully constructed strategy");
          			return;
          		}
          		if (!StringUtils.hasText(strategyName)) {
          			// Set default
          			strategyName = MODE_THREADLOCAL;
          		}
          		if (strategyName.equals(MODE_THREADLOCAL)) {
          			strategy = new ThreadLocalSecurityContextHolderStrategy();
          			return;
          		}
          		if (strategyName.equals(MODE_INHERITABLETHREADLOCAL)) {
          			strategy = new InheritableThreadLocalSecurityContextHolderStrategy();
          			return;
          		}
          		if (strategyName.equals(MODE_GLOBAL)) {
          			strategy = new GlobalSecurityContextHolderStrategy();
          			return;
          		}
          		// Try to load a custom strategy
          		try {
          			Class<?> clazz = Class.forName(strategyName);
          			Constructor<?> customStrategy = clazz.getConstructor();
          			strategy = (SecurityContextHolderStrategy) customStrategy.newInstance();
          		}
          		catch (Exception ex) {
          			ReflectionUtils.handleReflectionException(ex);
          		}
          	}
          
          	
          	public static void clearContext() {
          		strategy.clearContext();
          	}
          
          	
          	public static SecurityContext getContext() {
          		return strategy.getContext();
          	}
          
          	
          	public static Supplier<SecurityContext> getDeferredContext() {
          		return strategy.getDeferredContext();
          	}
          
          	
          	public static int getInitializeCount() {
          		return initializeCount;
          	}
          
          	
          	public static void setContext(SecurityContext context) {
          		strategy.setContext(context);
          	}
          
          	public static void setDeferredContext(Supplier<SecurityContext> deferredContext) {
          		strategy.setDeferredContext(deferredContext);
          	}
          
          	
          	public static void setStrategyName(String strategyName) {
          		SecurityContextHolder.strategyName = strategyName;
          		initialize();
          	}
          
          	
          	public static void setContextHolderStrategy(SecurityContextHolderStrategy strategy) {
          		Assert.notNull(strategy, "securityContextHolderStrategy cannot be null");
          		SecurityContextHolder.strategyName = MODE_PRE_INITIALIZED;
          		SecurityContextHolder.strategy = strategy;
          		initialize();
          	}
          
          	
          	public static SecurityContextHolderStrategy getContextHolderStrategy() {
          		return strategy;
          	}
          
          	
          	public static SecurityContext createEmptyContext() {
          		return strategy.createEmptyContext();
          	}
          
          	@Override
          	public String toString() {
          		return "SecurityContextHolder[strategy='" + strategy.getClass().getSimpleName() + "'; initializeCount="
          				+ initializeCount + "]";
          	}
          
          }


          클래스 설명으로


          주어진 Security를 현재 실행중인 스레드와 연결한다.

          이 클래스는 SecurityContextHolderStartegy 인스턴스에 위임하는 일련의 정적 메서드를 제공한다.

          이클래스의 목적은 주어진 JVM에 사용해야하는 전략을 편리하게 지정하는 방법을 제공하는 것이다.

          이클래스의 모든 것이 정적 으로 되어 있어 코드를 호출하는 것에서 사용하기 쉽다.


          SecurityContextHolder는 SecurityContext객체를 저장하는 금고와 같다고 비유한다.


          SecurityContextHolder는 SecurityContext라는 귀중한 정보를 안전하게 저장하기 위해서는 전략들이 필요한데

          기본적으로 ThreadLocal이라는 전략을 사용하여 SecurityContext를 저장한다.


          기본적으로 Spring Security에서 제공되는 전략은 3가지가 있는데  알아보겠다.


          • ThreadLocal

          클라이언트가 백엔드 애플리케이션에 요청을 보낼 때마다 각 각의 새로운 스레드(Thread)가 생성된다.

          이 각각의 Thread 안에 자신만의 ThreadLocal을 갖게 되어 ThreadLocal 안에 저장된 모든 객체가 Thread의 모든 여정에 일부로 호출되어 모든 메서드에 접근할 수 있게 된다.


          • IntheratableThreadLocal

          ThreadLocal과 유사하지만, 비동기 메서드 실행 시 SpringSecurity가 SeucurityContext를 다음 Thread에 복사하도록 지시하는 전략

          @Async 어노테이션을 사용하는 메서드를 실행하는 새 Thread가 SecurityContext를 상속받게 된다.

          @Async 어노테이션(메서드에 적용시키는 어노테이션으로 스프링이 해당 메서드를 별도의 Thread에 실행시키도록 지시하는 데 사용)

          • GLOBAL

           애플리케이션의 모든 Thread가 동일한 SecurityContext 인스턴스나 객체를 보게 된다.

          수천 개의 Thread가 있는 경우 모든 수천 개의 Thread가 동일한 SecurityContext 세부 사항을 보게 된다는 것이다.

          이 모드는 웹 애플리케이션에서 권장하지도 않는 모드이며 적용시키면 안 된다.

          사용되는 시나리오는 데스크톱 애플리케이션을 구현할 때 사용된다.


          SecurityContextHolderStartegy 설정


          전략을 설정할 Bean을 생성한다.

          SecurityConfig 안에

          @Bean
              public InitializingBean initializingBean() {
                  return () -> SecurityContextHolder.setStrategyName(SecurityContextHolder.MODE_INHERITABLETHREADLOCAL);
              }


          Bean을 생성하여 기본모드인 ThreadLocal을 InheritableThreaLocal로 바꾸는 예제이다.


          SpringSecurity에 로그인 사용자 정보 불러오기


          인증된 사용자 정보를 로드하는 방법으로는 두 가지가 있다.


          • SecurityContextHolder에 정적 호출을 사용하는 방법
          @RestController
          public class SomeController {
          
          	@GetMapping("/username")
              public String currentUserName() {
              	Authentication authentication = SecurityContextHolder.getContext().getAuthentication();
                  String currentPrincipalName = authentication.getName();
                  return currentPrincipalName;
                  }
          }


          • 인증방식을 메서드 인자로 직접 언급하는 방법

          프레임워크는 SecurityContextHolder에 추출하여 처리한다. Authentication 객체 대신 Principal을 언급할 수 있다.


          //Authentication 객체는 일반적으로 컨트롤러 단위보단 필터 단위 또는
          //SecurityContext를 직접 다뤄야할때 사용
          @RestController
          public class SomeController {
          
          	@GetMapping("/username")
              public String currentUserName(Authentication authentication) {
                  return authentication.getName();
                  }
          }


          //@AuthenticationPricipal 을 사용한 경우 : UserDetails를 커스텀 해서 사용할 경우 쓰고 
          //일반적으로 많이 사용된다.
          @RestController
          public class SomeController {
          
          	@GetMapping("/username")
              public String currentUserName(@AuthenticationPrincipal UserDetails userDetails) {
                  return userDetails.getUsername();
                  }
          }
          Kiwimel0n

          Kiwimel0n

          내용정리

          일반적인 사용 사례를 위한 Spring Security 사용자 정의 (HTTPS Redirection, Security Exception Handling, AuthenticationEntryPoint, Session Config, AuthenticationEvents)- SpringSecurity 6.x Udemy EazyBytes EazyBank

          springSecurity 2026. 2. 5. 17:23


          목차


            시작 글


            애플리케이션을 서비스하는 데 있어 SpringSecurity를 이용하여 일반적으로 설정하는 케이스들에 대해 알아보려고 한다.


            SpringSecurity를 활용한 HTTPS 트래픽만 허용하기


            실제 서비스를 하기 위해선 HTTPS 프로토콜을 사용해아한다.


            HTTPS가 기본인 이유는?

            • 인증: SSL/TLS 인증서를 통해 서버의 신뢰성을 검증할 수 있어, 피싱이나 중간자 공격(MITM)을 방지합니다.
            • 무결성 보장: 데이터가 전송 중에 변조되지 않았음을 보장합니다.
            • 브라우저 정책: 최신 브라우저는 로그인, 결제, 쿠키 전송 등 민감한 작업을 HTTP에서 차단하거나 경고를 띄웁니다.
            • 규제 및 표준 준수: GDPR, PCI-DSS(결제 카드 산업 보안 표준) 등은 HTTPS 사용을 요구합니다.

            하지만 우리가 테스트하는 환경에서는 HTTPS 프로토콜을 사용할 이유는 없어서

            Prod 환경에서만 설정을 해주면 된다.


            ProjectSecurityProdConfig 소스코드


            @Configuration
            @Profile("prod")
            public class ProjectSecurityProdConfig {
            
              @Bean
              SecurityFilterChain defaultSecurityFilterChain(HttpSecurity http,
                  RestClientCustomizer restClientCustomizer) throws Exception {
                http.redirectToHttps(withDefaults())
                    //.requiresChannel(rcc-> rcc.anyRequest().requiresSecure() )
                    // depracated됨으로 위의 redirectToHttps를 사용하게됨
                    .csrf(csrfConfig -> csrfConfig.disable())
                    .authorizeHttpRequests((requests) -> requests
                    .requestMatchers("/myAccount", "/myBalance", "/myLoans", "myCards").authenticated()
                    .requestMatchers("/notices", "/contact","/error","/register").permitAll());
                http.formLogin(withDefaults());
                http.httpBasic(withDefaults());
                return http.build();
              }
            
              @Bean
              PasswordEncoder passwordEncoder() {
                return PasswordEncoderFactories.createDelegatingPasswordEncoder();
              }
            
              @Bean
              public CompromisedPasswordChecker compromisedPasswordChecker(){
                return new HaveIBeenPwnedRestApiPasswordChecker();
              }
            
            }


            강의에서는 .requriesChannel() 메서드를 통해 HTTP 프로토콜을 HTTPS 리다이렉션을 해주었지만, Depracted 됨으로 인해 .redirectToHttps() 메서드를 사용해 주면 된다. 


            SpringSecurity 예외처리(Exception Handling)


            PostMan을 사용하여 BasicAuth 인증유형을 통하여 인증을 하거나 브라우저를 사용하여 로그인 페이지를 통해 자격증명을 해야 하는 경우 


            유효한 사용자 증명을 입력하지 않으면 두 가지 경우로 응답을 받을 수가 있다.

            하지만 때때로 실제 애플리케이션 환경에서는 이 응답 대신 다른 응답을 보내야 하는 요구사항을 받을 가능성이 크다.


            다른 필드나 다른 값을 보내야 할 수도 있고, body 부분의 본문을 커스텀하는 것 외에도 응답 내부에 자체 응답 헤더를 보내야 하는 요구사항이 있을 수도 있다.


            이러한 요구 사항들을 수용하고 애플리케이션에 반영을 하려면 Spring Security가 예외를 처리하는 방식을 이해한 후에 Postman에서 보고 있는 응답을 커스텀할 수 있다. 


            ExceptionTranslationFilter


            일반적으로 Spring Security 프레임워크는 애플리케이션 코어 내에서 발생하는 모든 종류의 비즈니스 예외나 런타임 예외에 대해 신경 쓰지 않는다. 오직 보안 관련 예외만 신경 쓰고 처리할 것이다.  따라서 Security 프레임 워크 내에서는 두 가지 유형의 예외가 발생할 수 있다.


            • AuthenticationException

            401 status를 말하는 것으로, 사용자나 클라이언트 애플리케이션이 인증되지 않았음을 나타낸다.

            따라서 BadCredentialsException, UsernameNotFoundException과 같은 모든 예외들이 AuthenticationException 범주에 속한다.


            • AccessDeniedException

            403 status를 말하는 것으로, 사용자나 클라이언트 애플리케이션이 올바르게 인증되었지만 보안된 API에 접근할 수 있는 충분한 권한이나 역할이 없음을 의미한다.


            기본적으로 Spring Security는 두 가지의 유형의 예외를 처리하는 데만 중점을 둔다. 이 두 가지 예외를 모니터링하는 필터가 있는데 이것이 바로 ExceptionTranslationFilter이다.


            ExceptionTranslationFilter 책임

            1. 수신된 유형이 AuthenticationException 관련인지 AccessDeniedException관련인지 확인한다.

            2 - 1. AuthenticationException과 관련이 있는 경우 AuthenticationEntryPoint 관련 구현체를 호출한다.

            2 - 2. AccessDeniedException과 관련이 있는 경우 AccessDeniedHandler인터페이스 관련 구현체를 호출한다.


            이를 통해 AuthenticationException 시나리오와 AccessDeniedException 시나리오에서 전송해야 하는 사용자 정의 로직과 사용자 정의 응답을 작성하는 법에 대해 어느 정도 명확해졌다. 이제는 AuthenticationEntryPoint와 AccessDeniedHandler 인터페이스에 대해 재정의를 하고 상용자 정의 로직을 실행하기 위한 우리만의 로직을 작성하기만 하면 된다.


            이제 ExceptionTranslationFilter안을 확인해 보겠다.


            • ExceptionTranslationFilter 뜯어보기
            더보기

            기본적으로 클래스 설명에 필터체인 내의 AccessDeniedException과 AuthenticationException을 처리한다고 명확히 강조하고 있다. SpringSecurity내부에 인증, 인가 흐름 또는 일반적인 보안 시나리오를 처리하는 동안 실행되는 많은 필터들이 있고 이러한 모든 시나리오에서 코드들이 AuthenticationException 또는 AccessDeniedException을 발생시키는 경우 이 필터가 해당 예외를 처리해야 한다.


            dofilter 메서드를 살펴보면 비즈니스 로직은 별로 없고 다음 필터를 호출하는 것 외에는 아무것도 하지 않는다.

            그러나 Exception이 발생하는 시나리오에서는 catch 블록이 실행되며 catch 블록 내부에 메서드 호출이 있는데

            handleSpringSecurityException()이 있다.


            handleSpringSecurityException()


             이 메서드 안에서는 예외 인스턴스가 무엇인지 확인한다. 


            • AuthenticationException인 경우 handleAuthenticationException()을 호출하려고한다.


            handleAuthenticationException() 메서드에서는 sendStartAuthentication() 메서드를 호출을 하며


             sendStartAuthentication() 메서드는 또 다른 메서드를 호출하려고 한다.

             이 메서드 안에서 해당 commence() 메서드를 호출하여 authenticationEntryPoint() 구현체중 하나를 호출하는 것을 볼 수 있다.


            • AccessDeneidException인 경우 handleDeniedException()을 호출하려고 한다.


            이 내부에도 로직이 존재하며 사용자가 익명으로 보안 페이지에 접근하려고 하면 이러한 시나리오에서는 동일한 메서드인

            setAuthentication() 메서드를 호출할 것이며 이 메서드 내부에서는 여전히 AuthenticationEntryPoint를 호출할 것이다.


            이러한 이유는

            누군가가 자격 증명 없이 접근하려고 하면 익명 사용자가 되기 때문이다.

            모든 익명 시나리오에 대해 AccessDenied 흐름으로 간주해서는 안된다. 여전히 AuthenticationException 흐름으로 간주해야 하기 때문이다. 익명의 사용자는 말 그대로 인증된 적이 없기 때문이다. 그래서 프레임워크 일부 시나리오에서 AccessDeniedException을 발생시킬 수 있음에도 handleAccessDeniedException() 메서드 내부에서는 먼저 예외가 익명흐름(Anonymous Flow) 중에 발생했는지 확인을 한다. 익명의 흐름이 발생한 경우 동일한 AuthenticationEntryPoint 비즈니스 로직을 호출할 것이다. 반면에 익명 시나리오가 아닌 일반 인증 시나리오에서 발생한 경우 handle() 메서드를 호출하여

            accessDeniedHandler 구현체 중 하나를 호출할 것이다.

            AuthenticationEntryPoint


            더보기


            인증 스키마를 시작하는데 ExceptionTranslationFilter가 사용된다고 한다. 

            단 하나의 추상 메서드인 commence()가 있는데 이 인터페이스의 구현 클래스가 무엇인지 이해하려고 하면 인증이 실패하는 httpBasicAuthentication 시나리오에서 많은 구현체들이 있다는 것을 알 수 있다.


            자격증명을 실패한 응답을 받은 후 header


            그런 다음 BasicAuthenticationEntryPoint가 호출되고 commence() 메서드 내부에 401과 같이 인증되지 않은 status와 함께 인증되지 않았다는 메시지를 보내는 로직이 있다. 401 status와 message 외에도 realm 세부 정보가 포함된 기본 응답 헤더인 WWW-Authenticate를 보내려고 한다. 그렇기 때문에 헤더 내부를 볼 수 있는 것이다.


            이런 식으로 만약 사용자 정의 ResponseBody와 함께 자체 응답 헤더를 보내고자 한다면 AuthenticationEntryPoint 구현하는 새로운 클래스를 정의해야 한다. commence() 메서드를 재정의하여 사용자 정의 로직을 모두 정의할 수 있다.


            AccessDeniedHandler

            더보기


            AccessDeniedHandler 구현체


            handle()이라는 단일 추상메서드가 구성되어 있다. 이 handle() 메서드 내부에서만 AccessDeniedException 시나리오에서 어떤 일이 일어날지에 대한 로직을 작성해야 한다. 이 인터페이스 구현체들을 살펴보면 상당한 양의 핸들러 구현 클래스가 존재한다. 그중 제일 중요한 것 중의 하나가 AccessDeniedHandlerImpl이다.


            우리 애플리케이션에 자격증명으로 인증은 완료가 되지만 구현되지 않은 api인 예를 들어 /myAccount1  이라던지 로 요청을 하면 디버그 시에


            AccessDeniedHandlerImpl에서 중단점을 실시할 시 멈추는 것을 알 수 있다.

            그 이후 SpringSecurity에서 만든 403 응답 포맷을 받는 것이다. 이 응답을 사용자 정의 하고 싶다면 이 클래스와 같은 구현클래스를 정의하고 handle() 메서드 내에 사용자 정의 로직을 작성하면 된다.


            예외처리 사용자 정의하기 (AuthenticationEntryPoint, AccessDeniedHandler)


            401 관련 예외 - AuthenticationEntryPoint 사용자 정의 


            HTTP Basic 인증 시나리오에서 호출되는 BasicAuthenticationEntryPoint를 커스텀해보겠다. 이것은 HTTP Basic 인증에서만 호출될 것이면 일반적인 UI 로그인 흐름에서는 호출이 안될 것이다. 따로 로그인 흐름 관련 EntryPoint는 LoginURLAuthenticationEntryPoint가 존재하기도 하며 필요하다면 이것을 이용하여 커스텀하면 될 것이다.


            exceptionhandling이란 패키지를 생성하여 CustomBasicAuthenticationEntryPoint 클래스를 생성해 주었다.

            • CustomBasicAuthenticationEntryPoint
            더보기


            public class CustomBasicAuthenticationEntryPoint implements AuthenticationEntryPoint {
            
              @Override
              public void commence(HttpServletRequest request, HttpServletResponse response,
                  AuthenticationException authException) throws IOException, ServletException {
                LocalDateTime currentTimeStamp = LocalDateTime.now();
                String message = (authException != null && authException.getMessage()!=null)? authException.getMessage()
                    : "Unauthorized";
                String path = request.getRequestURI();
                response.setHeader("eazybank-error-reason", "Authentication failed");
                response.setStatus(HttpStatus.UNAUTHORIZED.value());
                //커스텀 json response를 보내주기 위해서는 sendError 대신 Status로만 보내주어야 우리가 만든 jsonResponse가 동작한다.
                //response.sendError(HttpStatus.UNAUTHORIZED.value(), HttpStatus.UNAUTHORIZED.getReasonPhrase());
                response.setContentType("application/json;charset=UTF-8");
            
                //Construct the JSON response json 형태의 응답을 만든 구조
                String jsonResponse =
                    String.format("{\"timestamp\": \"%s\", \"status\": %d, \"error\": \"%s\", \"message\": \"%s\", \"path\": \"%s\"}",
                        currentTimeStamp, HttpStatus.UNAUTHORIZED.value(),  HttpStatus.UNAUTHORIZED.getReasonPhrase(),
                        message, path);
                response.getWriter().write(jsonResponse);
              }
            }


            eazybank-error-reason이라는 헤더이름인 자체적인 헤더값을 생성해 주었다. 우리가 만든 jsonResponse를 보내주기 위해 sendError() 메서드 대신 setStatus() 로만으로 상태를 설정해 주고 json 포맷을 설정 후 넣고 싶은 내용을 사용자 정의 후. getWriter(). write() 메서드에 jsonResponse를 담아주었다.


            • ProjectSecurityProdConfig or ProjectSecurityConfig

            자체적으로 만들어둔 EntryPoint를 SpringSecurity 프레임 워크에 전달하기 위해서는 Config 파일을 수정해 주어야 한다.

            httpBasic 인증에 대한 EntryPoint를 커스텀을 하였으므로 


            //http.httpBasic(withDefaults());
            http.httpBasic(hbc -> hbc.authenticationEntryPoint(new CustomBasicAuthenticationEntryPoint()));


            기본 설정이었던 http.Basic() 관련 설정을 람다 형식으로 authenticationEntryPoint에 우리의 자체적인 CustomBasicAuthenticationEntryPoint()를 적용시켜 주면 된다.


            • CustomBasicAuthenticationEntryPoint() 테스트
            더보기

            사용자가 등록이 안된 smith1@example.com이라는 계정으로 로그인해 보겠다.

            json형식으로 정상적으로 사용자정의된 EntryPoint응답을 받았다.


            헤더 부분에서도 정상적으로 eazbank-error-reason과 Content-Type이 우리가 정의한 대로 응답받은 것을 볼 수 있었다.


            403 관련 예외 - AccessDeniedHandler 사용자 정의


            exceptionHandling 패키지에 CustomDeniedHandler 클래스를 생성해 주겠다.


            • CustomAccessDeniedHandler
            더보기
            public class CustomAccessDeniedHandler implements AccessDeniedHandler {
            
              @Override
              public void handle(HttpServletRequest request, HttpServletResponse response,
                  AccessDeniedException accessDeniedException) throws IOException, ServletException {
                //Populate dynamic values
                LocalDateTime currentTimeStamp = LocalDateTime.now();
                String message = (accessDeniedException != null && accessDeniedException.getMessage()!=null)? accessDeniedException.getMessage()
                    : "Authorization failed";
                String path = request.getRequestURI();
                response.setHeader("eazybank-denied-reason", "Authorization failed");
                response.setStatus(HttpStatus.FORBIDDEN.value());
                response.setContentType("application/json;charset=UTF-8");
                //Construct the JSON response json 형태의 응답을 만든 구조
                String jsonResponse =
                    String.format("{\"timestamp\": \"%s\", \"status\": %d, \"error\": \"%s\", \"message\": \"%s\", \"path\": \"%s\"}",
                        currentTimeStamp, HttpStatus.FORBIDDEN.value(),  HttpStatus.FORBIDDEN.getReasonPhrase(),
                        message, path);
                response.getWriter().write(jsonResponse);
              }
            }


            CustomBasicAuthenticationEntryPoint와 비슷한 포맷을 가지고 있는 것을 볼 수 있다.
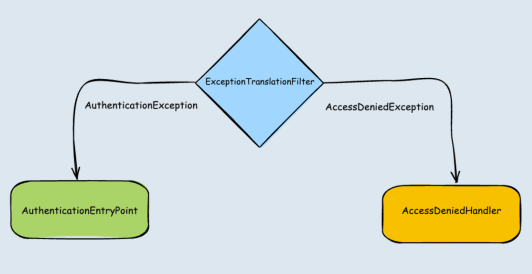
            • ProjectSecurityConifg or ProjectSecurityProdConfig 수정

            마찬가지로 우리의 커스텀  Handler를 프레임워크에 전 달해 주기 위해 Config를 수정시켜주어야 한다.


            EntryPoint와 다른 점은 Authorization에 대한 예외처리는 한 곳에서만이 아닌 전역에서 발생할 수 있다는 점이다.


            http.exceptionHandling(ehc -> ehc.accessDeniedHandler(new CustomAccessDeniedHandler()));


            . exceptionHandling() 전역설정을 통해 자체적인 CustomAccessDeniedHandler 객체를 전달해 줄 수 있다.

             

            • CustomAccessDeniedHandler() 테스트
            더보기

            구현되지 않는 api인 /myAccount1을 인증된 사용자를 통해 접근해 보겠다.


            정상적으로 사용자 정의된 AccessDeniedHandler가 작동된 것을 볼 수 있다.
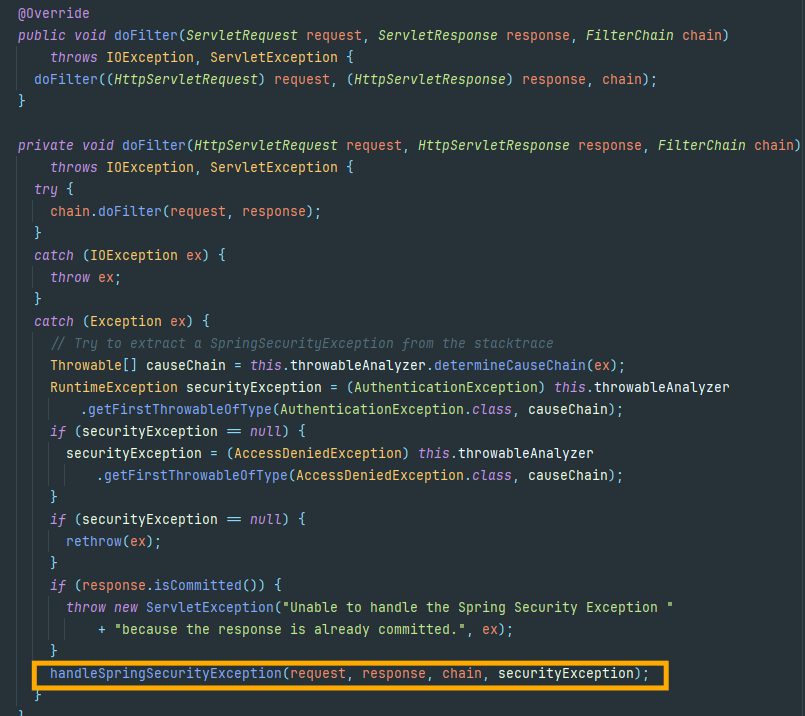
             

            Session 관련 설정


            이제는 애플리케이션의 세션관련한 보안설정을 어떻게 할 수 있는지에 대해 알아보려고 한다.


            Session Time out 설정


             기본적으로 로그인이 완료된 후 생성되는 세션은 기본 타임아웃이 30분으로 설정된다. 그후 사용자가 UI에서 어떤 작업을 시도하게 된다면 로그인 페이지로 리다이렉션된다. 하지만 때때로 애플리케이션의 중요도에 따라 적절한 타임아웃을 설정하고 싶을 경우가 있다.
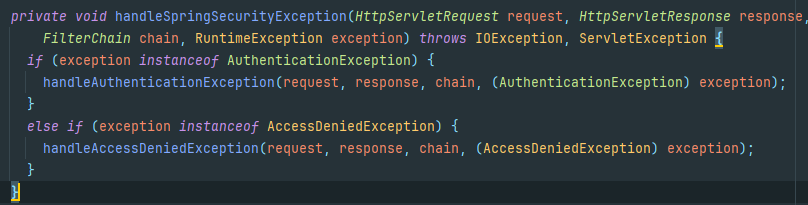
             

            SpringBoot 는 2분 or 1분 20초 이상의 타임 아웃만 설정 할 수 있다. 이러한 이유는 2분정도 작업을 하지 않았다고 바로 로그인 화면으로 다시 리다이렉션 되는 경우 사용자는 이유를 알 수 없으며 사용자 친화적이지 않기 때문이다.

            • application.properties
            server.servlet.session.timeout=${SESSION_TIMEOUT:20m}


            유효하지 않은 세션 설정


            UI 흐름에서 세션 타임아웃으로 인해 다시 로그인을 하라는 메세지를 최종사용자에게 전달할 수 있는 것을 대략적으로 설정을 통해 구현해보려고 한다.


            SpringSecurity와 관련된 설정은 대게 SecurityConfig에서 설정을할 수 있다.


            • ProjectSecurityConfig or ProjectSecurityProdConfig
            @Bean
              SecurityFilterChain defaultSecurityFilterChain(HttpSecurity http,
                  RestClientCustomizer restClientCustomizer) throws Exception {
                http.sessionManagement(smc -> smc.invalidSessionUrl("/invalidSession"))
                //람다 형식의 SessionManagementConfig 설정을 통해 검증되지않은 세션을 설정한 Url로 리다이렉트 시킬 수 있다.
                    .redirectToHttps(withDefaults())
                    .csrf(csrfConfig -> csrfConfig.disable())
                    .authorizeHttpRequests((requests) -> requests
                    .requestMatchers("/myAccount", "/myBalance", "/myLoans", "myCards").authenticated()
                    .requestMatchers("/notices", "/contact","/error","/register", "/invalidSession").permitAll());
                    // "/invalidSession" 을 추가해줌으로써 인증되지 않은 사용자에게 보여질 수 있게 해야한다.
                http.formLogin(withDefaults());
                http.httpBasic(hbc -> hbc.authenticationEntryPoint(new CustomBasicAuthenticationEntryPoint()));
                http.exceptionHandling(ehc -> ehc.accessDeniedHandler(new CustomAccessDeniedHandler()));
                return http.build();
              }


            MVC환경에서 저렇게 경로가 구성되어 있다고 가정하에 설정을 하였고 실질 적으로 HTML 페이지를 구성해 주어야 한다.


            동시 세션 제어 설정


            애플리케이션에 따라 동시 세션의 수에 대한 제약을 두고 싶어 할 수 가 있을 수 있다. 

            .maximumSessions()메서드와 .maxSessionsPreventsLogin()을 통하여 동시 세션 제어를 설정 할 수 있다.


            • ProjectSecurityConfig
            @Bean
              SecurityFilterChain defaultSecurityFilterChain(HttpSecurity http,
                  RestClientCustomizer restClientCustomizer) throws Exception {
                http.sessionManagement(smc -> smc.invalidSessionUrl("/invalidSession")
                        .maximumSessions(1).maxSessionsPreventsLogin(true))
                    //maxiumSessions : 동시세션 최대치 설정
                    //maxSessionPreventsLogin(ture) : 세션활성화 최대인 경우 세션로그인 안되도록 설정
                    .csrf(csrfConfig -> csrfConfig.disable())
                    .authorizeHttpRequests((requests) -> requests
                    .requestMatchers("/myAccount", "/myBalance", "/myLoans", "myCards").authenticated()
                    .requestMatchers("/notices", "/contact","/error","/register", "/invalidSession").permitAll());
                http.formLogin(withDefaults());
                http.httpBasic(hbc -> hbc.authenticationEntryPoint(new CustomBasicAuthenticationEntryPoint()));
                http.exceptionHandling(ehc -> ehc.accessDeniedHandler(new CustomAccessDeniedHandler()));
                return http.build();
              }


            AuthenticationEvents 설정


            실제 애플리케이션 내에서 인증 이벤트를 처리해야 하는 요구사항이 자주 발생 할 수 있다.

            예를 들어 인증에 성공하면 최종 사용자에게 인증이 성공적으로 완료 되었음을 알리는 이메일을 보내서 로그인 작업에 대해 사용자에게 알릴 수 있다는 것이나 매우 중요한 애플리케이션에서 사용자 인증 실패 시나리오에서 이메일을 보내거나 데이터 베이스에 실패 시도가 발생했음을 기록할 수 있다.


            SpringSecurity는 인증이 성공할 때와 실패할 때 마다 이벤트를 게시한다. AuthenticationSucessEvent라는 이벤트가 존재하며 이는 로그인 작업이나 인증 작업이 성공 할때마다 SpringSecurity 프레임워크에 의해 게시된다.

            반대로 실패할때는 AuthenticationFailureEvent를 게시한다.

            이러한 이벤트는 SpringSecurity 프레임 워크 내의 DefaultAuthenticationEventPublisher 클래스에 의해 게시된다.


            이제 우리의 인증 이벤트를 사용자 정의 해보겠다.


            events 라는 패키지를 생성해주고 AuthenticationEvents 클래스를 생성해 준다.


            AuthenticationEvents 사용자 설정


            @Component
            @Slf4j
            public class AuthenticationEvents {
            
              @EventListener
              public void onSuccess(AuthenticationSuccessEvent successEvent){
                log.info("Login successful for the user : {}", successEvent.getAuthentication().getName());
            	//요구사항에 맞게 추가적인 비즈니스 로직을 구성하면 된다.
              }
            
              @EventListener
              public void onFailure(AbstractAuthenticationFailureEvent failureEvent){
                log.info("Login failed for the user : {} due to : {}", failureEvent.getAuthentication().getName(),
                    failureEvent.getException().getMessage());
            
              }
            
            }


            • 인증 성공 시


            • 인증 실패시

            Kiwimel0n

            Kiwimel0n

            내용정리

            방명록