

| 일 | 월 | 화 | 수 | 목 | 금 | 토 |
|---|---|---|---|---|---|---|
| 1 | 2 | 3 | 4 | 5 | 6 | 7 |
| 8 | 9 | 10 | 11 | 12 | 13 | 14 |
| 15 | 16 | 17 | 18 | 19 | 20 | 21 |
| 22 | 23 | 24 | 25 | 26 | 27 | 28 |
- docker
- 스파르타내일배움캠프TIL
- 프로그래머스
- dofilterchain
- 내일배움캠프
- Java
- Springsecurity
- 스파르타내입래움캠프
- CI/CD
- CompromisedPasswordChecker
- dockervolume
- EazyBytes
- 내이배움캠프
- 내일배움캠프 #스파르타내일배움캠프 #스파르타내일배움캠프TIL
- GCP
- AuthenticationProvider
- 스파르타내일배움캠프 TIL
- Github Actions
- eazybank
- UserDetails
- 스파르타내일캠프
- AuthenticationEntryPoint
- Container
- 인프런
- 스파르타내일배움캠프
- accessdeniedhandler
- jdbcUserDetailsManager
- inmemoryuserdetailsmanager
- 최종프로젝트
- 스파르타내일캠프TIL
- Today
- Total
나의 공부일지
AuthenticationProvider를 이해하고 커스텀 Provider 구현하기-SpringSecurity6.x Udemy EazyBytes EazyBank 본문
AuthenticationProvider를 이해하고 커스텀 Provider 구현하기-SpringSecurity6.x Udemy EazyBytes EazyBank
Kiwimel0n 2026. 1. 29. 18:35
목차
시작 글
앞선 글에서 InMemoryUserDetailsManager와 JdbcUserDetailsManager를 통해 유저를 Springboot 메모리와 MySQL DB에 유저를 생성시켜 보았고 JdbcDaoImpl에서는 기본적인 유저(userTable(username , password, enabled), authorities Table(username, authority) ) 생성 밖에 하지 못해 직접 유저테이블을 구현하고 JPA로 맵핑을 하여 커스텀 UserDetailsService를 구현을 해 DB에서 유저를 가져오고 DaoAuthenticationProvider가 제공해 주는 유저가 인증이 완료되는지 까지를 확인 해보았다. 이제는 SpringSecurity가 기본적으로 제공해 주는 DaoAuthenticationProvider가 무엇이고 인터페이스인 AuthenticationProvider 가 왜 필요한지에 대해서 알아보려고 한다.
자체적인 AuthenticationProvider가 필요한 이유

- 지금의 SpringSecurity 프로젝트는 매우 작은 간단한 애플리케이션을 구축하고 있지만 실제 프로젝트나 실제 기업용 애플리케이션에서는 보안 요구사항이 매우 간단하지 않을 수가 있다. 예를 들어 위 시나리오처럼 하나의 애플리케이션에서 여러 가지 인증 방식을 제공하고자 하는 시나리오가 있다. 이러한 방식에 대해 각각의 인증제공자가 필요하다. 첫 번째로는 사용자 이름과 비밀번호로 로그인하는 방식과 두 번째로는 OAuth2 프레임워크를 통해 인증을 허용하고자 하는 경우 또 다른 방식으로는 JAAS(Java 인증 및 권한 부여 서비스)를 통해 인증을 받을 것이다. (Java라이브러리 내부 에는 Java 팀이 제공하는 작은 보안 플러그인, 인증 프레임워크가 있지만 요즘은 SpringSecurity를 대부분 선호하기 때문에 JAAS를 사용하는 경우는 적지만 레거시 프로그램에서 지원하는 경우도 있기 때문이다.) 복잡한 시나리오가 있을 수도 있고 특이한 시나리오가 있을 수도 있다. 따라서 모든 종류의 시나리오 대비할 필요가 있다.
(추가적으로 애플리케이션으로 들어오는 모든 요청은 필터에 의해 차단될 것이다. 그리고 이 필터들은 Authentication 객체를 준비하게 될 것이고 동일한 Authentication 객체가 AuthenticationManger에 제공될 것이다. AuthenticationManager는 인터페이스 이기 때문에 인증흐름 내에서 사용할 수 없지만 구현체인 ProviderManager가 관여하게 되어 인증유형이 무엇이냐에 따라 AuthenticationProvider들의 구현체들을 호출할 것이다. 여기서 Authentication객체의 장점이 인증 토큰의 유형에 따라 ProviderManger가 해당하는 인증제공자를 식별한다는 것이다.)
- DaoAuthenticationProvider는 UserDetailsService의 구현체의 도움을 받아 사용자 세부 정보를 로드하게 된다. 실제 사용자 세부정보가 저장 시스템에서 가져와지면 실제 비밀번호 비교 인증과 인증결정은 AuthenticationProvider 내에서 이루어질 것이다. 하지만 사용자 정의 인증 요구 사항이 있는 시나리오 같은 경우에는 예를 들어 18세 이상일 때만 인증을 허용해야 하는 요구 사항이 있거나 특정 국가에서만 인증을 허용하고자 하는 사용자 정의 사항 같은 경우에는 기본 제공자인 DaoAuthenticationProvider는 도움이 되지 않는다.
AuthenticationProvider 이해하기
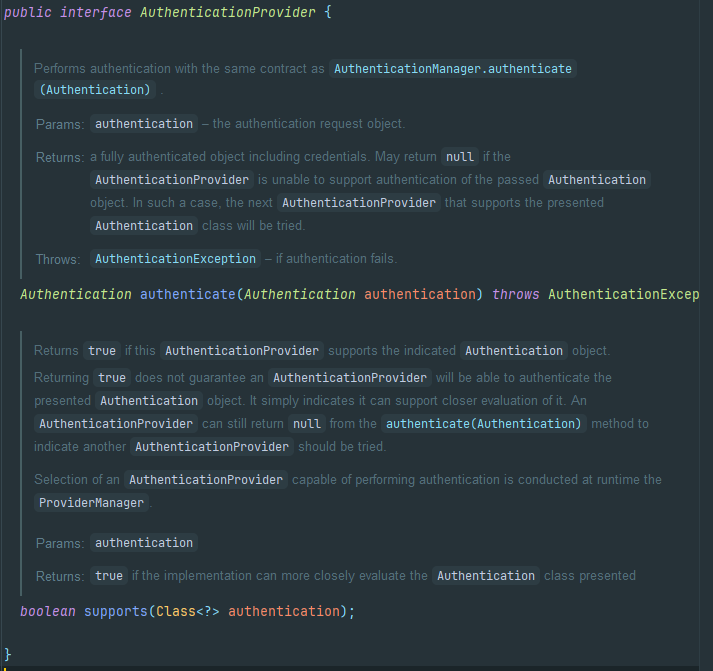
AuthenticationProvider 인터페이스는 간단하게 두 개의 메서드를 가지고 있다.
- authenticate()
실제인증 로직을 정의해야 하는 메서드로 ProviderManager는 Authentication 객체와 함께 authenticate()를 호출할 것이다. Authentication 객체는 사용자 이름 비밀번호 기타 세부 정보와 함께 boolean isAuthenticated 값을 false로 설정할 것이다. 이렇듯 커스텀 AuthenticationProvider를 정의할 때 수신한 인증 세부정보를 기반으로 저장시스템에서 사용자 세부 정보를 로드하고 있는지 확인해야 하면 자격증명 일치 여부를 수행한 후에는 추가 자격검증을 수행할 수 있다. 마지막으로 인증이 성공했는지 여부를 나타내는 Authentication 객체를 반환하면 된다.
DaoAuthenticationProvider를 예시로 들자면
DaoAuthenticationProvider는 AbstractUserDetailsAuthenticationProvider를 상속받았으며 authenticate() 메서드를 통해 Authentication 객체에서 username을 가져오고 determineUsername을 통해 저장시스템에서 사용자 세부 정보를 검색을 하며 additionalAuthenticationChecks를 통해 PassowordEncoder를 사용하여 비밀번호가 일치하는지 확인하는 로직을 볼 수 있다.
@Override
	public Authentication authenticate(Authentication authentication) throws AuthenticationException {
		Assert.isInstanceOf(UsernamePasswordAuthenticationToken.class, authentication,
				() -> this.messages.getMessage("AbstractUserDetailsAuthenticationProvider.onlySupports",
						"Only UsernamePasswordAuthenticationToken is supported"));
                        //authentication 객체가 UsernamePasswordAuthenticationToken 클래스인지 확인한다.
		String username = determineUsername(authentication); //authentication 객체에서  username을 가져온다.
		boolean cacheWasUsed = true;
		UserDetails user = this.userCache.getUserFromCache(username);
		if (user == null) {
			cacheWasUsed = false;
			try {
				user = retrieveUser(username, (UsernamePasswordAuthenticationToken) authentication);
			}
			catch (UsernameNotFoundException ex) {
				this.logger.debug(LogMessage.format("Failed to find user '%s'", username));
				if (!this.hideUserNotFoundExceptions) {
					throw ex;
				}
				throw new BadCredentialsException(this.messages
					.getMessage("AbstractUserDetailsAuthenticationProvider.badCredentials", "Bad credentials"));
			}
			Assert.notNull(user, "retrieveUser returned null - a violation of the interface contract");
		}
		try {
			this.preAuthenticationChecks.check(user);
			additionalAuthenticationChecks(user, (UsernamePasswordAuthenticationToken) authentication);
            // 비밀번호 확인
		}
		catch (AuthenticationException ex) {
			if (!cacheWasUsed) {
				throw ex;
			}
			// There was a problem, so try again after checking
			// we're using latest data (i.e. not from the cache)
			cacheWasUsed = false;
			user = retrieveUser(username, (UsernamePasswordAuthenticationToken) authentication);
			this.preAuthenticationChecks.check(user);
			additionalAuthenticationChecks(user, (UsernamePasswordAuthenticationToken) authentication);
		}
		this.postAuthenticationChecks.check(user);
		if (!cacheWasUsed) {
			this.userCache.putUserInCache(user);
		}
		Object principalToReturn = user;
		if (this.forcePrincipalAsString) {
			principalToReturn = user.getUsername();
		}
		return createSuccessAuthentication(principalToReturn, authentication, user);
}- supports()
우리가 사용자 정의 AuthenticationProvider를 정의할 때 프레임 워크에 해당하는 AuthenticationProvider가 어떤 유형의 인증을 지원할 것인지 알려야 한다.
DaoAuthenticationProvider를 예시로 들자면 UsernamePassowrdAuthenticationToken 유형의 인증을지원할 것임을 나타낸다.
@Override
	public boolean supports(Class<?> authentication) {
		return (UsernamePasswordAuthenticationToken.class.isAssignableFrom(authentication));
	}
    //isAssignablerFrom(Class<?> cls) 메서드는 클래스 타입 간의 대입 가능성(호환성)을 검사한다.
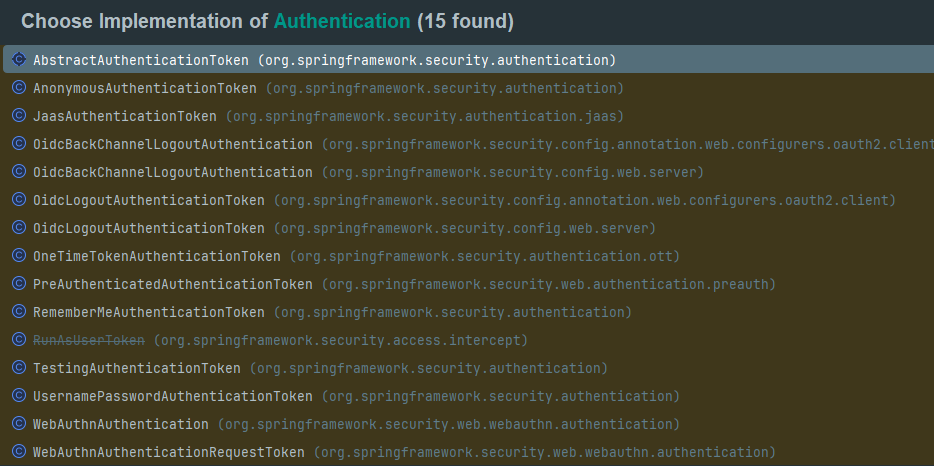
그 외의 유형들로는 Authentication 인터페이스를 보면 알 수 있다.
★ Authentication 구현체
토큰을 받아 어떤 AuthenticationProvider를 제공하느냐? 는 ProviderManager를 보면 알 수가 있다.
ProviderManager에는 똑같이 authenticate메서드가 있는데
authentication 객체의 해당하는 토큰 class를 toTest로 받아와 온 뒤 AuthenticationProvider 구현체들을 가져와 해당 토큰들을 지원하는 authenticationProvider대한 인증로직이 실행된다.

자체적인 AuthenticationProvider 구현하기
AuthenticationProvider의 구조를 알아봤고 흘러가는 흐름 또한 알게 되었다. 이제 우리의 애플리케이션에 적용해보려고 한다. config패키지 내 EazyBankUsernamePwdAuthenticationProvider class를 생성해 주겠다.
@Component
//컴포넌트를 명시하면서 SpringBean으로 만들어 Security프레임워크가
//우리의 AuthenticationProvider를 인식하게 한다.
@RequiredArgsConstructor
public class EazyBankUsernameAuthenticationProvider implements AuthenticationProvider {

  private final UserDetailsService userDetailsService;
  private final PasswordEncoder passwordEncoder;

  @Override
  public Authentication authenticate(Authentication authentication) throws AuthenticationException {
    String username = authentication.getName();
    String pwd = authentication.getCredentials().toString();
    UserDetails userdetails = userDetailsService.loadUserByUsername(username);
    if(passwordEncoder.matches(pwd, userdetails.getPassword())) {
      // 추가적으로 검증할 로직을 추가해주면 된다.
      return new UsernamePasswordAuthenticationToken(username, pwd, userdetails.getAuthorities());
    }else {
      throw new BadCredentialsException("password");
    }

  }

  @Override
  public boolean supports(Class<?> authentication) {
    return (UsernamePasswordAuthenticationToken.class.isAssignableFrom(authentication));
  }
}
DaoAuthenticationProvider를 대체하기 위해 인증 로직을 가져와 자체적인 EazyBankUsernameAuthenticationProvider를 구현하였다. supports 메서드에 return에 중단점을 설정하고 인증을 시도해 보면

ProviderManager에서 멈춘 것을 볼 수 있다.

현재로서는 한 개의 AuthenticationProvider만 생성했기 때문에 size가 한 개인 것을 알 수 있으며
우리가 자체 AuthenticationProvider를 생성하면 Security프레임워크에서 제공하는 DaoAuthenticationProvider와 같은 AuthenticationProvider는 Back off가 된다고 한다. 마저 중단점을 해제하고 실행시키면 정상적으로 응답을 받은 것을 확인할 수 있다.
자체적인 AuthenticationProvider의 순서 흐름

- 보안 페이지에 처음 접속하는 사용자
- AuthorizationFilter, AbstractAuthenticationProcessingFilter, DefaultLoginPageGeneratingFilter와 같은 필터를 거친 뒤 사용자가 로그인 되지 않았다면 로그인페이지로 리다이렉트 시켜줍니다.
- 사용자는 자식의 자격증명을 입력하면 그 요청을 필터가 가로챕니다.
- UsernamePasswordAuthenticationFilter와 같은 필터들이 username 과 password를 요청에서 추출하여 UsernamePasswordAuthenticationToken 과 같은 객체로 Authentication 인터페이스를 구현시킨다. 객체가 생성되면 ProviderManager의 authenticate() 메서드가 호출됩니다.
- AuthenticationManager의 구현체인 ProviderManager가 주어진 객체 스타일의 인증 제공자 목록을 확인하여 이 시나리오 에서 적용될 자체적인 AuthenticationProvider의 authenticate() 메서드를 호출합니다.
- EazyBankUsernamePwdAuthenticationProvider에서 적용된 EazyBankUserDetailsService의 loadUserByUsername() 메서드를 호출하여 사용자의 세부정보를 가져옵니다. 가져온 사용자의 세부정보를 passowordEncoder를 활용하여 비밀번호 검증을 하여 사용자의 인증을 확인합니다.
- 마지막으로 인증 성공 여부에 대한 UsernamePasswordAuthenticationToken 와 같은 인증 객체를 ProviderManager에 반환합니다.
- ProviderManager는 인증이 성공했는지 여부를 확인합니다. 그렇지 않으면 다른 사용 가능한 인증 제공자를 시도합니다. 그렇지 않으면 인증 정보를 필터에 그대로 반환합니다.
- 인증된 Authentication 객체는 필터를 통해 SecurityContext 객체에 저장되어 추후 사용되며, 최종 사용자 에게 응답이 반환 됩니다.

프로필을 사용하여 환경별 보안 구성하기
실시간 프로젝트에서는 코드는 여러 환경에서 배포된다. 이러한 환경들은 Production 외에 UAT, SIT, Devlop과 같은 환경으로 말이다. 이러한 환경은 프로덕션 이외의 모든 환경을 비프로덕션환경 또는 하위 환경이라고 명칭 한다.
이러한 이야기를 하는 이유는 실제 운영환경에서는 사용자가 실제로 사용하여 자신의 username과 password를 입력하여 자격증명을 하여 보안을 유지하는 것이 옳지만 비프로덕션 환경 같은 경우에서는 보통 QA담당자, 개발자와 같은 사람이 몇 가지 시나리오를 테스트하기 위해서 사용자 이름만 묻고 비밀번호 같은 경우에는 아무 값이나 입력하여 빠르게 테스트를 하여 편의를 생각할 수 있는 부분이기 때문이다.
이러한 경우를 위해 SpringBoot 내부에는 프로파일이라는 개념이 있으며 이 프로파일을 사용하여 속성을 조건부로 로드할 수 있으며 Bean을 조건부로 로드하며 생성할 수 있다.
Springboot properties 설정
기존에 있던 단일 프로파일인 appplication.properties를 복사 붙여 넣기 하여 이름을 application_prod.properties로 변경해 주었다.

- application_prod.properties
spring.config.activate.on-profile= prod
//프로파일 이름을 명시해 주어야한다.
spring.application.name=${SPRING_APP_NAME:springsecsection6}
logging.level.org.springframework.security=${SPRING_SECURITY_LOG_LEVEL:ERROR}
//에러만 로그파일이나 콘솔에 기록되게 한다.

spring.datasource.url=jdbc:mysql://${DATABASE_HOST:localhost}:${DATABASE_PORT:3306}/${DATABASE_NAME:eazybank}
spring.datasource.username=${DATABASE_USERNAME:root}
spring.datasource.password=${DATABASE_PASSWORD:root}

spring.jpa.show-sql=${JPA_SHOW_SQL:false}
spring.jpa.properties.hibernate.format_sql=${HIBERNATE_FORMAT_SQL:false}
//prod 환경의 프로파일이기 때문에 JPA의 SQL문같은 경우에는 콘솔에 표시해주지 않게 설정해준다.

logging.pattern.console= ${LOGPATTERN_CONSOLE:%green(%d{HH:mm::ss.SSS}) %blue(%-5level) %red([%thread]) %yellow(%logger{15})- %msg%n}
- spring.config.actiavte.on-profile : 프로파일 이름을 명시해 준다.
프로덕션 환경을 위한 별도의 속성파일을 생성했으므로 알려야 한다.
- application.properties
spring.application.name=${SPRING_APP_NAME:springsecsection6}
logging.level.org.springframework.security=${SPRING_SECURITY_LOG_LEVEL:TRACE}

spring.config.import = application_prod.properties
//생성한 prod환경의 properties를 명시해 준다. 여러 속성을 생성한 경우 , 를 구분자로 명시할 수 있다.
spring.profiles.active = prod
//SpringBoot 프레임워크가 기본적으로 사용할 특정 프로파일을 명시한다.

spring.datasource.url=jdbc:mysql://${DATABASE_HOST:localhost}:${DATABASE_PORT:3306}/${DATABASE_NAME:eazybank}
spring.datasource.username=${DATABASE_USERNAME:root}
spring.datasource.password=${DATABASE_PASSWORD:root}
spring.jpa.show-sql=${JPA_SHOW_SQL:true}
spring.jpa.properties.hibernate.format_sql=${HIBERNATE_FORMAT_SQL:true}

logging.pattern.console= ${LOGPATTERN_CONSOLE:%green(%d{HH:mm::ss.SSS}) %blue(%-5level) %red([%thread]) %yellow(%logger{15})- %msg%n}
- spring.config.import : ", "를 구분자로 사용하여 여러 속성을 명시할 수 있다.
- spring.profiles.active : 기본적으로 사용할 프로파일을 명시한다.
spring.profiles.active 설정을 인텔리제이 내에서도 설정할 수 있다.
Modify Run Configuration에서

환경변수를 통해 설정을 하거나
기본적으로 Active profiles 칸이 활성화되어 있어

이런 식으로도 적용된다.
이제는 활성화된 프로파일에 따라 유효한 비밀번호나 임의의 비밀번호를 조건부로 허용하는 방법을 구성해 보겠다.
프로파일 별로 AuthenticationProvider를 구성해 비밀번호를 조건부로 허용하기
프로파일 별로 Bean을 활성화하는 방법은 간단하다. @Profile()을 사용하기만 하면 된다.
- EazyBankUsernamePwdAuthenticationProvider
@Component
@Profile("!prod")
@RequiredArgsConstructor
public class EazyBankUsernamePwdAuthenticationProvider implements AuthenticationProvider {

  private final UserDetailsService userDetailsService;

  @Override
  public Authentication authenticate(Authentication authentication) throws AuthenticationException {
    String username = authentication.getName();
    String pwd = authentication.getCredentials().toString();
    UserDetails userdetails = userDetailsService.loadUserByUsername(username);
      return new UsernamePasswordAuthenticationToken(username, pwd, userdetails.getAuthorities());

  }

  @Override
  public boolean supports(Class<?> authentication) {
    return (UsernamePasswordAuthenticationToken.class.isAssignableFrom(authentication));
  }
}
프로덕션이 아닌 환경에서는 비밀번호 검증 로직을 제외시켜 조건부로 임의의 비밀번호를 입력하더라도 인증이 되도록 설정하였다.
- EazyBankProdUsernamePwdAuthentiactionProvider
@Component
@Profile("prod")
@RequiredArgsConstructor
public class EazyBankProdUsernamePwdAuthenticationProvider implements AuthenticationProvider {

  private final UserDetailsService userDetailsService;
  private final PasswordEncoder passwordEncoder;

  @Override
  public Authentication authenticate(Authentication authentication) throws AuthenticationException {
    String username = authentication.getName();
    String pwd = authentication.getCredentials().toString();
    UserDetails userdetails = userDetailsService.loadUserByUsername(username);
    if(passwordEncoder.matches(pwd, userdetails.getPassword())) {
      return new UsernamePasswordAuthenticationToken(username, pwd, userdetails.getAuthorities());
    }else {
      throw new BadCredentialsException("password");
    }

  }

  @Override
  public boolean supports(Class<?> authentication) {
    return (UsernamePasswordAuthenticationToken.class.isAssignableFrom(authentication));
  }
}
이와 비슷하게 ProjectSecurityConfig 같은 경우도 @Profile() 어노테이션을 통해 프로덕션 환경과 비프로덕션환경을 나눠 설정할 수 있다. 그렇게 총 구성된 패키지의 모습은 이러하다.

이렇게 설정한 후에 인텔리제이에서 비프로덕션 환경인 default 프로파일을 설정 후 애플리케이션을 실행시키면

default 프로파일로 애플리케이션이 구동된 것을 확인할 수 있으며

아무 비밀번호를 입력하여 인증을 시도해도 응답을 성공적으로 받을 수 있다는 것을 볼 수 있다.


